Control Freak June Blog Tour – Catalog Newness!

freakwelcome2013

I can’t believe it’s time for another Tour! This year is moving isn’t it?! Welcome to this month’s Control Freaks Blog Tour featuring products from the new 2014-2015 Annual Catalog! I have to say that I am loving the new Catalog, I like the layout and the products are all awesome! If you are following the tour you have arrived here from the talented Julie Davison’s blog, always great ideas and really fun stuff! This month I have two fun cards for you! The first one uses one of my favorite new sets and the second one has a great sentiment!

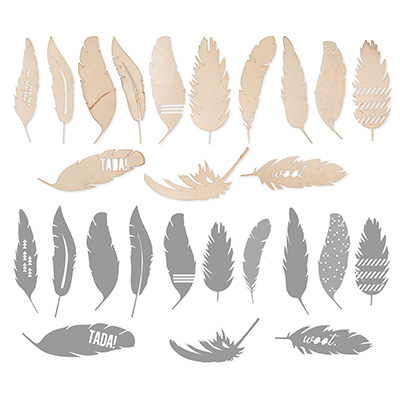
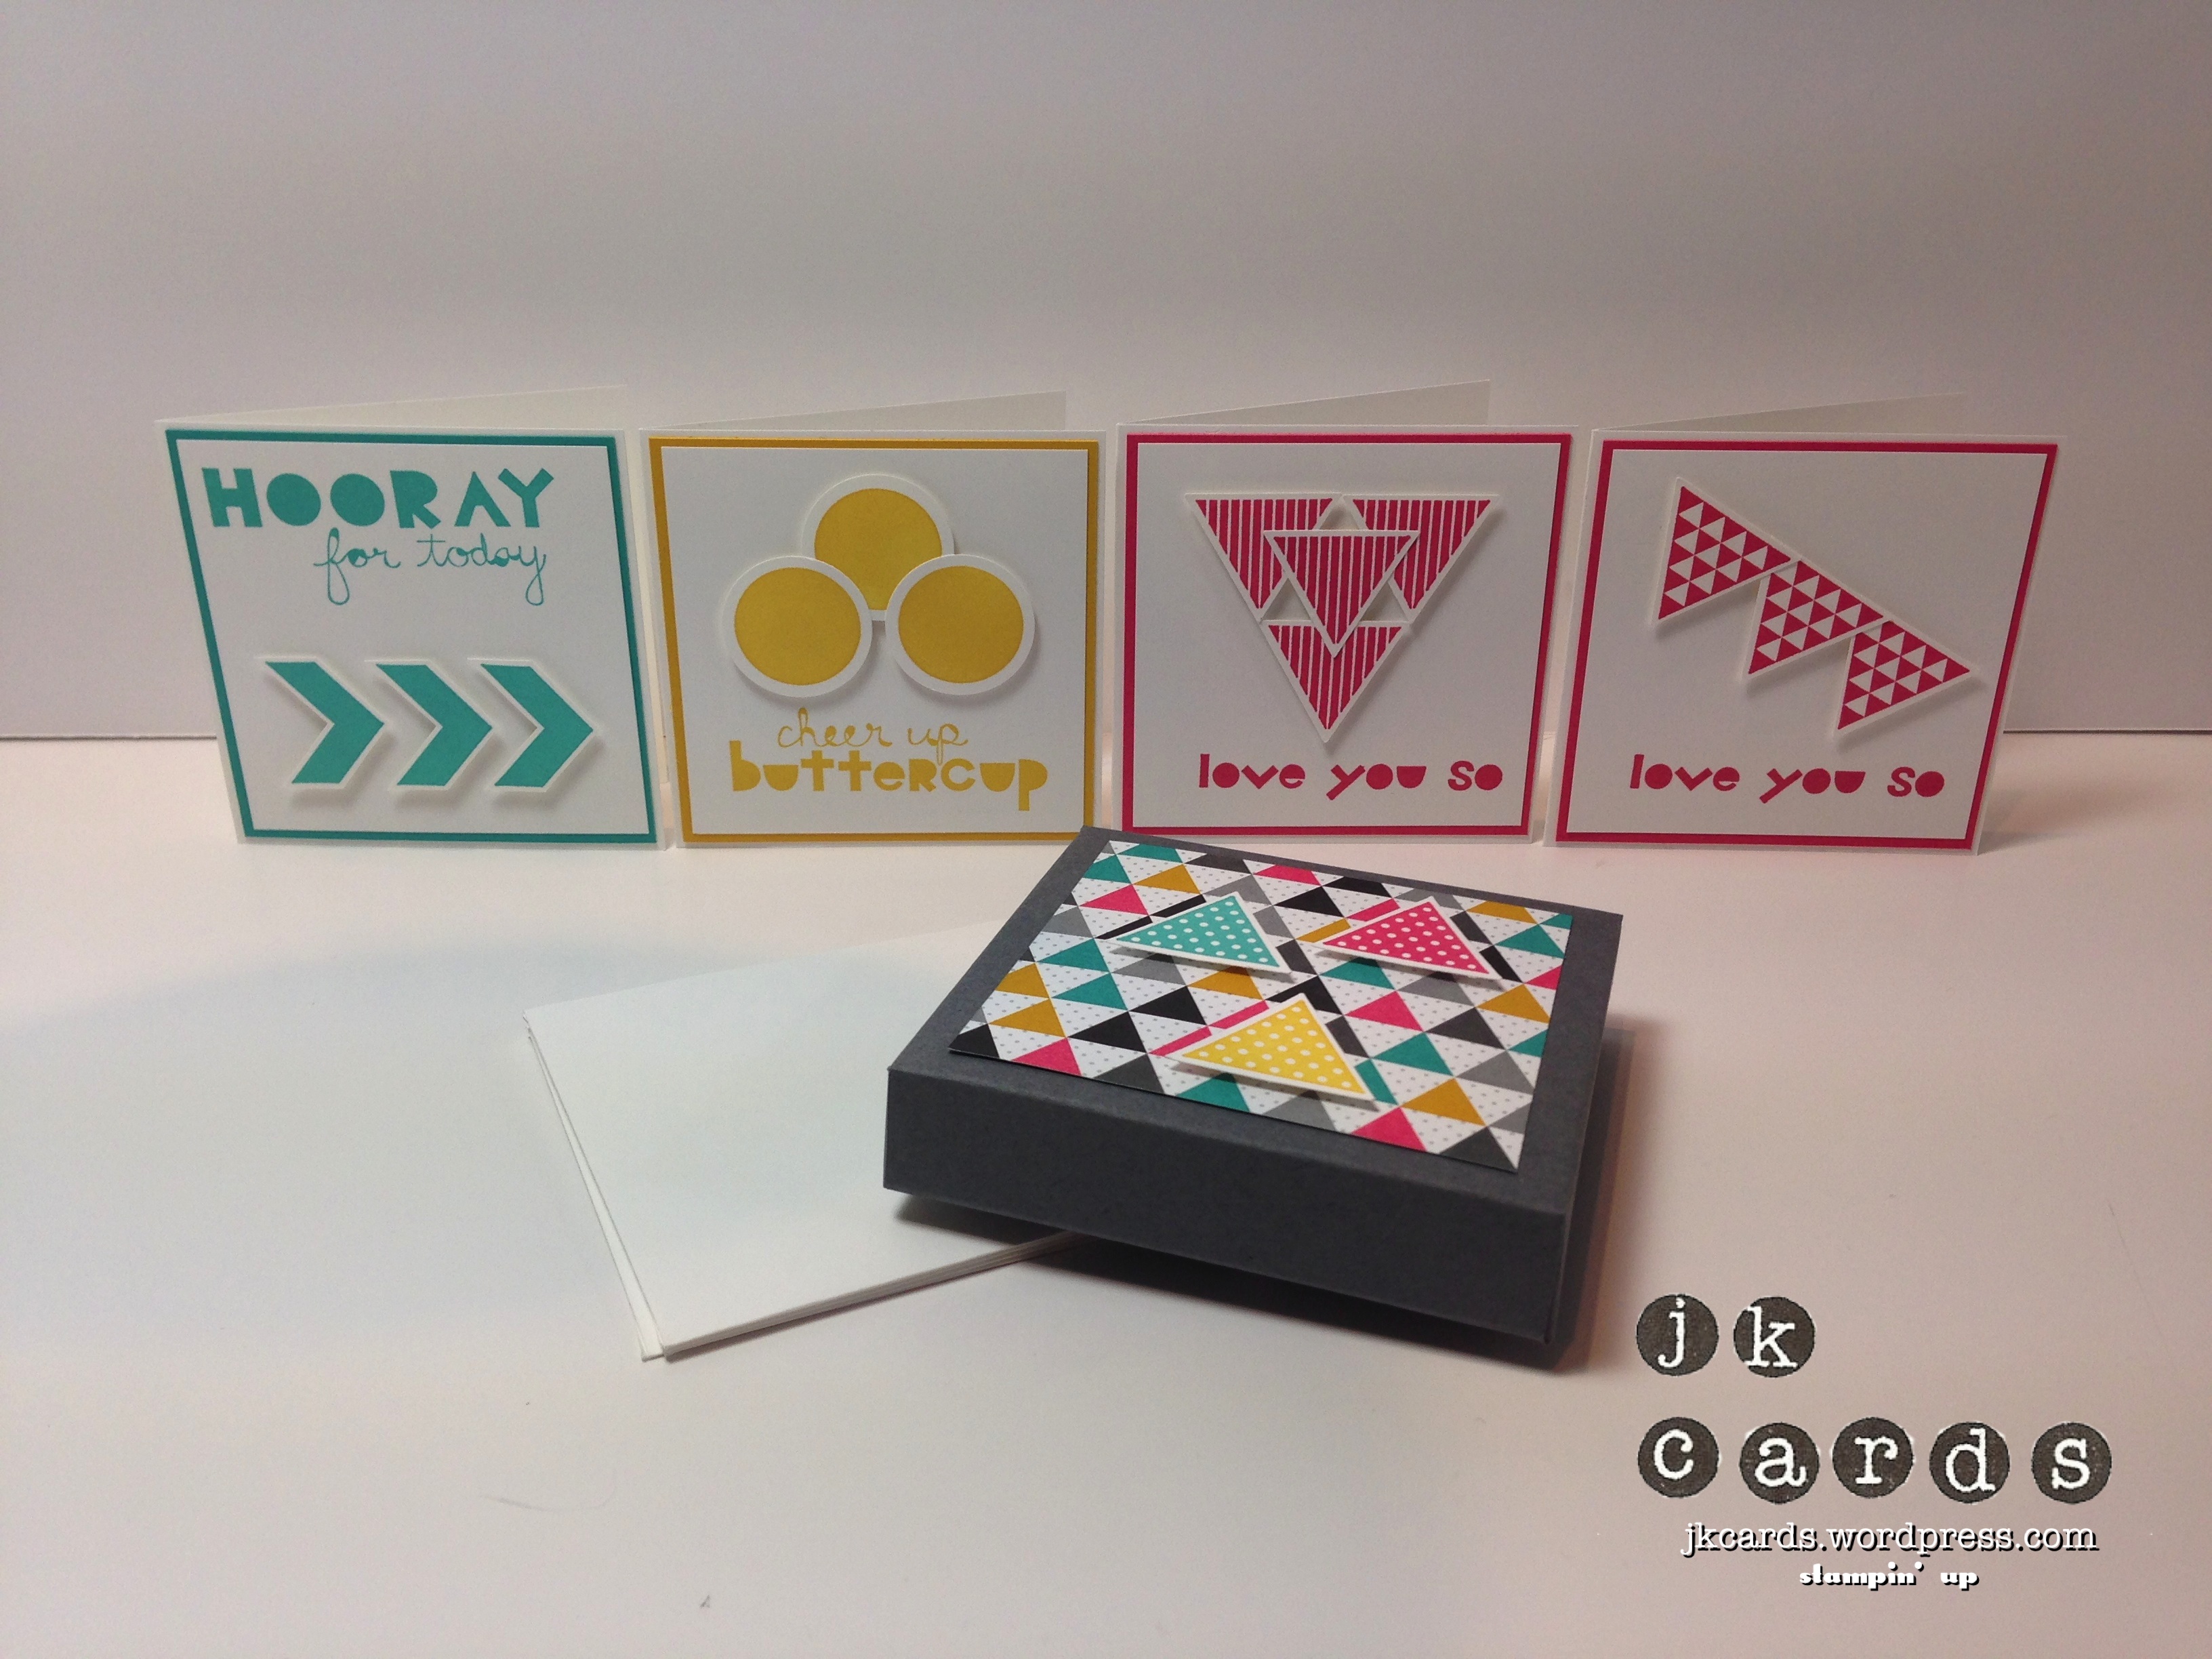
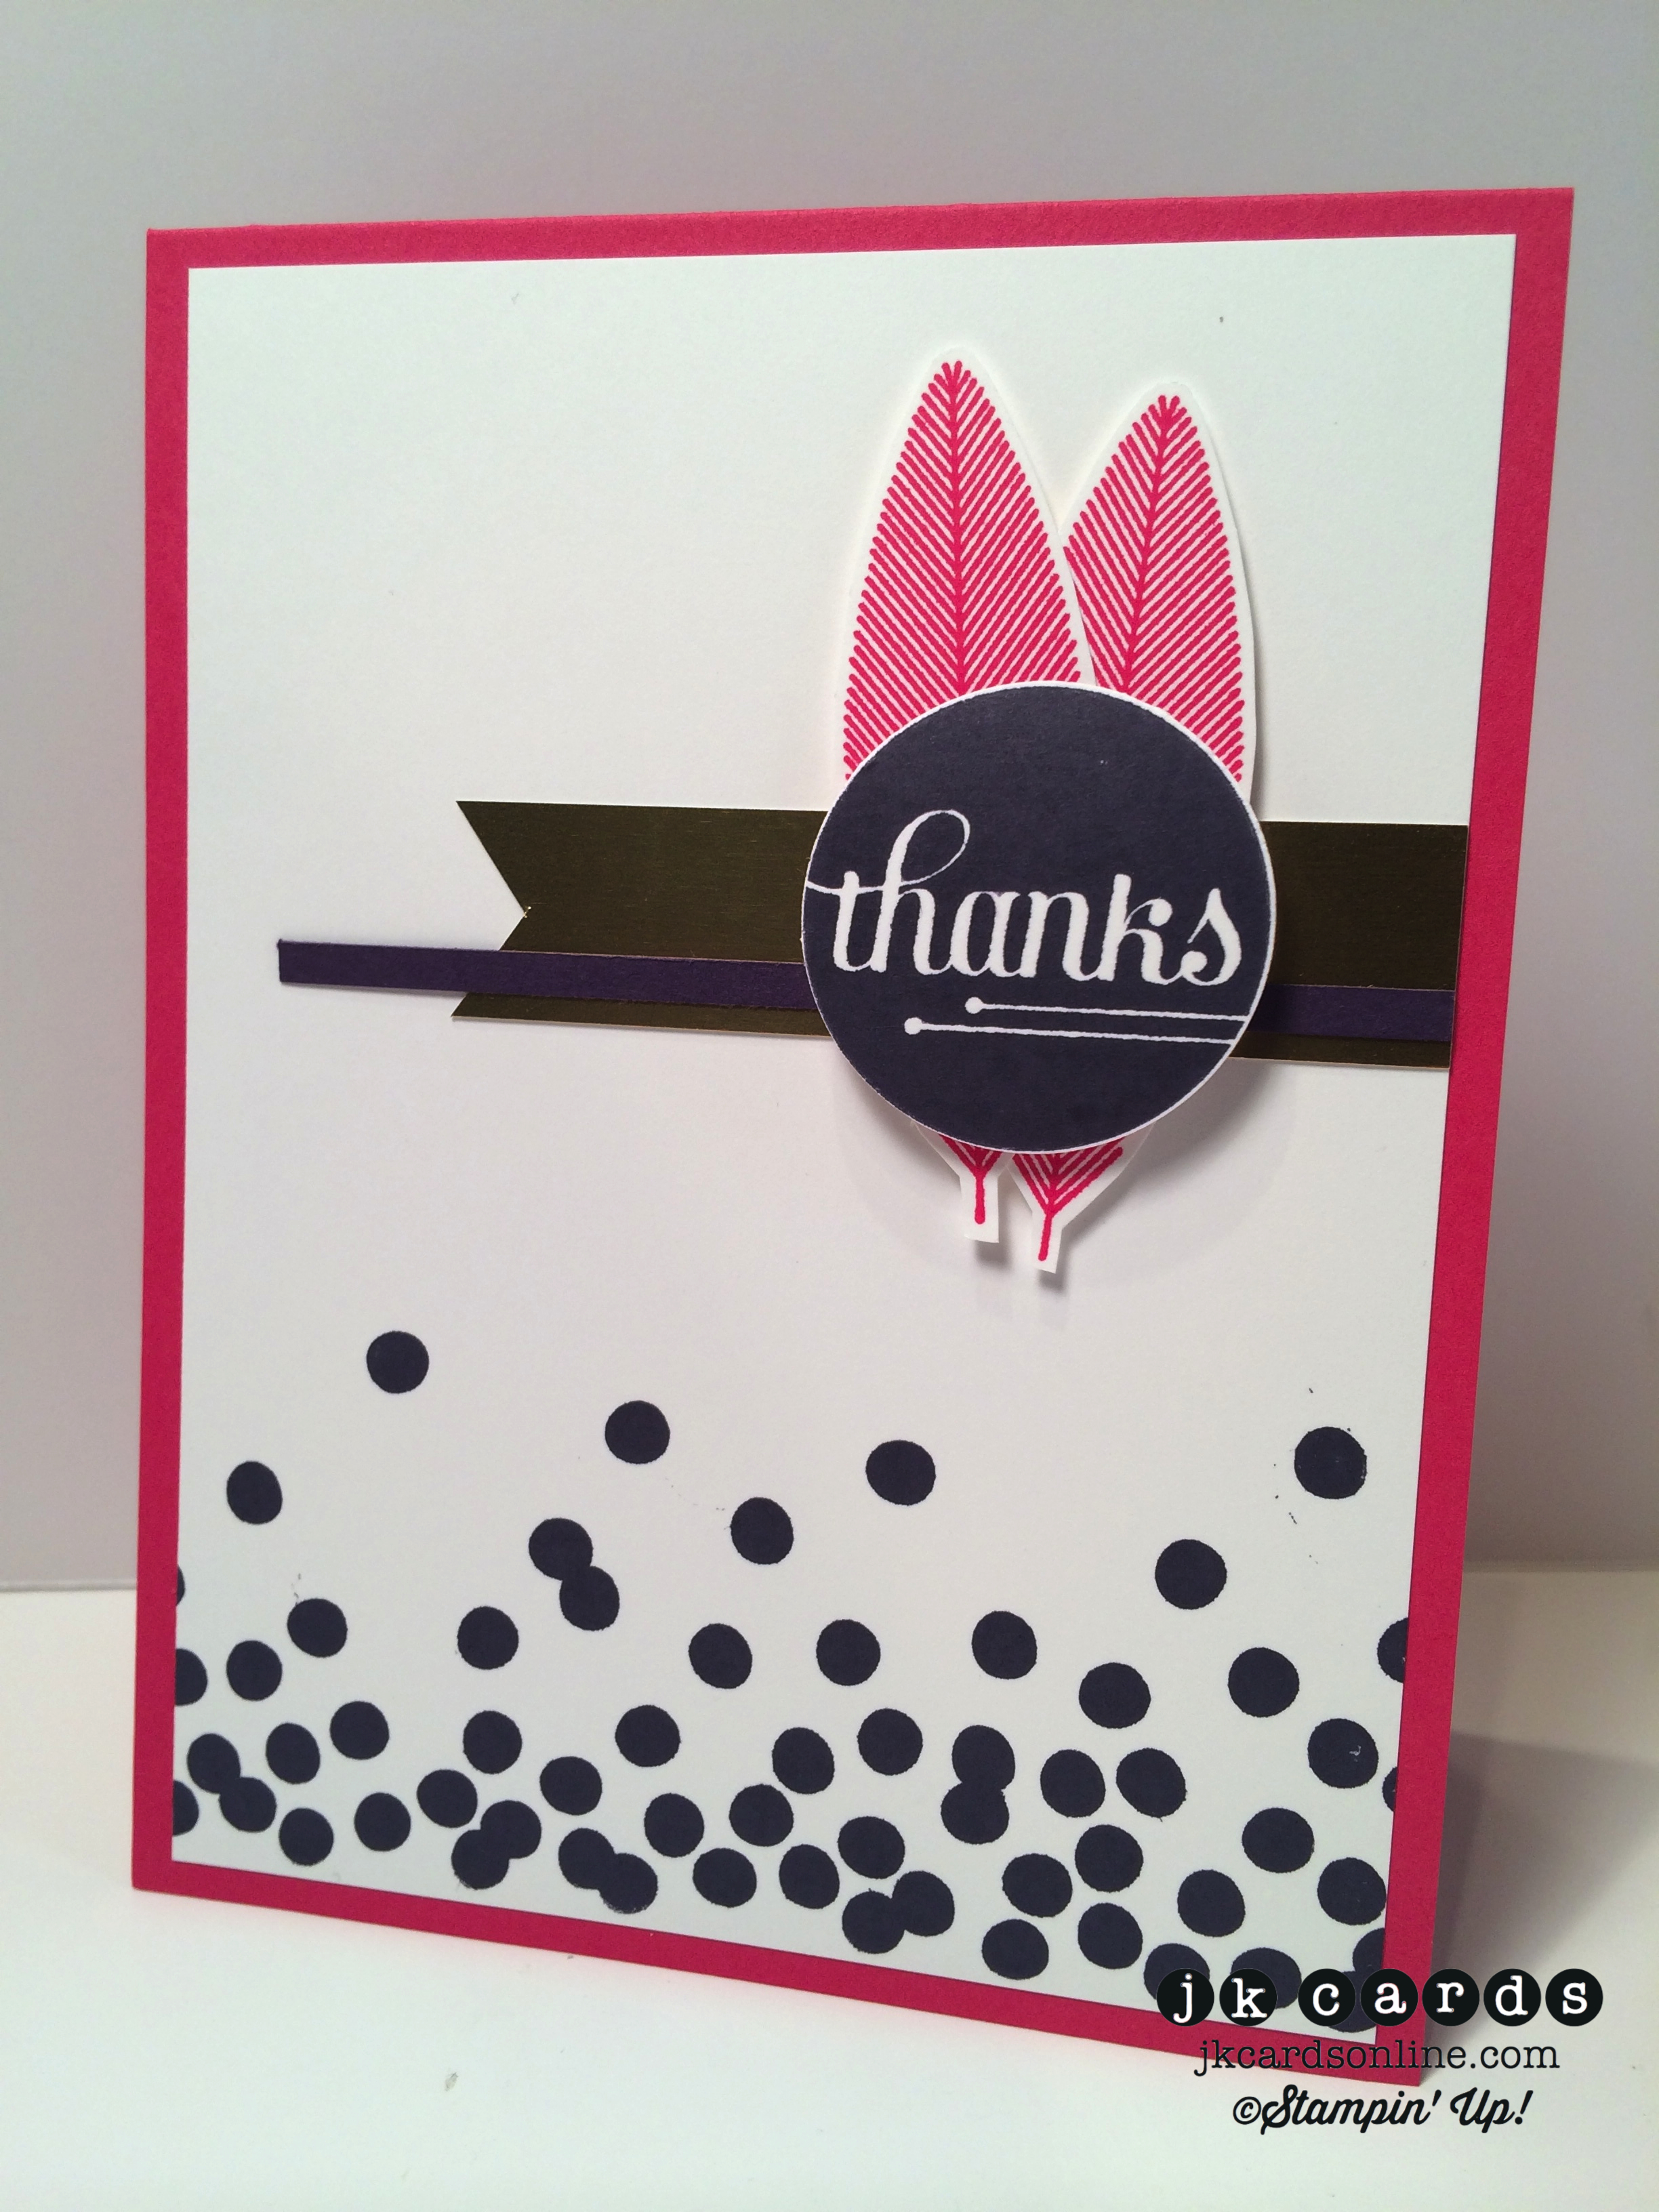
You all know that I have a little obsession with feathers (see blog header! LOL!) and when I saw the A Happy Hooray Stamp Set in the new catalog I knew I had to have it! My card starts off with a base of Melon Mambo Card Stock. I stamped the Dotty Angles Photopolymer stamp across the bottom of a piece of Whisper White in Elegant Eggplant. The Photopolymer Stamps are a great choice for backgrounds and 2-Step, nice and easy to line up! Next up, I flagged a piece of Gold Foil Sheet and adhered it to the card along with a thin sliver of Elegant Eggplant. My two feathers and greeting are from the A Happy Hooray Stamp Set, the feathers are stamped in Melon Mambo and cut out with my paper Snips. The greeting is stamped in Elegant Eggplant and punched out with the 1 3/8″ Circle Punch. I love the simple yet bold look of the card and the dots across the bottom are just fun!

IMG_0339-imp

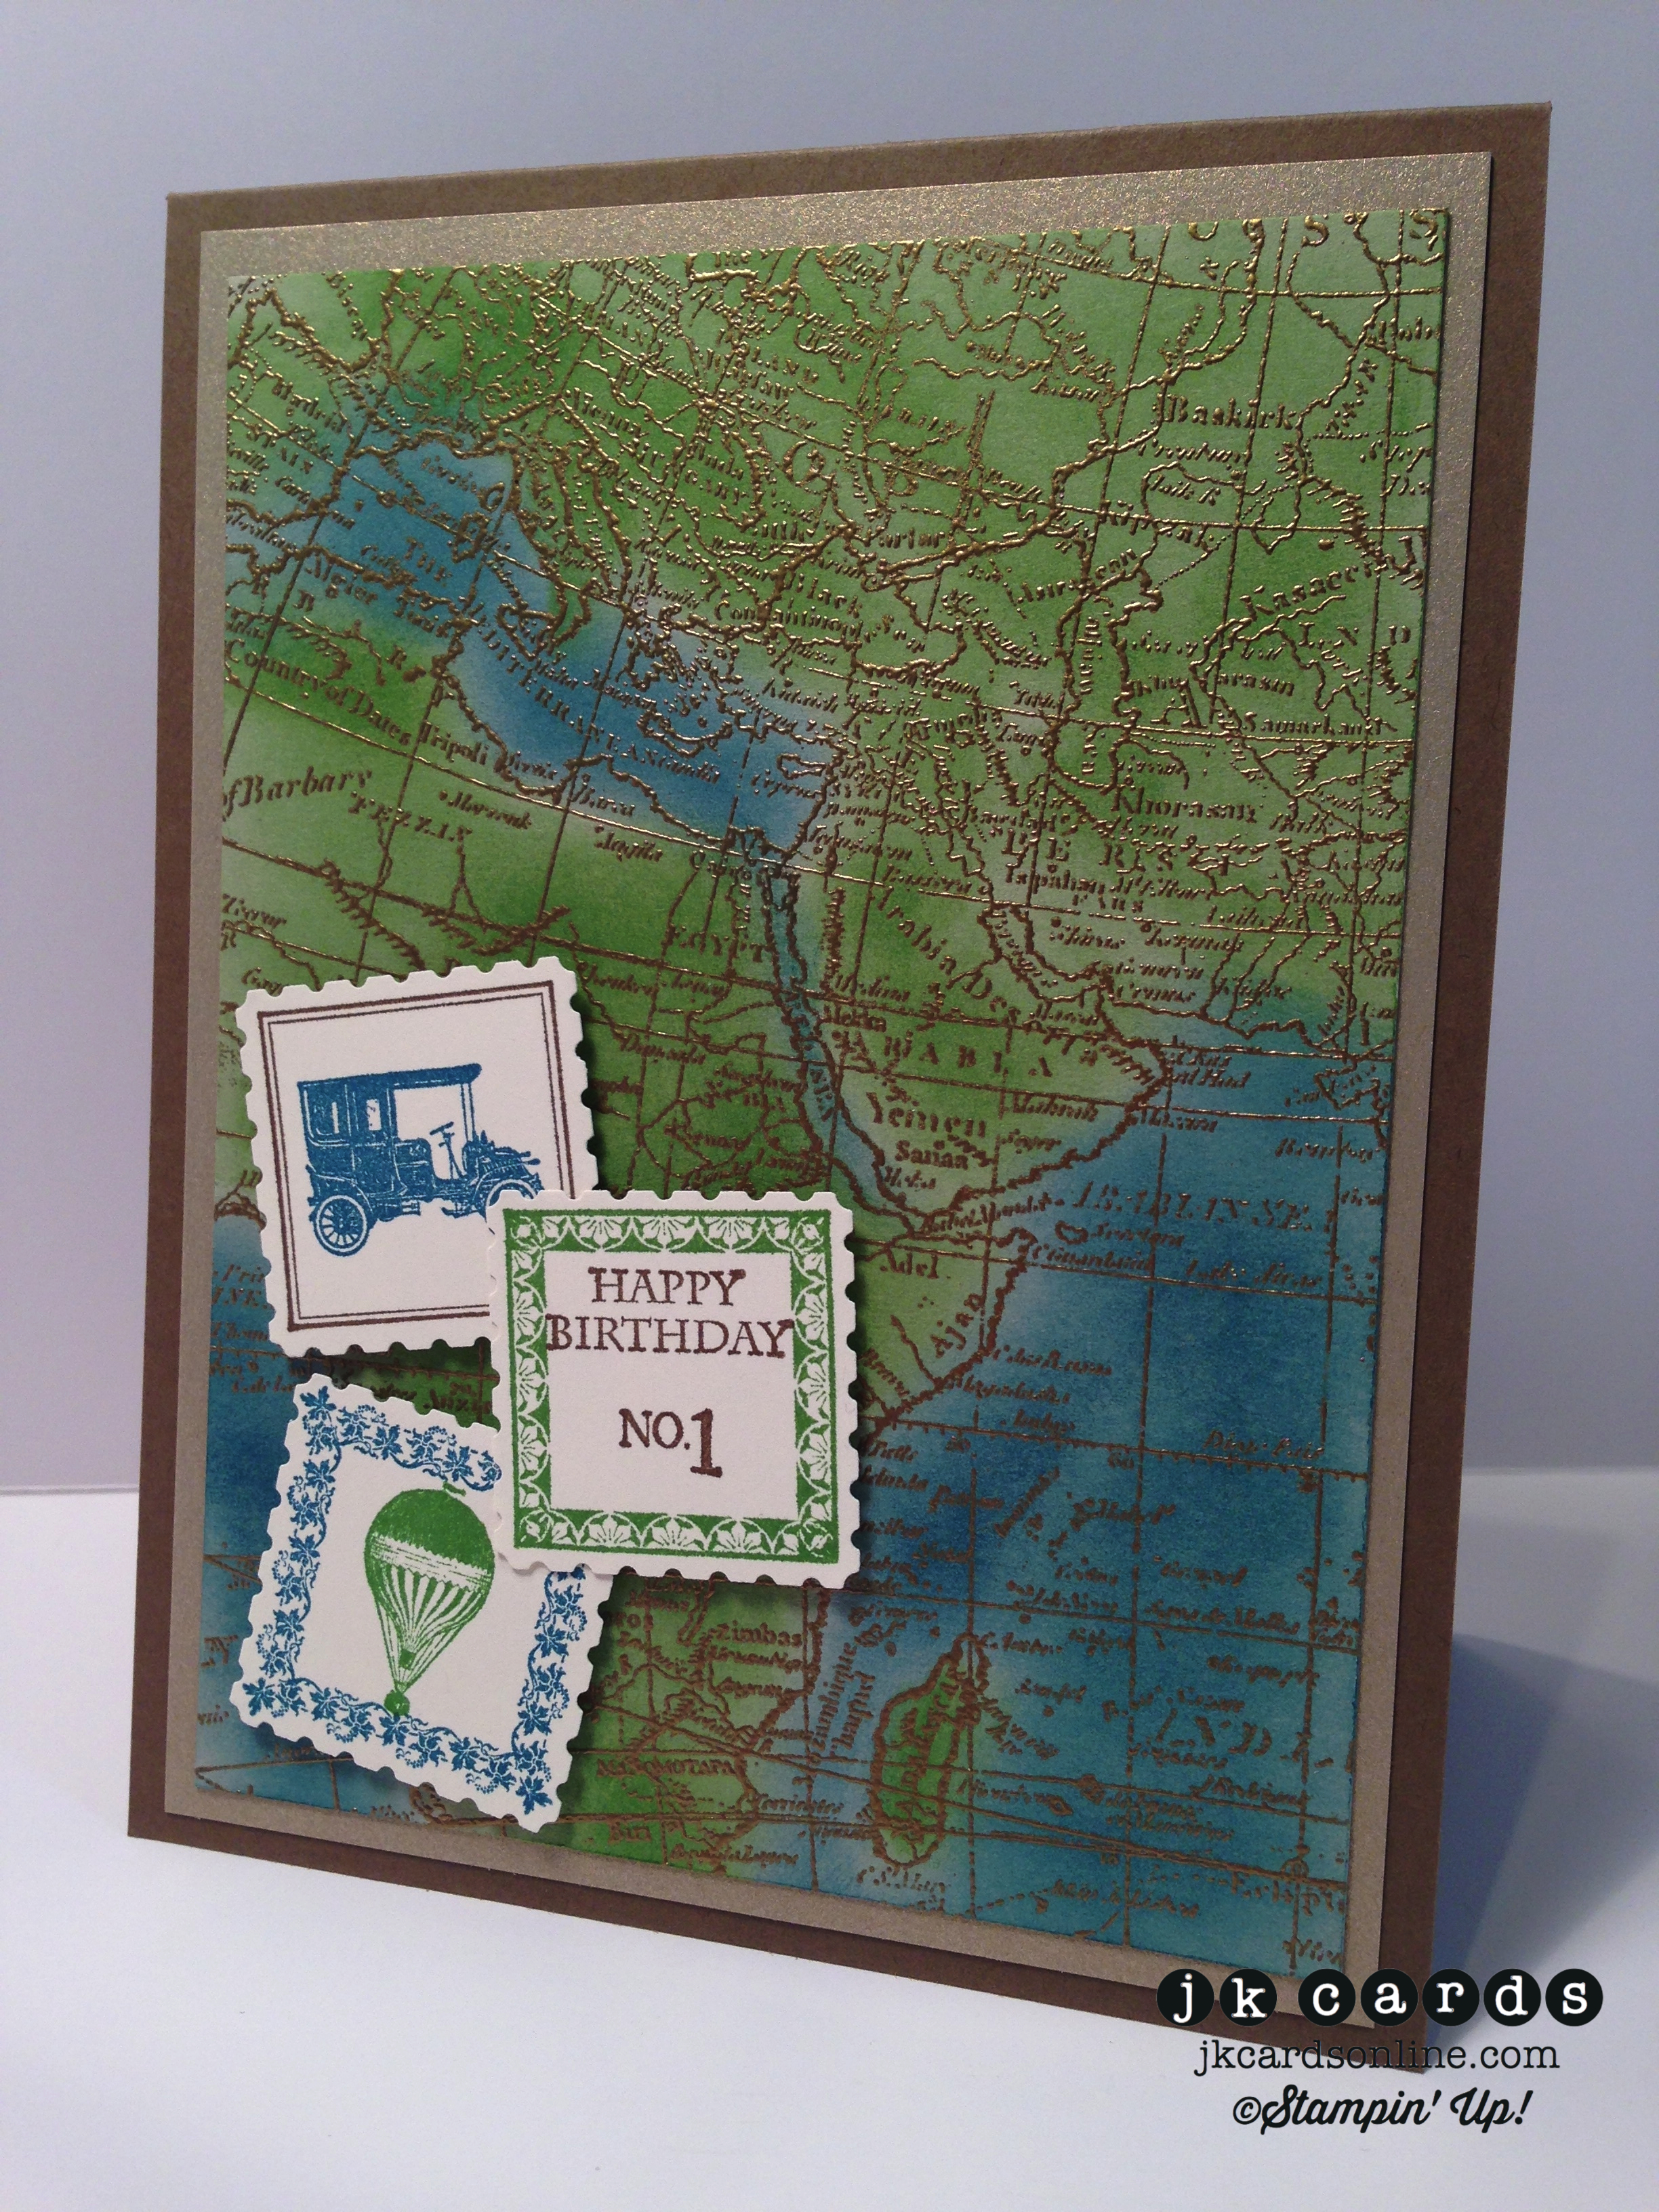
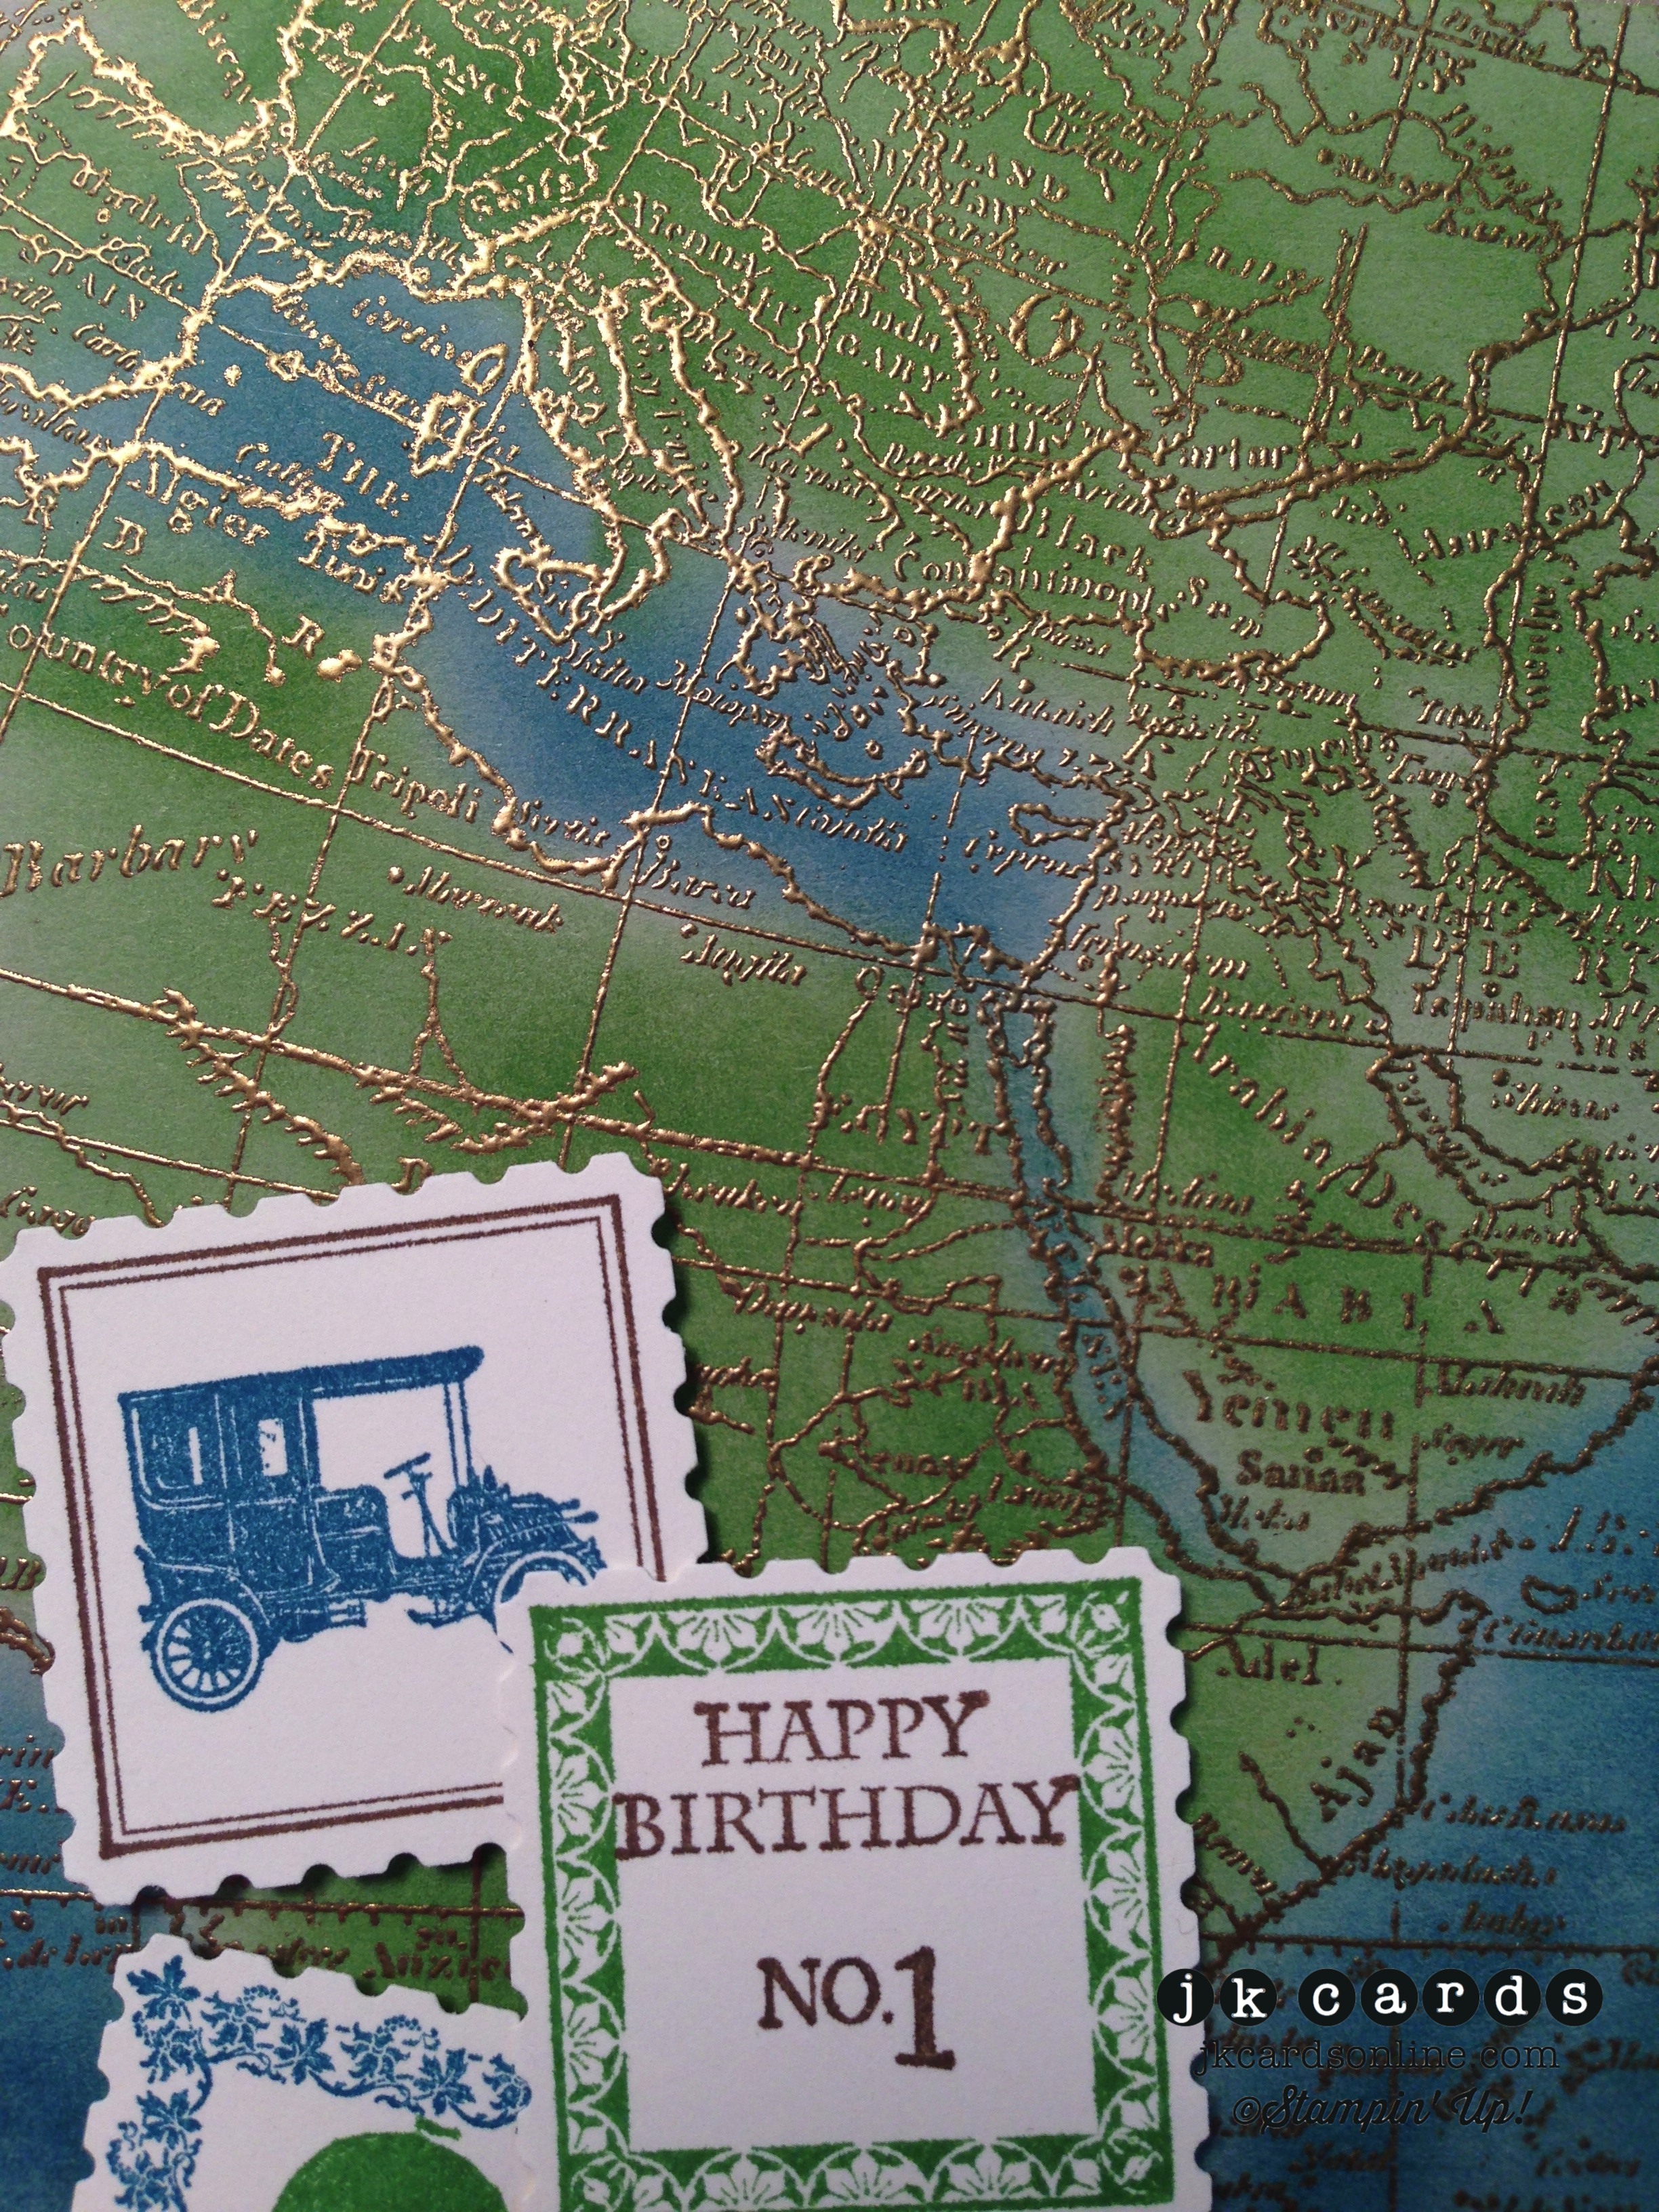
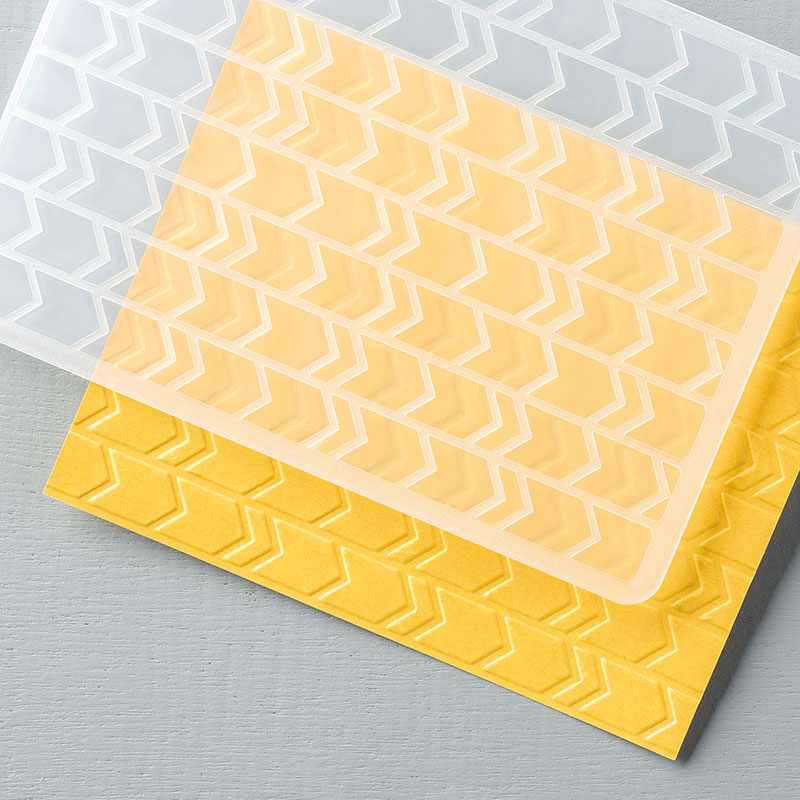
My second card uses the another fun new Photopolymer Set. The base of this card is Whisper White Card Stock. My background consists of a piece of Lost Lagoon on the top and a piece of Soft Suede on the bottom. I used the Tiny Triangles Textured Impressions Embossing Folder to emboss both pieces and some Gold Foil Sheet across the middle to hide the seam. My greeting is from the Age Awareness Photopolymer Stamp Set. I stamped each piece individually in Soft Suede and Lost Lagoon. I love the greeting, Facebook really does help me remember a lot of people’s birthdays!

IMG_0336-imp

I hope you enjoyed my cards using products from the new 2014-2015 Catalog. There are so many things in the Catalog, I merely skimmed the surface. Now you’re off to see what the clever Heidi Boos has in store for you. She never disappoints! Thanks so much for stopping by to see me, and enjoy the rest of the tour!

clickhere2013
Stampin’ Up! products used:

Card 1:

Card Stock: Melon Mambo, Whisper White and Elegant Eggplant

Specialty Card Stock: Gold Foil Sheet

Ink: Elegant Eggplant and Melon Mambo Classic Stampin’ Ink

Stamp Sets: A Happy Hooray Clear Mount and Dotty Angles Photopolymer

Punches: 1 3/8″ Circle Punch

Tools: Paper Snips, Stampin’ Dimensionals and SNAIL


Card 2:

Card Stock: Whisper White, Lost Lagoon and Soft Suede

Specialty Card Stock: Gold Foil Sheet

Ink: Lost Lagoon and Soft Suede Classic Stampin’ Ink

Stamp Set: Age Awareness Photopolymer

Embossing Folder: Tiny Triangles

Tools: Big Shot, Stampin’ Dimensionals and SNAIL

Control Freaks May Blog Tour – New Catalog Sneak Peek!

freakwelcome2013

Time sure flies doesn’t it?! Guess I must be having fun! Welcome to this month’s Control Freaks Blog Tour featuring sneak peeks of goodies from the new 2014-2015 Annual Catalog! I have to say that I am loving the new Catalog, I like the layout and the products are all awesome! If you are following the tour you have arrived here from the talented Melissa Davies’ blog, always great ideas and really fun stuff! This month I have two cards and a little box that can hold a treat!

First up is a card using the new Sea Street Stamp Set and the Maritime Designer Series Paper. I used Real Red Card Stock for my card base and the background is a piece of Coastal Cabana that I embossed with the Decorative Dots Textured Impressions Embossing Folder. Remember that one from Sale-A-Bration? It’s back! The greeting is from the Something to Say Stamp Set and is stamped in Real Red on Whisper White and cut out with the Hearts Collection Framelits. Two pieces of paper from the Maritime Designer Series Paper Pack are up next. The top square has a heart cut out with the Hearts Collection Framelits and is mounted to the card with Stampin’ Dimensionals along with the greeting in the middle. The little octopus is from the Sea Street Stamp Set, stamped in Night of Navy and cut out with my Paper Snips. I love to fussy cut but he was a little bit of a challenge! LOL! The fun patterns in the DSP and the cute little octopus make for a fun card!

CF May New Cat Prev Octopus Love Card-WM

My second card uses one of my favorite new sets. I’m a huge fan of the details in the stamps! This card starts off with a base of Garden Green Card Stock. The background is a piece of Very Vanilla stamped with the World Map Background Stamp in Smoky Slate. The three images are from the Traveler Stamp Set and are stamped in Night of Navy, Soft Suede and Memento Tuxedo Black. I cut them all out with my Paper Snips, much easier than the octopus! The greeting I chose is from the Really Good Greetings Stamp Set and is stamped in Night of Navy. I used the Word Bubbles Framelits to cut it out and snipped off the point to make it a perfect rectangle. Stampin’ Dimensionals adhere everything to the card. I think the images with the map and the greeting make for a happy card. Travel means possibilities and fun. It’s definitely the life that I imagine!

CF May Blog Tour New Cat Prev Vintage World Imagine Card-WM

Finally I have a little box for you. It’s the perfect size for a little treat or to put a gift card in. The box is created using a piece of Hello Honey Card Stock and the Hamburger Box Bigz XL Die. On the top is a bow that I cut out from a piece of Lullaby Designer Series Paper with the Gift Bow Bigz XL Die. I used the new Fast Fix Adhesive to assemble it and a Stampin’ Dimensional holds it to the top of the box. My greeting on the front is from the Label Love Stamp Set and is stamped in Baked Brown Sugar and punched out with the Artisan Label Punch. A quick fun project that would make anyones birthday a little more fun!

CF May Blog Tour New Cat Prev Honey Hambuger Birthday Box-WM

CF May Blog Tour New Cat Prev Honey Hamburger Birthday Box Top-WM

So what do you think of the new goodies in the Catalog? I really think they are some of the best we have had in a while. Start making your lists now and get ready because you can begin ordering in just under two weeks! Thank you for hopping by to see my projects for this month’s Control Freaks Tour. Now you are off to see my super clever friend Wendy Weixler, she never disappoints! Enjoy! 🙂

clickhere2013

Stampin’ Up! products used:

Octopus Love Card:

Card Stock: Real Red, Coastal Cabana and Whisper White

Designer Series Paper: Maritime

Ink: Real Red and Night of Navy Classic Stampin’ Ink

Stamp Sets: Sea Street and Something to Say Clear Mount

Framelits: Hearts Collection

Embossing Folder: Decorative Dots

Tools: Big Shot, Paper Snips, Stampin’ Dimensionals and SNAIL

Vintage World Imagined Card:

Card Stock: Very Vanilla and Garden Green

Ink: Smoky Slate, Night of Navy and Soft Suede Classic Stampin’ Ink and Memento Tuxedo Black

Stamp Sets: Traveler, Really Good Greetings and World Map Background Clear Mount

Framelits: Word Bubbles

Tools: Big Shot, Paper Snips, S;d and SNAIL

Honey Hamburger Birthday Box:

Card Stock: Hello Honey and Whisper White

Designer Series Paper: Lullaby

Ink: Baked Brown Sugar Classic Stampin’ Ink

Stamp Set: Label Love Clear Mount

Bigz Dies: Hamburger Box Xl and Gift Bow L

Punch: Artisan Label

Tools: Big Shot, Fast Fix Adhesive, Multi-Purpose Glue and Stampin’ Dimensionals

Control Freaks April Blog Tour

freakwelcome2013

It’s that time again! Welcome to this month’s Control Freaks Blog Tour! This month our theme is Masculine/Gender Neutral. If you are following the tour you have arrived here from the talented Barb Mulikin’s blog, great projects right?! This month I have two cards and one fun project inspired by a video that I saw on YouTube for a box with a little twist!

My first card is a birthday card. For the base I used a piece of Soft Suede Card Stock. My background is a piece of Sahara Sand that I heat embossed with Gold Stampin’ Emboss Powder using the World Map Background Stamp. To color in the land and sea I used my Sponge Daubers and Island Indigo and Gumball Green Ink. Before adhering it to the card I backed it with a piece of Brushed Gold Card Stock. All of the stamped images are from the Postage Collection Host(ess) Stamp Set and are stamped in Island Indigo, Gumball Green and Soft Suede. They are punched out with the Postage Stamp Punch and adhered to the card with Stampin’ Dimensionals. I love the way the background came out with the gold heat embossing and the sponged ink. I will definitely be doing that again!

CF April Blog Tour Global B'day-WM

CF April Blog Tour Global B'day Close-WM

For my second card I did a simple nautical themed one. The base is Crumb Cake Card Stock. I stamped the World Map Background Stamp in Basic Black on a piece of white cotton fabric and then cut it out with the Banners Framelits Dies. It’s adhered to the card with Sticky Strip. My ship is from The Open Sea Stamp Set and is also stamped in Basic Black on Soft Sky and cut out with the Deco Labels Collection Framelits. I slipped a piece of So Saffron behind it that I flagged on both ends before adhering it to the card with Stampin’ Dimensionals. The greeting is from the Loving Thoughts Stamp Set. I really do enjoy using different things like fabric on a card, it adds so much with not much effort at all.

CF April Blog Tour Nautical B'day-WM

My final project is a fun box that has a little surprise inside. The box itself is created with a piece of Crumb Cake Card Stock and my Envelope Punch Board. Like I said I watched a video on YouTube to get the dimensions. There is a piece of Natural 5/8″ Chevron Ribbon that acts as a pull for the box. The sleeve is made from a piece of Early Espresso Core’dinations with a piece of Soho Subway Designer Series Paper on top. The greeting is from the Label Love Stamp Set and is stamped in Island Indigo and punched out with the Artisan Label Punch. I cut out a piece of Summer Starfruit with the Deco Labels Collection Framelits and embossed it with the Alphabet Press Textured Impressions Embossing Folder. Behind it is a piece of 1 1/4″ Burlap Ribbon that is flagged on the bottom. Sticky Strip and Stampin’ Dimensionals hold all of the pieces in place. Inside the box, with one on the front, are tickets from the You’re Amazing Stamp Set that are stamped in Island Indigo, Summer Starfruit and Crisp Cantaloupe. I used the Ticket Duo Builder Punch to punch them out and they are randomly adhered to each other and to the props with SNAIL. Sort of a neat box isn’t it with plenty of room for a gift card or a little special present.

CF April Blog Tour Pop Up Box 1-WM

CF April Blog Tour Pop Up Box 3-WM

CF April Blog Tour Pop Up Box 2-WM.jpg

I really hope that you enjoyed my projects for this month’s Control Freaks Blog Tour. Now you are off to see what the talented Connie Babbert has in store for you! Enjoy the rest of the tour! 🙂

clickhere2013

Stampin’ Up! products used:

Globe Card:

Card Stock: Soft Suede, Sahara Sand and Very Vanilla

Specialty Card Stock: Brushed Gold

Ink: Island Indigo, Gumball Green and Soft Suede Classic Stampin’ Ink

Specialty Ink: Versa-Mark

Stampin’ Emboss Powder: Gold

Stamp Sets: Postage Collection (Host(ess)) and World Map Background Map Clear Mount

Punch: Postage Stamp

Tools: Heat Tool, Sponge Daubers, Stamp-a-ma-jig, Stampin’ Dimensionals and SNAIL

Nautical Card:

Card Stock: Crumb Cake, Soft Sky and So Saffron

Ink: Basic Black Classic Stampin’ Ink

Stamp Sets: The Open Seas, Loving Thoughts and World Map Background Clear Mount

Framelits: Deco Labels Collection and Banners

Tools: Big Shot, Stamp-a-ma-jig, Sticky Strip and Stampin’ Dimensionals

NON Stampin’ Up!: Cotton Fabric

Pop Up Box

Card Stock: Crumb Cake, Summer Starfruit and Very Vanilla

Designer Series Paper: Soho Subway

Ink: Island Indigo, Summer Starfruit and Crisp Cantaloupe Classic Stampin’ Ink

Stamp Sets: You’re Amazing and Label Love Clear Mount

Framelits: Deco Labels Collection

Punches: Ticket Duo Builder and Artisan Label

Embellishments: 1 1/4″ Burlap Ribbon and Natural 5/8″ Chevron Ribbon

Tools: Big Shot, Envelope Punch Board, Sticky Strip, Stampin’ Dimensionals and SNAIL

Control Freaks March Blog Tour!

freakwelcome2013

It’s that time again! Welcome to this month’s Control Freaks Blog Tour! This month our theme is Spring/Easter. Speaking of Spring, I’m hoping that the weather cooperates, I’m pretty done with Winter as I’m sure that all of you are too! If you are following the tour you have arrived here from the talented Debbie Henderson’s blog. This month I have two cards and one fun project inspired by friend Nicole from work.

Up first I have a fun bright card that definitely feels like Spring. The card base is a piece of Whisper White Card Stock. I took another piece of Whisper White and stamped it with the Simple Stems Stamp Set in Coastal Cabana, Daffodil Delight and Perfect Plum randomly. Next up is a piece of Gingham Garden Designer Series Paper. My greeting is from the Memorable Moments Stamp Brush Set and cut out from a piece of Elegant Eggplant with my E-Cutter. The you is from the Countless Sayings 1 Photopolymer Stamp Set and is stamped in Elegant Eggplant.  I used the 3/16″ Corner Rounder on the corners of the DSP and adhered it to the card with Stampin’ Dimensionals. My flagged piece of Whisper White is stamped with a stamp from the Perfect Pennants Stamp Set in Perfect Plum. A piece of twine from the Sweet Sorbet Accessory Pack is tied in a bow and adhered with a Mini Glue Dot. To finish the card I used the 1″ Circle Punch to punch out a piece of Eastern Elegance Designer Series Paper. In the middle is a piece of Elegant Eggplant, punched out with the Itty Bitty Shapes Punch Pack and I used some Crystal Effects on it to give it some shine.

CF March Blog Tour Card 1-WM

Next up is a card that reminds me of a country picnic. The base is Daffodil Delight Card Stock, a piece of Gingham Garden Designer Washi Tape goes across the top. Some Gingham Garden Designer Series Paper Is flagged and also used for the center of the Tea Lace Paper Doily, punched out with the 2 1/2″ Circle Punch. The tag is from the Notable Notions Stamp Set and is stamped in Island Indigo. I used the Chalk Talk Framelits Dies to cut it out and stamped the flowers from the Springtime Hello Stamp Set, stamped in Pear Pizzaz. Tucked under the tag is a piece of 1 1/4″ Burlap Ribbon that is flagged too. My greeting is also from the Notable Notions Stamp Set, I stamped it in Night of Navy on one of the Essentials Wooden Elements. Love that it fits right on there!

CF March Blog Tour Card 2-WM

My final project is the one that I mentioned was inspired by my friend Nicole. She came into work one day with her Country Living Magazine and showed me this neat project. It was a set of coasters made from Mason Jar lids with some cork that was stamped with Staz-On. I thought they were so cool and would make a fun gift. I found some lids on Amazon and I already had a ton of the adhesive cork sheet. I cut the cork sheet out using my Circles Collection Framelits. The images are from the By the Tide Stamp Set and are stamped in Jet Black Staz-On. I decided that they needed to be dressed up a bit so I used one of the Mini Muslin Bags and stamped the lobster from the same set in Cherry Cobbler. My tag is made with the Angled Tag Topper Punch and still more of the stamps are stamped in Marina Mist, Soft Suede and Smoky Slate. I slid the coasters in and tied the tag to the bag. Pretty neat little gift right?! Nicole thought they were!

CF March Blog Tour Coasters-WM

CF MArch Blog Tour Coasters & Bag-WM

CF March Blog Tour Bag-WM

I hope that you enjoyed my projects for this month’s Control Freaks Blog Tour. Now you are off to see what clever Barb Mullikin has in store for you! Enjoy the rest of the tour!

clickhere2013

Stampin’ Up! products used:

Card 1:

Card Stock: Whisper White and Elegant Eggplant

Designer Series Paper: Gingham Garden and Eastern Elegance

Ink: Coastal Cabana, Daffodil Delight, Perfect Plum and Elegant Eggplant Classic Stampin’ Ink

Stamp Sets: Simple Stems and Perfect Pennants Clear Mount and Countless Sayings 1 Photopolymer

MDS: Moments Ago Stamp Brush Set

Embellishments: Sweet Sorbet Accessory Pack and Crystal Effects

Punches: 1″ Circle Punch and Itty Bitty Shapes Pack

Tools: E-Cutter, Stamp-a-ma-jig, Mini Glue Dots, Stampin’ Dimensionals and SNAIL

Card 2:

Card Stock: Daffodil Delight and Whisper White

Designer Series Paper: Gingham Garden

Stamp Sets: Notable Notions and Springtime Hello Clear Mount

Ink: Night of Navy, Island Indigo and Pear Pizzaz Classic Stampin’ Ink

Framelits: Chalk Talk

Punch: 2 1/2″ Circle Punch

Embellishments: Tea Lace Paper Doily, Essentials Wooden Elements and 1 1/4″ Burlap Ribbon

Tools: Big Shot, Stamp-a-ma-jig, Sticky Strip, Stampin’ Dimensionals and SNAIL

Coasters:

Card Stock: Very Vanilla

Ink: Cherry Cobbler, Marina Mist, Smoky Slate and Soft Suede Classic Stampin’ Ink

Specialty Ink: Jet Black Staz-On

Stamp Set: By the Tide Clear Mount

Framelits: Circles Collection

Punch: Scallop Tag Topper

Tools: Big Shot and Stamp-a-ma-jig

NON Stampin’ Up!: Mason Jar Lids and Adhesive Cork Sheet

Control Freaks February Blog Tour

freakwelcome2013

Hello everyone and welcome to this month’s Control Freaks Blog Tour. This month we had an “anything goes” kind of theme. We could choose pretty much anything we wanted, fun! If you are following the tour you have arrived here from the talented Barb Mullikin’s blog. I have three cards and they are completely different from anything I’ve done before. I’ve used MDS and my e-cutter to make them. Let’s get started, shall we?!

My first card uses a bold, bright color combination. The card base is Crumb Cake. Next up is a layer of Pistachio Pudding and on top of that is a piece of Crisp Cantaloupe that I embossed with the Arrows Textured Impressions Embossing Folder. I used MDS and my e-cutter to cut out the mustaches from the the Many Mustaches Stamp Brush Set and the greeting from the Moments Ago Stamp Brush Set. Both cut out from Coastal Cabana, the mustaches are adhered with Stampin’ Dimensionals and the “awesome” with 2-Way Glue. A fun simple card and the bold color is definitely not for the feign of heart!

CF Feb Tour Card 1-WM

My second card is a little more subdued. The base of the card is Crumb Cake Card Stock and my background is a piece of Very Vanilla. Across the lower half of the card is some Retro Fresh This and That Designer Washi Tape. My feather is from the Feathered Woodcuts Kit-Digital Download and my banner is from the One Big Sale-A-Bration 2014 Digital Ensemble. The feather is cut out from Crumb Cake and the banner from Coastal Cabana. I really love the detail on the feather and the Washi Tape sets the whole card off nicely.

CF Feb Tour Card 2-WM

My last card hits very close to home! I used Baked Brown Sugar for my card base. On top of that is a piece of Coastal Cabana and my background is a piece of Soft Sky embossed with the Stylish Stripes Textured Impressions Embossing Folder. My “hello” greeting is from the Moments Ago Stamp Brush Set and is adhered to the card with 2-Way Glue. The New York state is from the Fifty Nifty Kit-Digital Download and is cut out of Baked Brown Sugar. I added a Basic Jewels Rhinestone to show you all where I fall on the map! A simple, but fun card and with the Fifty Nifty Kit you can cut out any state you want!

CF Feb Tour Card 3-WM

So there you have my first foray into the world of My Digital Studio and e-cutters! I still think I prefer the traditional way to make cards but it does add some more options to your crafting arsenal doesn’t it?! There was a little bit of a learning curve but once I figured it all out I had a lot of fun! I hope that you enjoyed my projects for this month’s Control Freaks Blog Tour. Now you are off to see what clever Debbie Henderson has in store for you! Enjoy the rest of the tour! 🙂

clickhere2013

Stampin’ Up! products used:

Card 1:

Card Stock: Crumb Cake, Pistachio Pudding, Crisp Cantaloupe and Coastal Cabana

MDS: Many Mustaches and Moments Ago Stamp Brush Sets

Embossing Folder: Arrows

Tools: Big Shot, E-Cutter, 2-Way Glue, Stampin’ Dimensionals and SNAIL

Moments Ago Stamp Brush Set

Many Mustaches

Arrows TIEF

Card 2:

Card Stock: Crumb Cake, Very Vanilla and Coastal Cabana

MDS: Feathered Woodcuts Kit-Digital Download and One Big Sale-A-Bration 2014 Digital Ensemble

Embellishments: Retro Fresh This and That Designer Washi Tape

Tools: E-Cutter, Stampin’ Dimensionals and SNAIL

Feathered Woodcuts

Retro Fresh This And That Designer Washi Tape

Card 3:

Card Stock: Baked Brown Sugar, Coastal Cabana and Soft Sky

MDS: Moments Ago Stamp Brush Set and Fifty Nifty Kit-Digital Download

Embossing Folder: Stylish Stripes

Embellishment: Basic Jewels Rhinestones

Tools: Big Shot, E-Cutter, 2-Way Glue, Stampin’ Dimensionals and SNAIL

Moments Ago Stamp Brush Set

Fifty Nifty

Basic Rhinestones

Control Freaks January Blog Tour

freakwelcome2013

Hello everyone and welcome to this month’s Control Freaks Blog Tour featuring products from the 2014 Sale-A-Bration Catalog and Love! If you are following the tour you have arrived here from the talented Mary Brown’s blog. I’m excited to share my two cards with you, both of them contain some love so let’s get to them!

My first card uses some neat Sale-A-Bration goodies and is simple but fun! The base of the card is Strawberry Slush Card Stock and my background is a piece of Blushing Bride. I stamped the greeting from the Love You to the Moon Stamp Set in Strawberry Slush on the background and again on a piece of Whisper White. The heart is then cut out using the Hearts Collection Framelits Dies and adhered over the other greeting with Stampin’ Dimensionals. My banners are from the Banner Blast Stamp Set** and are stamped in Strawberry Slush and Blushing Bride. I used the Banner Punch** to punch them out and adhered them to the card with Stampin’ Dimensionals. A piece of White Bakers Twine goes behind the banners to give them something to hang from. I really like the greeting stamped in the popped up heart, it give the card a little something unexpected and the banners are just fun!

CF Jan Blog Tour Card 1-WM

My second card starts with a piece of Crumb Cake Card Stock that I trimmed off the two top edges of to give it a tag look. A piece of paper from the Fresh Prints Designer Series Paper Stack makes the background with a Tea Lace Paper Doily on top of that. Along the bottom is a piece of Real Red that I trimmed with the Adorning Accents Edgelit Dies. I used the Hearts Collection Framelits Dies to cut out the hearts that are stamped in Coastal Cabana and Pool Party from the Hearts a Flutter Stamp Set. Stampin’ Dimensionals hold them to each other and the card. The greeting is from the Just Sayin” Stamp Set and are stamped in Coastal Cabana and Pool Party. Up top there is a piece of Real Red that I punched out with the 7/8″ Scallop Circle Punch and a piece of twine from the Sweet Shop Accessory Pack** is tied in a bow. The Fresh Prints Designer Series Paper Stack has some great colors in it and I do love that Just Sayin’ Stamp Set!

CF Jan Blog Tour Card 2-WM

I hope that you enjoyed my two projects for the January Control Freaks Blog Tour featuring products from the 2014 Sale-A-Bration Catalog and some love thrown in for good measure! Now you are off to the talented Cindy Elam’s blog! Thanks for hopping by and enjoy your day! 🙂

clickhere2013

Stampin’ Up! products used:

Card 1:

Card Stock: Strawberry Slush, Blushing Bride and Whisper White

Ink: Strawberry Slush and Blushing Bride Classic Stampin’ Ink

Stamp Sets: Love You to the Moon and Banner Blast** Clear Mount

Framelits: Hearts Collection

Punch: Banner

Embellishments: White Bakers Twine

Tools: Big Shot, Stamp-a-ma-jig, Stampin’ Dimensionals and SNAIL

Card 2:

Card Stock: Crumb Cake, Whisper White, Coastal Cabana and Pool Party

Designer Series Paper: Fresh Prints Stack

Ink: Coastal Cabana, Pool Party and Real Red.

Framelits: Hearts a Flutter and Word Bubbles

Edgelits: Adorning Accents

Punch: 7/8″ Scallop Circle

Embellishments: Tea Lace Paper Doily and Coastal Cabana Twine (Sweet Sorbet Accessory Pack)**

Tools: Big Shot, Stampin’ Dimensionals and SNAIL

Control Freaks December Blog Tour

freakwelcome2013

Hello everyone and welcome to the December Control Freaks Blog Tour featuring the 2014 Occasions Catalog preview! If you are following the tour then you have arrived here from Leann Greff’s blog. Wasn’t her stuff awesome?! I have two projects for you today. One is a masculine friendship card and the other is a box of note cards.

First up is the card. For the base I used Pacific Point Card Stock. On top of that is a piece of Whisper White stamped with the Hardwood Background Stamp* in Smoky Slate. My greeting is from the Hello, Sailor Stamp Set*, stamped in Pacific Point and cut out with the Circles Collection Framelits Dies. I backed it with a piece of Summer Starfruit cut out with the Starburst Collection Framelits Dies*. Two pieces of paper from the High Tide Designer Series Paper* and a piece of Gold Foil Sheet are all flagged underneath. Finally, another piece of Gold Foil Sheet is punched out with the star from the Merry Mini’s Punch Pack and adhered with a Stampin’ Dimensional to finish off the card. I’m loving the Hardwood Background Stamp and the nautical theme of the stamp set and the DSP.

Control Freaks December Blog Tour - Occasions Card

My second project is a cute little box that contains four notecards that could easily be slipped into someone’s bag or briefcase to brighten their day. The box is made with the Envelope Punch Board. Deb Valder had a really neat video on YouTube showing how to make a box out of the Envelope Punch Board. My box is made from a piece of Basic Gray Card Stock and my fastener is made with two Candy Dot Brad Bases and two pieces of Basic Black Card Stock punched out with the 3/4″ Circle Punch. Some Whisper White Bakers Twine ties it together. A piece of Kaleidoscope Designer Series Paper* is on the front and three triangles from the Geometrical Stamp Set* are stamped in Strawberry Slush, Bermuda Bay and Crushed Curry and punched out with the Triangle Punch*. My four notecards use the same stamp set. Two are stamped in Strawberry Slush, one in Crushed Curry and one in Bermuda Bay. The Strawberry Slush ones are backed with Strawberry Slush Card Stock and the triangles are punched out with the Triangle Punch*. The Crushed Curry card is backed with Crushed Curry and the circles are punched out with the 1″ Circle Punch. Finally, the Bermuda Bay is backed with Bermuda Bay and the chevrons are cut out with my Paper Snips. The shapes on all of the note cards are held on with Stampin’ Dimensionals. Who wouldn’t want to find one of these little cards in their bag to put a smile on their face and let them know someone’s thinking about them?!

Control Freaks December Blog Tour - Occasions Box & Cards

Control Freaks December Blog Tour - Occasions Box

Control Freaks December Blog Tour - Occasions Box Back

Control Freaks December Blog Tour - Occasions Cards

I hope that you enjoyed your sneak peek of the 2014 Occasions Catalog! Now on to your next stop, up next is  my friend Wendy Weixler, enjoy! Thanks so much for stopping by here and have a great day!

clickhere2013

Stampin’ Up! products used:

Card:

Card Stock: Pacific Point, Whisper White and Summer Starfruit

Specialty Paper: Gold Foil Sheet

Designer Series Paper: High Tide*

Ink: Smoky Slate and Pacific Point Classic Stampin’ Ink

Stamp Sets: Hello, Sailor* and Hardwood Background* Clear Mount

Framelits: Circles Collection and Starburst*

Punch: Merry Mini’s

Tools: Big Shot, Paper Snips, Stampin’ Dimensionals and SNAIL

Box/Note Cards:

Card Stock: Basic Gray, Whisper White, Strawberry Slush, Crushed Curry and Bermuda Bay

Designer Series Paper: Kaleidoscope*

Ink: Strawberry Slush, Crushed Curry and Bermuda Bay Classic Stampin’ Ink

Stamp Set: Geometrical*

Punches: Triangle*, 3/4″ Circle and 1″ Circle

Embellishments: Candy Dot Brad Bases and Whisper White Bakers Twine

Tools: Envelope Punch Board, Paper Snips, Stamp-a-ma-jig, Sticky Strip, Stampin’ Dimensionals and SNAIL

*2014 Occasions Catalog (January 3, 2014)

Control Freaks November Blog Tour

freakwelcome2013

Hello everyone and welcome to the November Control Freaks Blog Tour! Our theme for this month’s tour is Christmas! If you are following the tour then you have arrived here from Cindy Elam’s blog. She had some great stuff, didn’t she?! I have two home decor projects for you. Who couldn’t use a little inspiration to help with the decorating around your house this time of year?

The first of the two projects I have for you today is a banner. I’m a big fan of nontraditional holiday colors and this banner is no exception. The bases for the banner are Cherry Cobbler Card Stock that I stamped in Cherry Cobbler with the Dictionary Background Stamp. I flagged the bottoms and used the 1″ Circle Punch to create the ticket corners on the top. The rosettes are made from Winter Frost Specialty Designer Series Paper using my Simply Scored Scoring Tool. My next layer is a piece of Blushing Bride that I cut out with the Chalk Talk Framelits Dies and embossed with the Alphabet Press Textured Impressions Embossing Folder. The letters that spell out JOY are cut out using the Typeset Alphabet Bigz Dies from Cherry Cobbler. To add a little interest I stamped some snowflakes from the Festive Flurry Stamp Set in Pool Party and cut them out with the Festive Flurry Framelits Dies. The flags are held on to the jute twine with some Pool Party that is punched out with the “Vintage” Tab Punch. The snowflakes are held on with Card Stock that is punched out with the Word Window Punch. It’s a fun and relatively simple banner to make, but it’s sure to dress up any home for the holidays!

Control Freaks Nov. Tour Banner

Control Freaks Nov. Tour Banner Close

Control Freaks Nov. Tour Banner Snowflake

My second project for today I’m going to use as a tree topper, but you could also use it as an ornament on a bigger tree or it could be hung on a door. The base for my project is a piece of Soft Sky Card Stock that I cut out with the Circles Collections Framelits Dies. The background is a piece of Very Vanilla that I stamped with the World Map Background Stamp in Old Olive and that is also cut out with the Circles Framelits. I used the Christmas Star Single Stamp heat embossed with Gold Stampin’ Emboss Powder, cut out with my Paper Snips and scored with my Simply Scored Scoring Tool. Some stacked Stampin’ Dimensionals adhere it to the background. The greeting is from the Greetings of the Season Stamp Set, stamped in Cherry Cobbler and punched out with the 1 3/4″ Scallop Circle Punch. It is backed with a piece of Cherry Cobbler that I cut out with the Deco Labels Collection Framelits Dies. Two flagged pieces of Brushed Gold Card Stock are adhered behind it. On the back of it is a tube of Soft Sky that I will use to place it on top of my tree.

Control Freaks Nov. Tour Tree Topper

I hope that you enjoyed my projects for this month’s Control Freaks Blog Tour. Now on to your next stop, up next is Lisa Martz, enjoy! Thanks so much for stopping by here and have a great day!

clickhere2013

Stampin’ Up! products used:

Banner:

Card Stock: Cherry Cobbler, Blushing Bride, Pool Party and Whisper White

Designer Series Paper: Winter Frost Specialty

Ink: Cherry Cobbler and Pool Party Classic Stampin’ Ink

Stamp Sets: Festive Flurry and Dictionary Background Stamp Clear Mount

Framelits: Festive Flurry and Chalk Talk

Embossing Folder: Alphabet Press

Punch: 1″ Circle

Bigz Dies: Typeset Alphabet

Tools: Big Shot, Simply Scored Scoring Tool, Paper Snips, Stampin’ Dimensionals and SNAIL

Tree Topper:

Card Stock: Soft Sky, Very Vanilla and Cherry Cobbler

Specialty Card Stock: Brushed Gold

Ink: Cherry Cobbler and Old Olive

Specialty Ink: Versa-Mark

Stampin’ Emboss Powder: Gold

Stamp Sets: Christmas Star Single and Greetings of the Season Clear Mount

Framelits: Circles Collection and Deco Labels

Punch: 1 3/4″ Scallop Circle

Tools: Big Shot, Heat Tool, Simply Scored Scoring Tool, Paper Snips, Stampin’ Dimensionals and SNAIL

Control Freaks October Blog Tour

freakwelcome2013

Hello everyone and welcome to the October Control Freaks Blog Tour! Our theme for this month’s tour is Gratitude. A very fitting theme seeing as the time of year we are coming up on there are so many things that we all have to be grateful for. The holiday’s help us to stop and remember that. If you are following the tour then you have arrived here from LeeAnne Greff’s blog. When I think of grateful I think of thank you cards so I made a box of thank you cards that are great to have handy or they would make a fun gift for someone.

I saw a tutorial on Pinterest where someone had used the Envelope Punch Board to make a box to hold four cards with envelopes, well, I had to give that a try! The box for the cards is made from Crumb Cake Card Stock that is cut to 9″ x 9″ and then using the Envelope Punch Board it’s scored and punched at 3 1/2″ and 4 1/2″. You then flip it and do the same on the opposite side. For the two remaining sides you follow the score lines from the previous sides and when you are finished you have your box. Some Sticky Strip holds it together and a piece of 1 1/4″ Burlap Ribbon is wrapped around it to hold it closed. I used the Snow Day Stamp Set to stamp my snow man in Whisper White Craft Ink on Soft Sky and cut him out with my Paper Snips. His buttons and face are Basic Black and his nose is Pumpkin Pie. A piece of Sahara Sand and a piece of Soft Sky are cut out with the Deco Labels Collection Framelits Dies. The Soft Sky piece has his arms stamped in Soft Suede on it and its all adhered to the Burlap with Sticky Strip. A little piece of Burlap is also used for his scarf. I did the same process for the four snowmen on the cards. The greeting along the bottom and snowflakes are stamped in Soft Sky on Sahara Sand. The main greeting is from the Lots of Thanks Stamp Set and is stamped in Soft Suede on Soft Sky and punched out with the Label Bracket Punch. Some Crumb Cake Envelopes complete the set. I’m going to use mine as a gift for someone this holiday season. Who couldn’t use a nice set of handmade thank you’s to send out?! I hope that you enjoyed my project for this month’s Control Freaks Blog Tour. Now on to your next stop, up next is Jan Tinklenberg, enjoy! Thanks so much for stopping by here and have a great day! 🙂

Control Freaks Blog Tour October 2013

Control Freaks Blog Tour October 2013

Control Freaks Blog Tour October 2013

Control Freaks Blog Tour October 2013


clickhere2013

Stampin’ Up! products used:

Card Stock: Crumb Cake, Sahara Sand and Soft Sky

Ink: Soft Suede, Basic Black and Pumpkin Pie Classic Stampin’ Ink

Craft Ink: Whisper White

Stamp Sets: Snow Day and Lots of Thanks Clear Mount

Framelits: Deco Labels

Punch: Label Bracket

Embellishments: 1 1/4″ Burlap Ribbon

Tools: Big Shot, Envelope Punch Board, Stamp-a-ma-jig, Paper Snips, Sticky Strip, Stampin’ Dimensionals and SNAIL

Control Freaks September Blog Tour

freakwelcome2013

Hello everyone and welcome to the September Control Freaks Blog Tour Featuring Halloween Projects! I’m on a plane at the moment on my way to see a very good friend. Nothing like posting from 30,000 feet! If you are following the tour you should have arrived here from my good friend and very talented stamper Sandy Mathis’ blog. Her projects were just amazing weren’t they?!?! I have two fun and different projects for you this month. A nifty Halloween Wreath and a fun Halloween clock! Yes… a clock!

First up I have my Wreath. I was in a store the other day and I saw this pre-packaged halloween wreath and I thought well I can make that with my Stampin’ Up! goodies so that’s exactly what I did! For the backing of the wreath I cut out a piece of Basic Black Card Stock with my Circles Collection Framelits Dies. The cones are made from 12 sheets of Witches’ Brew Designer Series Paper cut in 4″ x 4″ squares. Out came the hot glue gun and after about two full sticks my cones were assembled and glued to the base. The center of the wreath is a piece of Basic Gray, again cut out with the Circles Framelits, and a rosette made from some more Witches’ Brew DSP. A piece of Summer Starfruit cut out with the Labels Collection Framelits Dies and pierced with the Festive Paper-Piercing Pack is the backing for the stamps. Both of the stamps are from the Halloween Bash Stamp Set, the Pumpkin Pie one is cut out with the Decorative Label Punch and the Basic Black one with the Scallop Oval Punch. They are all adhered to one another with Stampin’ Dimensionals. A pretty neat take on a wreath that you can make larger just by changing the dimensions of your squares!

Control Freaks Sept Blog Tour

My second project is a really fun one. I was inspired when I was meandering through one of the local craft stores and happened down the clock aisle. I thought wouldn’t it be fun to make a Halloween clock?! For the base of the clock I used my Circles Collection Framelits to cut out a piece of Coaster Board and a piece of Witches’ Brew Designer Series Paper. I glued them to each other using Multi-Purpose glue and used my Paper Snips to make the hole in the middle for the movement to go through. The numbers are from the ABC-123 Sketch Alphabet & Numbers Stamp Set and are stamped in Pumpkin Pie and punched out with the 7/8″ Scallop Circle Punch. All of the other stamped images and greeting are from the Halloween Hello Stamp Set and are stamped in Pumpkin Pie too. I used my Pumpkin Pie and Daffodil Delight Stampin’ Write Markers to color in the candy corn and adhered everything to the clock face with Stampin’ Dimensionals. I really love the way the greeting spins around the center and the candy makes it’s way around the clock face too!

Control Freaks Sept Blog Tour

So what do you think?!?! A little different and fun huh?! I really hope that you enjoyed my projects for this month’s Control Freaks Blog Tour featuring Halloween Projects. Now you are off to see the talented Connie Babbert’s projects. She always has some fun ideas! Thank you for stopping by and enjoy the rest of the tour! 🙂

clickhere2013

Stampin’ Up! products used:

Wreath:

Card Stock: Basic Black, Basic Gray, Summer Starfruit and Very Vanilla

Designer Series Paper: Witches’ Brew

Ink: Pumpkin Pie and Basic Black Classic Stampin’ Ink

Stamp Set: Halloween Bash Clear Mount

Framelits: Circles Collection and Labels Collection

Punches: Decorative Label and Scallop Oval

Tools: Big Shot, Simply Scored, Festive Paper-Piercing Pack, Paper-Piercing Tool, Hot Glue Gun, Stampin’ Dimensionals and SNAIL

Clock:

Card Stock: Very Vanilla

Specialty: Coaster Board

Designer Series Paper: Witches’ Brew

Ink: Pumpkin Pie Classic Stampin’ Ink

Stampin’ Write Markers: Pumpkin Pie and Daffodil Delight

Stamp Set: Halloween Hello and ABC-123 Sketch Alphabet & Numbers Clear Mount

Framelits: Circles Collection

Punches: 7/8″ Scallop Circle and 1 1/4″ Scallop Circle

Tools: Big Shot, Paper Snips, Multi-Purpose Glue, Stampin’ Dimensionals and SNAIL