Control Freaks August Blog Tour

freakwelcome2013

Hello there and welcome to the Control Freaks August Blog Tour! We are so glad to have you along. This month we are featuring products from the 2013 Holiday Catalog. If you are following the tour then you have arrived here from the amazing Julie Davidson’s blog. She has cool stuff didn’t she? I have been having lots of fun playing with all of the goodies in the Holiday Catalog and I have also been having lots of fun with the new Thinlits Dies. I have a card for you today that uses the Thinlits and two fun projects that use Vellum.

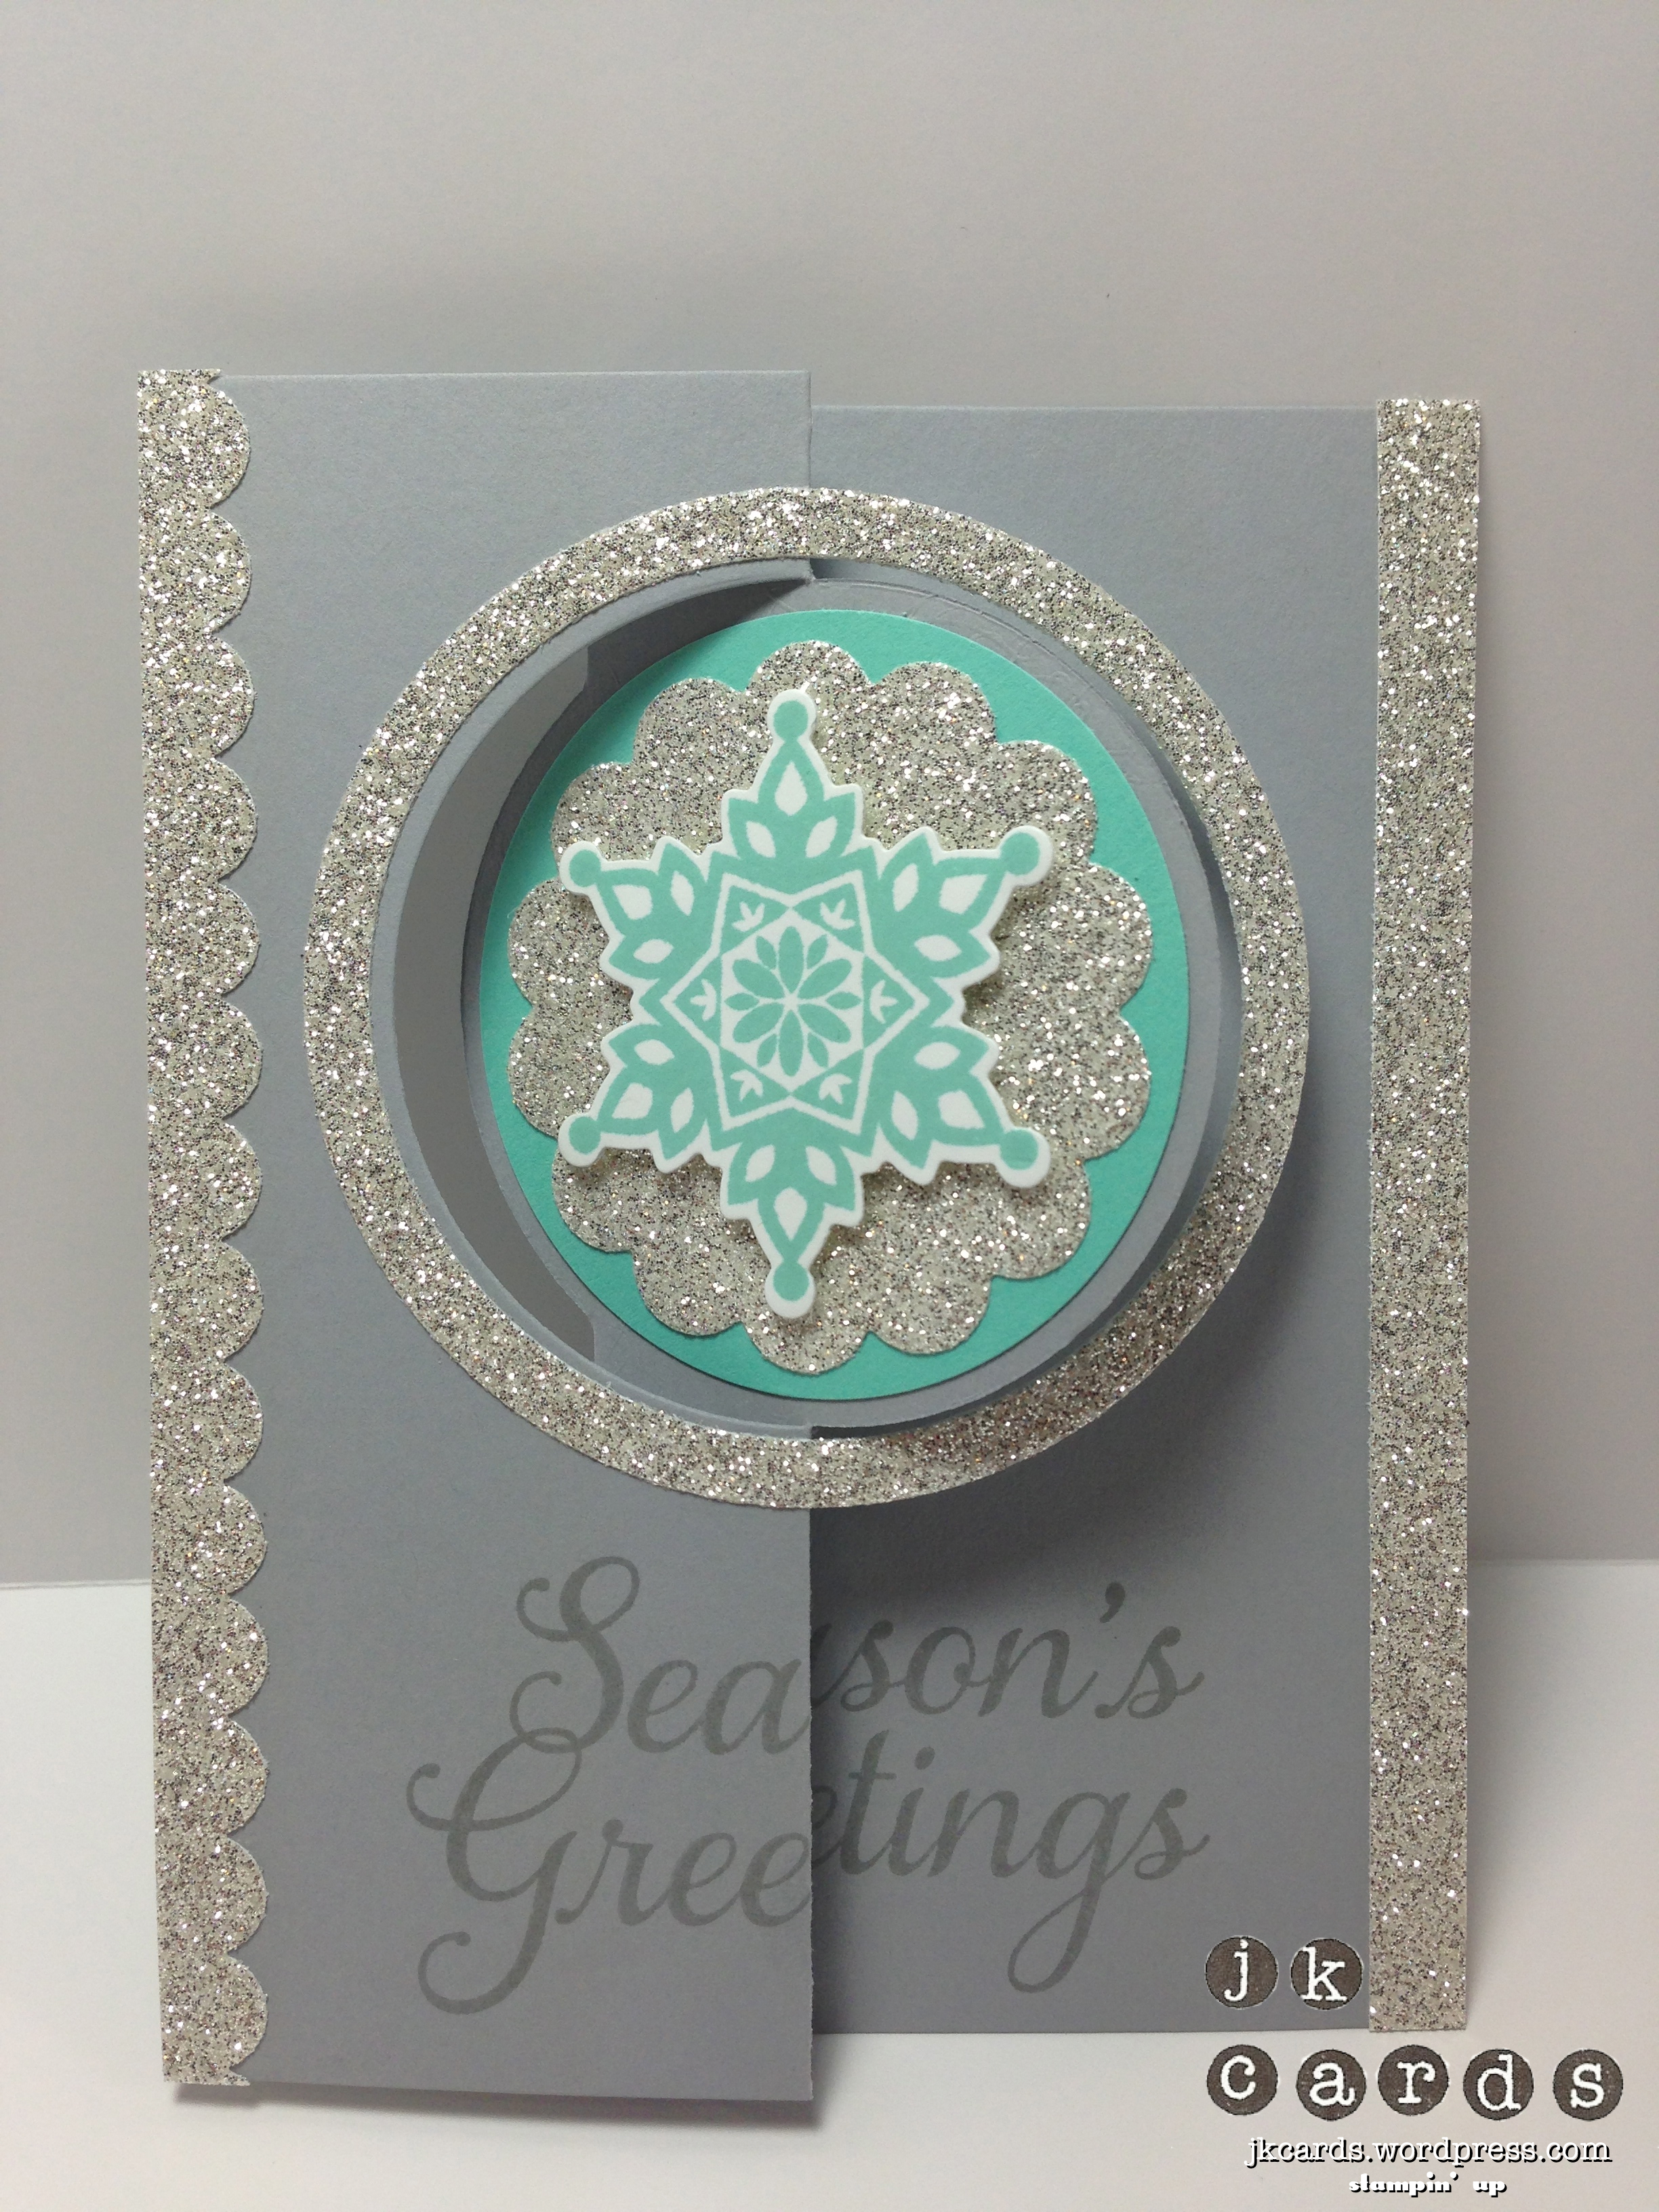
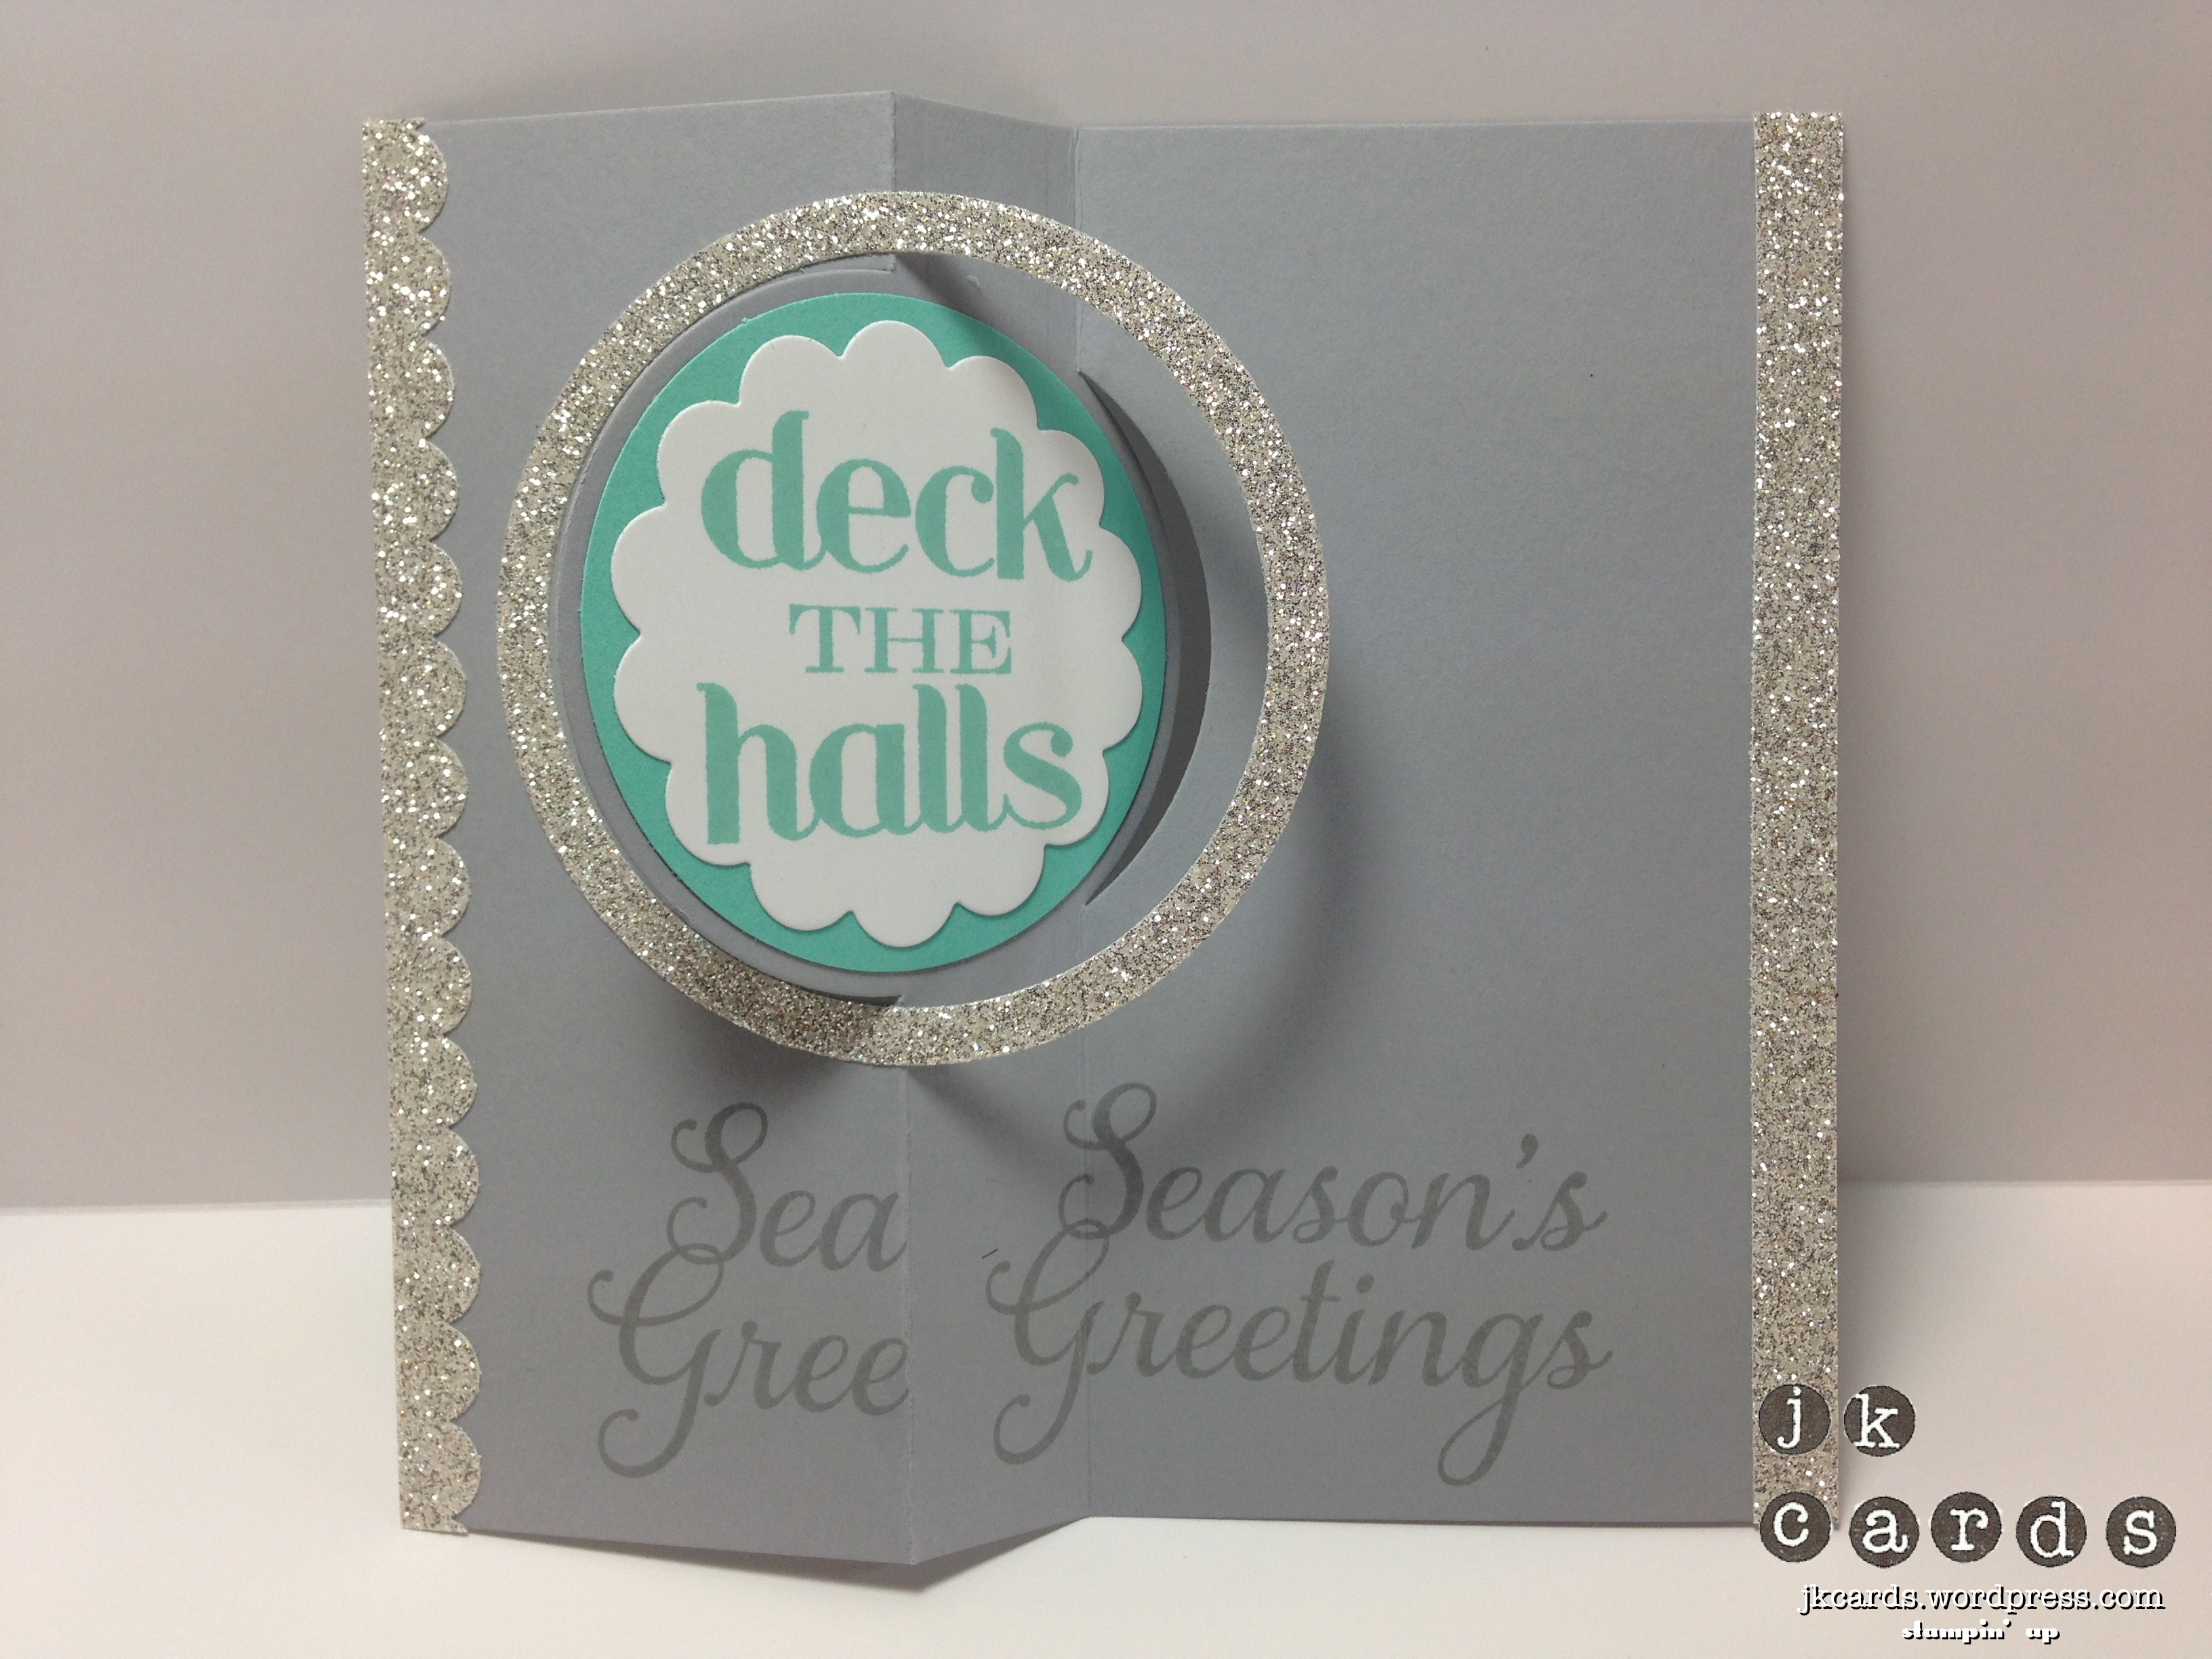
First up we have the card. When they introduced the Thinlits at Convention I knew that I was going to love them and I was right! They are so much fun to play with and not just to make the cards. The elements they come with are great too! The base of my card is Smoky Slate Card Stock and I used the Circle Card Thinlits Die to cut it out. The circle in the middle starts off with a piece of Costal Cabana that I punched out with the 2 1/2″ Circle Punch. I used the scallop circle from the Thinlits set to cut out a piece of Silver Glimmer Paper. The snowflake is from the Festive Flurry Stamp Set and is cut out with the Festive Flurry Framelits Dies. The circle of Glimmer paper is cut out using the Circles Collection Framelits Dies. I adhered only the left side so that when you flip the card it circles the greeting which is from the Christmas Messages Stamp Set and is stamped in Costal Cabana. The greeting is from the Joy to the World Stamp Set and is stamped in Smoky Slate. A strip of Silver Glimmer Paper, the one on the left is punched with the Scallop Edge Punch, finish the card off with some more sparkle. I love the way the circle flips around to surround the greeting too!

Control Freaks August Blog Tour Card Closed

Control Freaks August Blog Tour Card Open

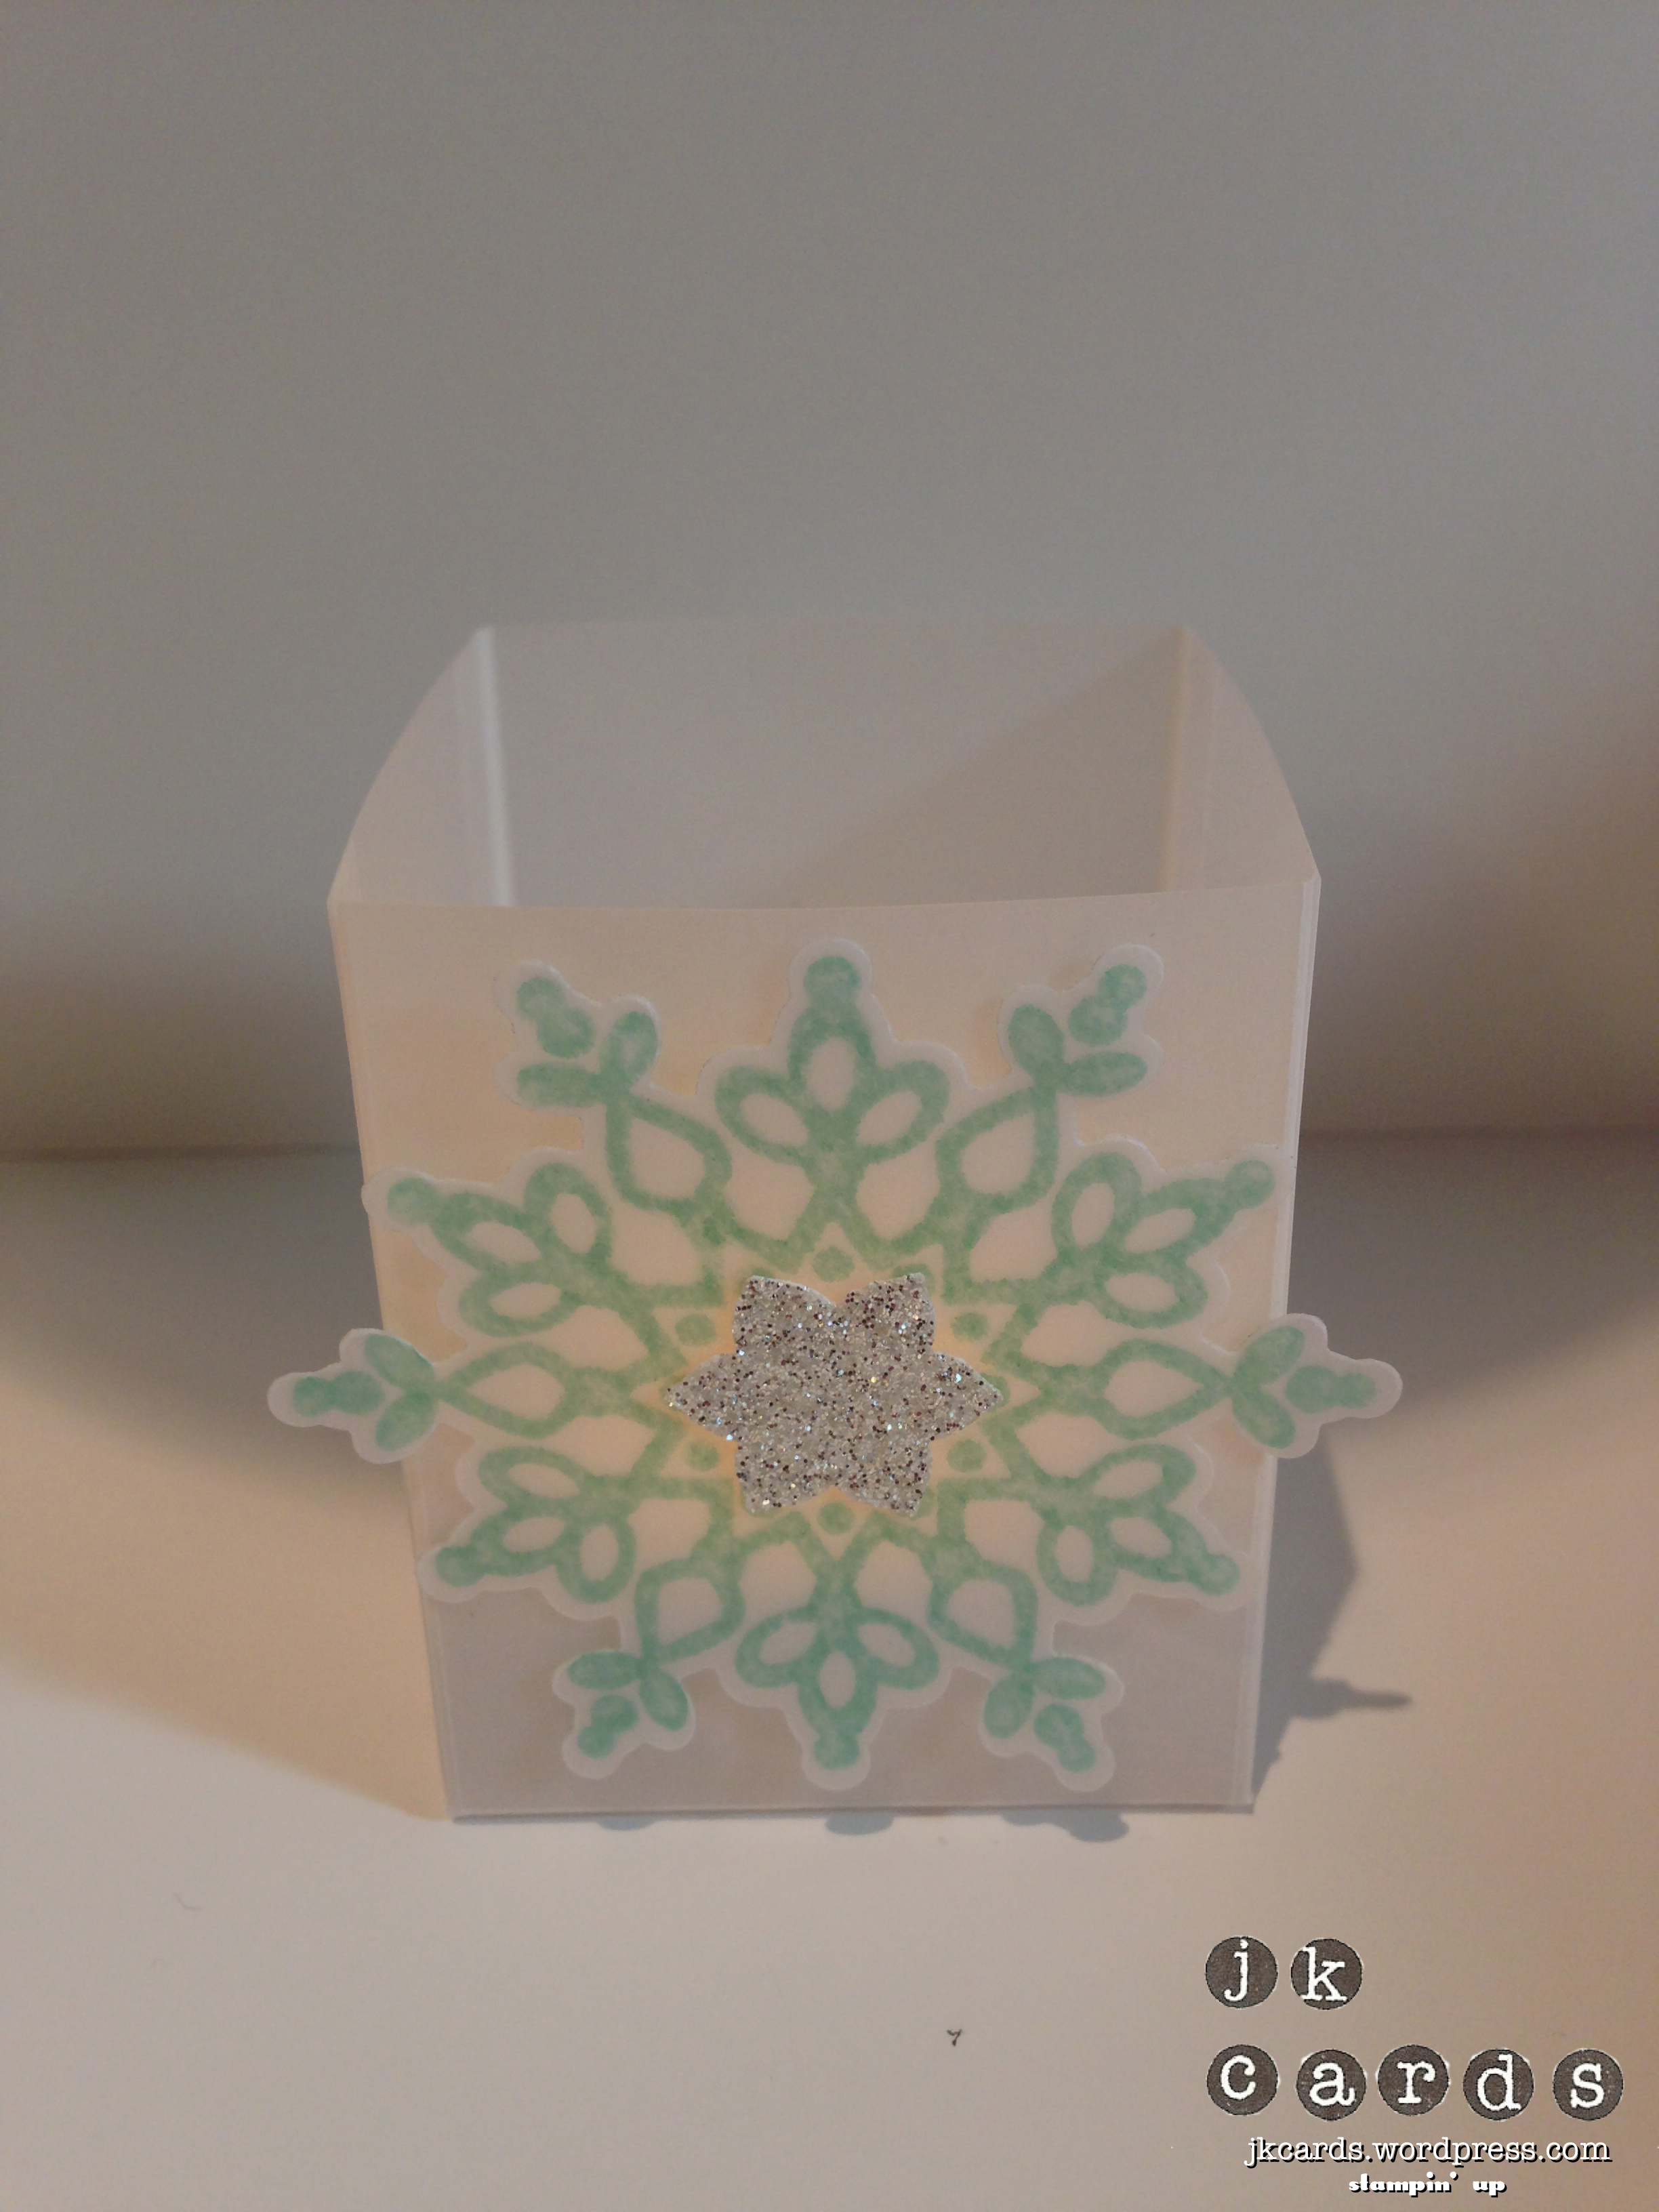
Next up I have a simple Votive Holder that I made with some Vellum Card Stock and my Simply Scored Scoring Tool. Another one of the snowflakes from the Festive Flurry Stamp set is stamped in Costal Cabana on Vellum and cut out with the Festive Flurry Framelits Dies. I used the Boho Blossom Punch to punch out the piece of Silver Glimmer Paper in the center, it fits just perfectly! A nice simple way to dress up a table or mantle for the Holidays!

Control Freaks August Blog Tour Votive

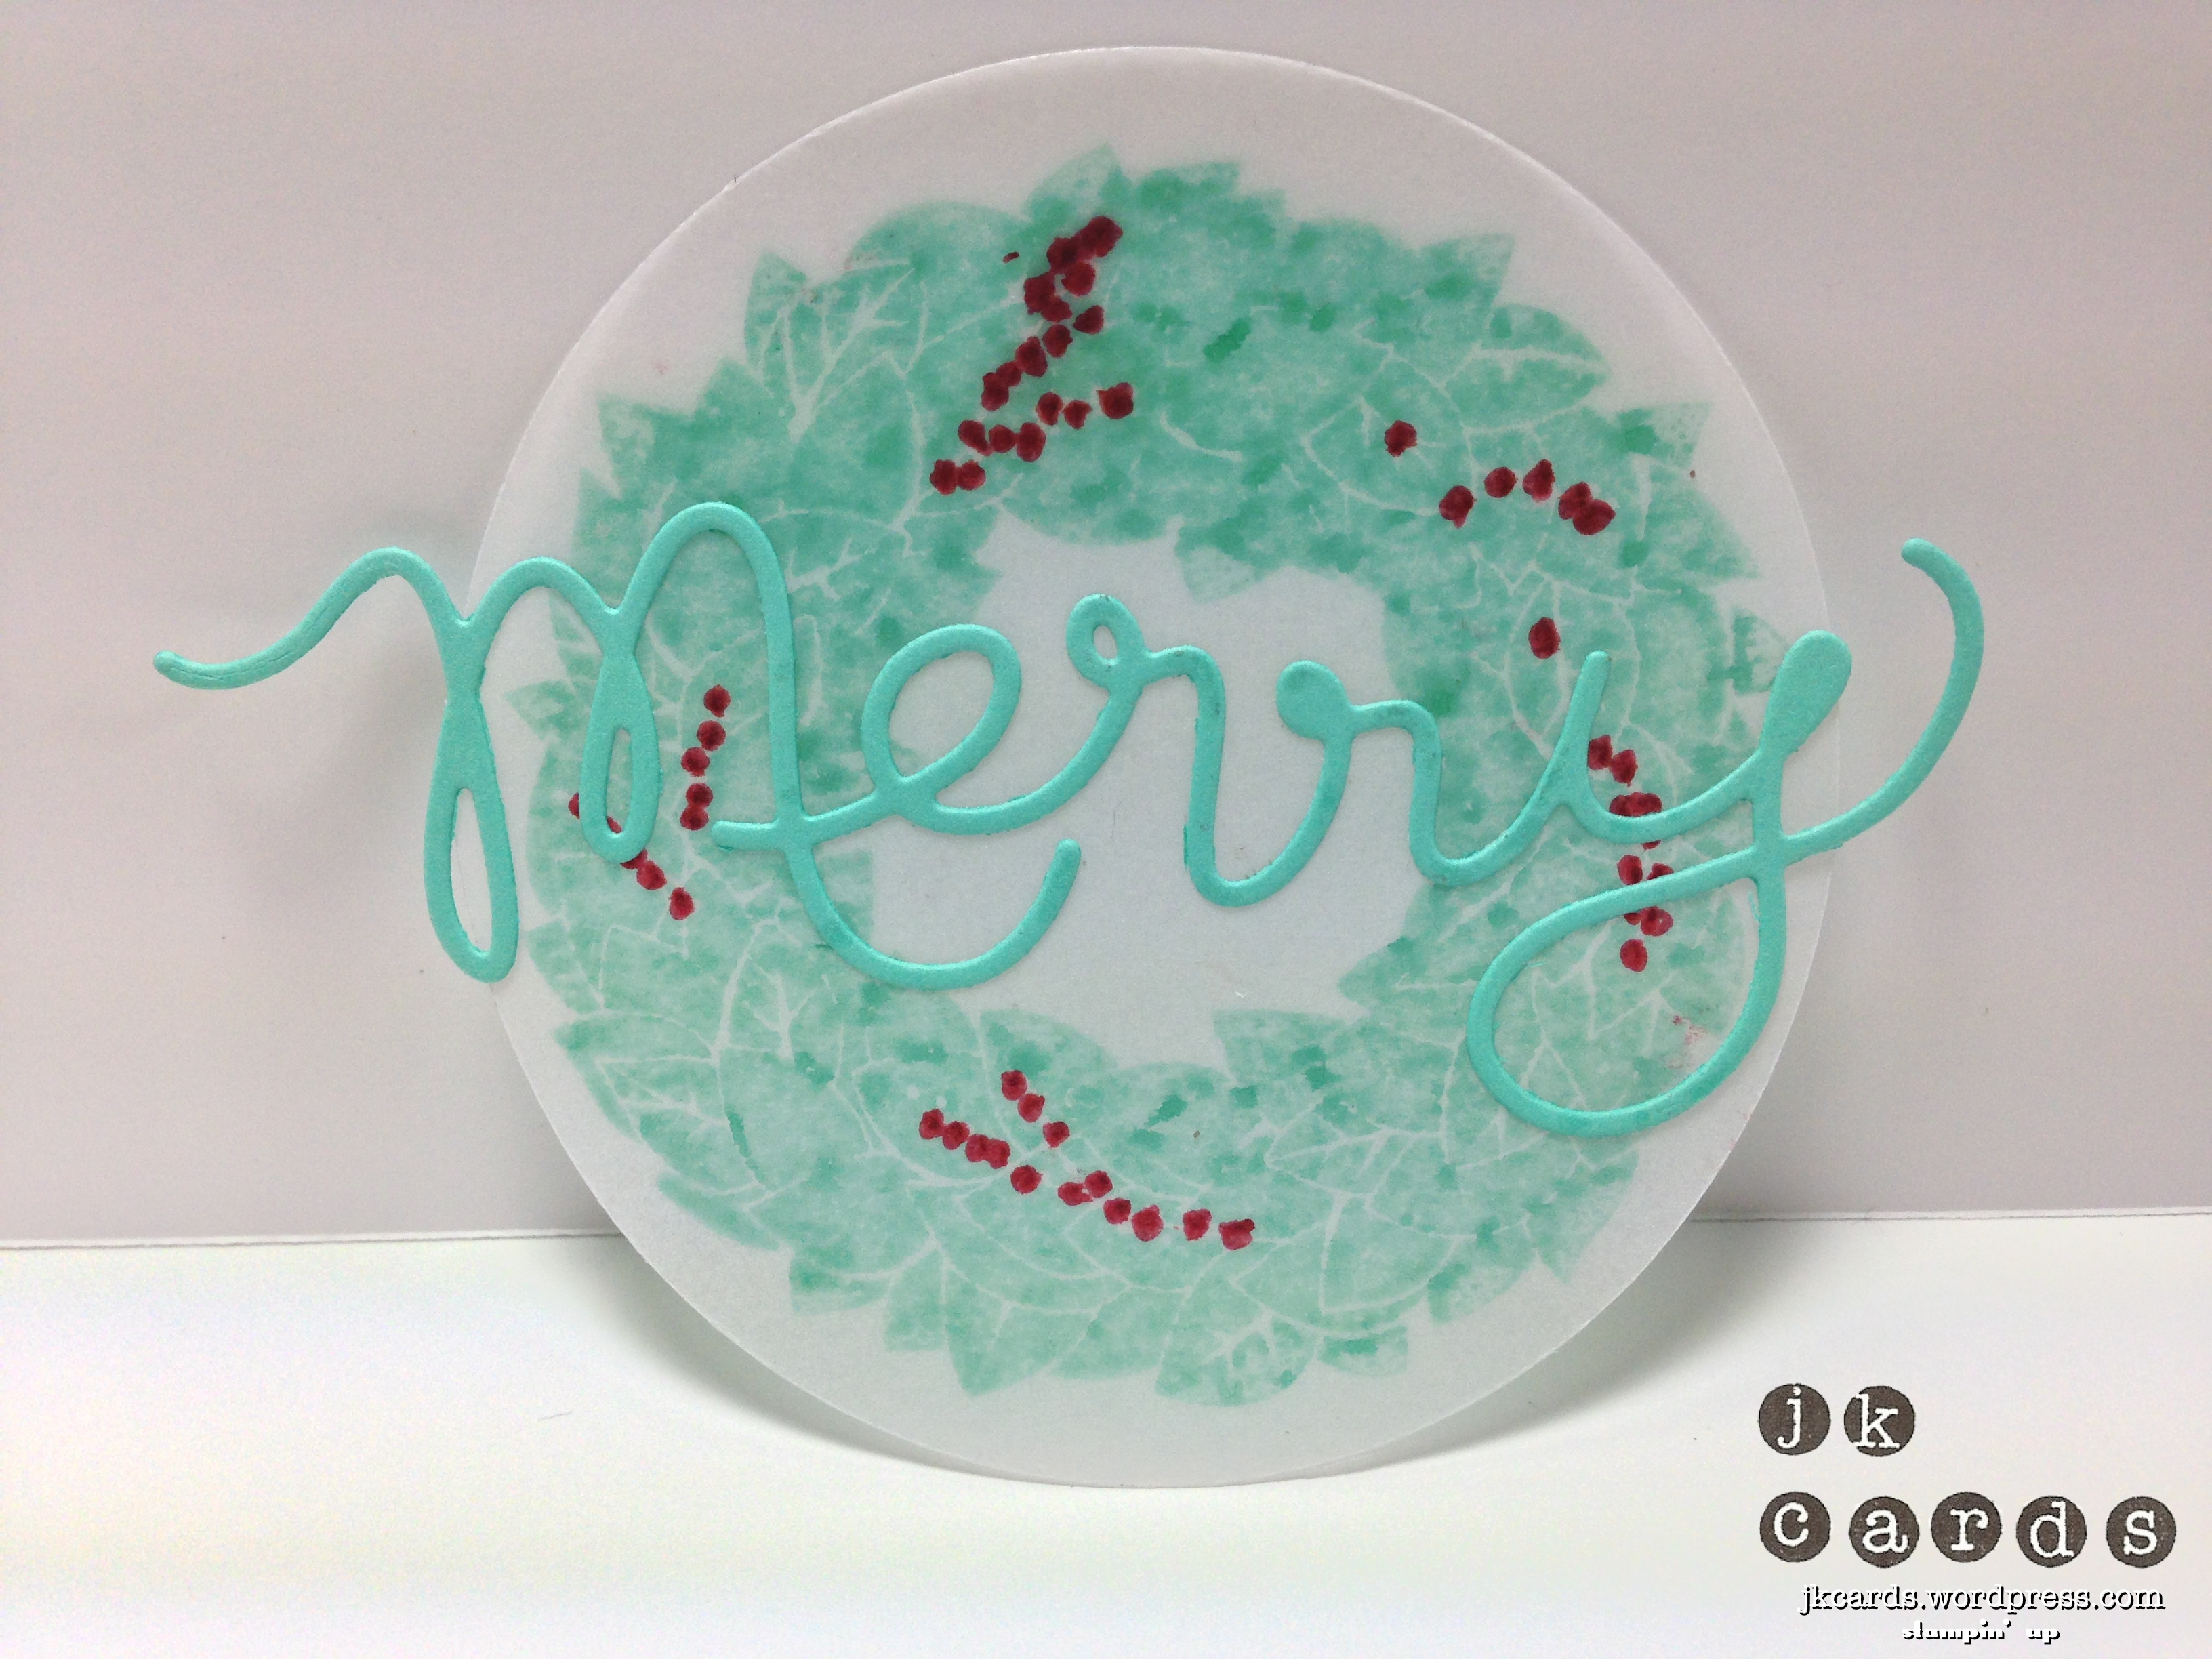
Finally I have a quick project that you could use as an ornament or to hang in a window. I stamped the Wonderful Wreath in Costal Cabana on more Vellum Card Stock and cut it out with the Circles Collection Framelits Dies. The berries are colored in with my Cherry Cobbler Stampin’ Write Marker. I used the Expressions Thinlits Dies to cut out Merry from some more Costal Cabana and adhered it to the wreath with 2-Way Glue. It looks really neat with some light behind it and could also easily be used on a card front or a gift package.

Control Freaks August Blog Tour Window Hanging

I hope that you enjoyed my card and projects for this month’s Control Freaks Blog Tour and that you are inspired to go and play with some goodies from the Holiday Catalog! Next up for you crafty pleasure we have the talented LeeAnn Greff. I’ll bet you can’t wait to see what she has in store for you! Thanks for hopping by and enjoy the rest of the tour! 🙂

clickhere2013


Stampin’ Up! products used:

Card:

Card Stock: Smoky Slate and Costal Cabana

Specialty Paper: Silver Glimmer

Ink: Costal Cabana and Smoky Slate Classic Stampin’ Ink

Stamp Sets: Festive Flurry, Joy to the World and Christmas Messages Clear Mount

Thinlits: Circle Card

Framelits: Festive Flurry

Punches: 2 1/2″ Circle and Scallop Border

Tools: Big Shot, 2-Way Glue, Stampin’ Dimensionals and SNAIL

Votive Holder:

Specialty Card Stock: Vellum

Specialty Paper: Silver Glimmer

Ink: Costal Cabana Classic Stampin’ Ink

Stamp Set: Festive Flurry

Framelits: Festive Flurry

Punch: Boho Blossom

Tools: Big Shot, Simply Scored and SNAIL

Wreath:

Card Stock: Costal Cabana

Specialty Card Stock: Vellum

Stamp Set: Wonderful Wreath

Ink: Costal Cabana Classic Stampin’ Ink

Marker: Cherry Cobbler Stampin’ Write

Framelits: Circles Collection

Thinlits: Expressions

Tools: Big Shot and 2-Way Glue

Control Freak Convention Card Swap/Holiday Catalog Tour

freakwelcome2013

Hello everyone and welcome to the Control Freaks Convention Swap/Holiday Catalog Tour. If you are going along the tour you have arrived here from the talented LeAnn Greff, she always has some amazing projects! I’m doing a little something different this time around. One of my favorite features in the Stampin’ Success Magazine that Stampin’ Up! Demonstrators get every other month is the Stepped Up article. I have two cards to share with you today and two versions of each card. The first card will appeal to you clean and simple side while the second card adds some extra for a little oomph.

My first card is actually one of my favorites. It starts off with a base of Whisper White Card Stock and I stamped the “skid marks” from the Gorgeous Grunge Stamp Set in Pear Pizzaz three times in the middle. The tag is made from a piece of Wisteria Wonder that I stamped the ampersand from the Hello, Lovely Stamp Set in Wisteria Wonder. Two butterflies are punched out from a piece of Pear Pizzaz that I stamped with the Travel Journal Builder Wheel in Pear Pizzaz and punched out with the Bitty Butterfly Punch. The greeting is from the Bitty Banners Stamp Set and is stamped in Wisteria Wonder and cut out with the Bitty Banners Framelits Dies.

CF Conv Swap Card 1

The Stepped Up version of the card adds a piece of Whisper White 1/4″ Stitched Grosgrain Ribbon to the tag and some Basic Jewels Rhinestones randomly placed. To make the whole card pop I mounted it to a base of Wisteria Wonder Card Stock. I like both versions of the card but a little bling and a base goes a long way! It’s also a great way to combine some sets you may already have with some new goodies!

CF Blog Tour Card 1 SU

The second card I have for you uses one of my favorite card stock. The base of the card is Naturals White Card Stock. I used the Tape It! Stamp Set to stamp the Washi Tape in Bermuda Bay, Baked Brown Sugar and Strawberry Slush. Up at the top is the greeting from the Label Something Stamp Set stamped in Baked Brown Sugar and punched out with the Ticket Duo Builder Punch and stapled to a piece of Bermuda Bay that was punched out with the 2 1/2″ Circle Punch and cut in half. The hexagon, from the Six Sided Sampler Stamp Set punched out with the Hexagon Punch, flower from the Flower Shop Stamp Set punched out with the Pansy Punch and the button from the Notable Notions Stamp Set punched out with the 1 1/4″ Circle Punch are all adhered to the card with Stampin’ Dimensionals. All of the images are stamped on Naturals White.

CF Conv Swap 2

The Stepped Up version includes some Basic Jewels Pearls in the center of the flower and is mounted to a base of Bermuda Bay Card Stock. Again, just a little bling and a base give the card a whole new look. I also love the way that a bunch of completely different stamp sets can have such a cohesive look!

CF Blog Tour Card 2 SU

I hope that you enjoyed my Stepped Up post for the Control Freaks Convention Swap Tour. It was such an honor to meet up with all of the Freaks at Convention in person. I’m so happy to be a part of their fun group! Now on to the your next dose of creativity with the clever Lisa Martz. Have a great time on the tour and thanks for stopping by!

clickhere2013

Stampin’ Up! supplies used

Card 1:

Card Stock: Whisper White, Wisteria Wonder and Pear Pizzaz

Ink: Pear Pizzaz and Wisteria Wonder Classic Stampin’ Ink

Stamp Sets: Bitty Banners, Gorgeous Grunge, Hello, Lovely Clear Mount and Travel Journal Builder Wheel

Framelits: Bitty Banners

Punch: Bitty Butterfly

Embellishments: Whisper White 1/4″ Stitched Grosgrain Ribbon and Basic Jewels Rhinestones

Tools: Big Shot, Stampin’ Dimensionals and SNAIL

Card 2:

Card Stock: Naturals White and Bermuda Bay

Ink: Baked Brown Sugar, Strawberry Slush and Bermuda Bay Classic Stampin’ Ink

Stamp Sets: Tape It!, Six Sided Sampler, Notable Notions, Label Something and Flower Shop Clear Mount

Punches: Ticket Duo Builder, 1 1/4″ Circle, Hexagon, Pansy and 2 1/2″ Circle

Embellishments: Basic Jewels Pearls

Tools: Stampin’ Dimensionals and SNAIL

Control Freaks June Blog Tour

freakwelcome

Hello peeps, how is your day going so far? Mine is going well. I’m very happy that it’s time for the June Control Freaks Blog Tour!! This month we are featuring products from the new 2013-2014 Catalog. If you are following the tour you have arrived here from the very clever LeeAnn Greff’s blog. Now they were some awesome projects! There are so many great new stamps and accessories I didn’t know where to begin! I have two cards and a 3D project to share with you so lets get to them.

The first card uses an eclectic mix of new goodies. The base of the card is Real Red Card Stock and the background and the piece of paper in the frame are from the I Am Me Designer Series Paper Pack. I used the new Filmstrip Stamp, stamped in Basic Gray, on top of the background. In the lower left I used one of the images from the Six Sided Sampler Stamp Set stamped in Calypso Coral. I created the frame from Whisper White and cut out the center of the frame with the Squares Collection Framelits Dies. The greeting on the top is from last month’s Paper Pumpkin Kit and the date stamp is the Epic Day This and That Rotary Stamp. I stamped the bird from the Morning Meadow Host(ess) Stamp Set and cut it out with my Paper Snips. The butterfly is from the Papillion Potpourri Stamp Set and is punched out with the Elegant Butterfly Punch. Some of the new fun Candy Dots are placed randomly on the card to finish it off. A fun trendy card that uses lots of new goodies!

Control Freaks June Tour Card 1

The second card is a newer style of card called Freestyle Collage and I got the idea from Pinterest. The base is Whisper White Card Stock. I cut the tag and the flag from some of the Gingham Garden Designer Series Paper. The frame is made the same way as the first one, using the Squares Collection Framelits and some Pear Pizzaz. The leaves of flower are Creped Filter Paper that I colored with my Sponge Dauber and Melon Mambo Ink. I used my Paper Snips to cut them out and they are adhered behind a Simply Presses Clay Flower that I colored with my Aqua Painter and Night of Navy Ink. In between is some Linen Thread for a little texture. The celebrate is from the Sketched Birthday Stamp Set and is cut out with the Bitty Banners Framelits Dies. The you is from the Fabulous Phrases Stamp Set and is punched out with the Little Labels Punch Pack. A very eclectic mix of styles and texture but I think it works. I love that Stampin’ Up! products lend themselves to so many different styles.

Control Freaks June Tour Card 2

The last project I have for you is made with one of the new Tag a Bag Gift Boxes. The tag is made from Very Vanilla Card Stock and is flagged on the bottom and the top is rounded with the 2 1/2″ Circle Punch. I stamped the & from the Hello, Lovely Stamp Set and the For You is form the Bitty Banners Stamp Set and is cut out with the Bitty Banners Framelits Dies. For the flower I used the 7/8″ Scallop Circle Punch with some Crisp Cantaloupe, they are cut halfway up and some hot glue is used to assemble it. A Very Vintage Designer button is in the middle. One of the mini clothespins from the Tag a Bag Accessory Kit holds some 7/16″ Natural Trim and Linen Thread to the tag and box. The belly band is Crisp Cantaloupe and the greeting is also from the Hello, Lovely Stamp Set. I used my Crisp Cantaloupe and Pistachio Pudding Stampin’ Write Markers to color in the stamp and punched it out with the Decorative Label Punch. It’s a perfect box to give some cookies to someone special in. 🙂

Control Freaks June Tour 3D Box

I hope that you enjoyed my projects for this month’s Control Freaks Blog Tour featuring products from the new 2013-2014 Catalog. Thank you for stopping by and you are off to see the very talented Robin Spinner’s projects. Enjoy!

tourclickhere

Stampin’ Up! products used:

Card 1

Card Stock: Real Red, Whisper White and Pool Party

Designer Series Paper: I Am Me

Ink: Calypso Coral, Pool Party and Basic Gray Classic Stampin’ Ink

Stamp Sets: Paper Pumpkin Kit, Six Sided Sampler, Morning Meadow and Papillon Potpourri Clear Mount, Filmstrip Wood Mount and Epic Day This and That Rotary Stamp

Framelits: Squares Collection

Punches: Hexagon and Elegant Butterfly

Embellishments: Subtles Candy Dots

Tools: Big Shot, Paper Snips, Stampin’ Dimensionals and SNAIL

Card 2

Card Stock: Whisper White and Pear Pizzaz

Specialty paper: Creped Filter

Designer Series Paper: Gingham Garden

Ink: Melon Mambo and Night of Navy Classic Stampin’ Ink

Framelits: Bitty Banners and Squares Collection

Punch: Little Labels Punch Pack

Embellishments: Simply Pressed Clay, Buttons & Blossoms Simply Pressed Clay Moulds and Linen Thread

Tools: Big Shot, Paper Snips, Sponge Dauber, Aqua Painter, Mini Glue Dots, Stampin’ Dimensionals and SNAIL

3D Box

Card Stock: Very Vanilla, Crisp Cantaloupe and Pistachio Pudding

Ink: Pistachio Pudding and Crisp Cantaloupe Classic Stampin’ Ink

Markers: Pistachio Pudding and Crisp Cantaloup Stampin’ Write Markers

Stamp Sets: Hello, Lovely and Itty Bitty Banners Clear Mount

Framelits: Bitty Banners

Punches: 7/8″ Scallop Circle, 2 1/2″ Circle, Decorative Label and 1 1/4″ Circle

Embellishments: 7/8″ Natural Trim, Linen Thread, Mini Clothes Pins and Very Vintage Designer Buttons

Tools: Silicone Craft Sheet, Sticky Strip, Stampin’ Dimensionals and SNAIL

Control Freaks May Blog Tour!

freakwelcome

Hello everyone and welcome to the Control Freaks Blog Tour for May 2013. The focus this month is on the goodies from the new 2013-2014 Catalog! I’m really liking the new stuff that I have had the chance to play with and my wish list is growing every time I look through the catalog again, and again! If you are following the tour you have arrived here form the incredibly talented Connie Babbert’s blog. She always has such amazing projects! Today I have two cards and a 3D project for you so let’s get to them!

First up is a card that is basically a one layer card. I used the Wildflower Meadow Background Stamp and my Stampin’ Write Markers to color it in. The colors are Gumball Green, Calypso Coral, Pool Party and Primrose Petals. After I stamped the image I used the coordinating Wildflower Meadow Textured Impressions Embossing Folder to perfectly emboss the entire stamped image, how cool is that?! The only thing left to do is to stamp the greeting from the Really Good Greetings Stamp Set in Pool Party and mount it to a piece of Pool Party Card Stock. It’s a great stamp/embossing folder combo and markered it has big impact!

Control Freaks May Blog Tour Gee Thanks Card

My second card uses the new Mosaic Madness Stamp Set with the coordinating Punch and Designer Series Paper. The main panel of the card has the border form the Mosaic Madness Stamp Set stamped in Strawberry Slush. The Quatrefancy Specialty Designer Series Paper is punched out on the top and bottom with the Mosaic Punch along with the ones on either side which were embossed with the Modern Mosaic Textured Impressions Embossing Folder and then stamped. The greeting is from the Really Good Greetings Stamp Set and has the ends flagged. There are some Basic Jewels Rhinestones on the greeting and the mosaics. Everything is stamped in Strawberry Slush which is a new In-Color. I love the monochromatic look of the card and the greeting is one of my favorites form the set.

Control Freaks May Blog Tour Strawberry Mosaic

My last project is a 3D one. I wanted to show off the new In-Colors and I thought that a vase full of flowers would be a good way to do it. All of the flowers are punched out with the Fancy Flower Punch. I used my hot glue gun to assemble them and also to fix the Vintage Faceted Designer Buttons in their center. The tag on the vase also includes the two brand new colors that are added to the color families, Smokey Slate and Soft Sky. The friends is from the You’re Amazing Stamp Set, which is also in the new catalog. I really like the new In-Colors, Costal Cabana, Baked Brown Sugar, Pistachio Pudding, Crisp Cantaloupe and Strawberry Slush and Smoky Slate is fast becoming a favorite too.

Control Freaks May Blog Tour In-Color Flowers

Control Freaks May Blog Tour In-Color Flowers Close

I hope that you enjoyed my Control Freaks Catalog Peek projects for this month’s blog tour. Now you are off to the amazing Mary Brown, hey, I think I’m a Create with Connie and Mary sandwich! LOL! She always has great projects for you! Enjoy the tour and the rest of your day! 🙂

tourclickhere

Stampin’ Up! products used:

Card 1

Card Stock: Whisper White and Pool Party

Ink: Pool Party Classic Stampin Ink

Markers: Gumball Green, Calypso Coral, Pool Party and Primrose Petals

Stamp Sets: Wildflower Meadow Background and Really Good Greetings Clear Mount

Tools: Big Shot, Stamp-a-ma-jig and SNAIL

Card 2

Card Stock: Whisper White

Designer Series Paper: Quatrefancy Specialty

Ink: Strawberry Slush Classic Stampin’ Ink

Stamp Sets: Mosaic Madness and Really Good Greeting

Embossing Folder: Modern Mosaic

Punch: Mosaic

Embellishment: Basic Jewels Rhinestones

Tools: Big Shot, Stamp-a-ma-jig, Stampin’ Dimensionals and SNAIL

3D Project:

Card Stock: Baked Brown Sugar, Crisp Cantaloupe, Pistachio Pudding, Strawberry Slush, Costal Cabana, Soft Sky, Smokey Slate and Whisper White

Framelits: Window Frames Collection

Punch: Fancy Flower

Embellishments: Vintage Faceted Designer Buttons

Tools: Paper Snips, Hot Glue Gun, Floral Stems and Glass Vase

Control Freaks January Blog Tour!

freakwelcome

Hello and welcome to the Control Freaks January Blog Tour featuring products from the 2013 Sale-A-Bration Brochure! If you are following the tour you have just arrived from Connie Babbert’s blog. She always has such awesome projects doesn’t she?!?! I have two projects to share with you today, both of them are 3D Home Decor items and I hope that you enjoy them!

First up we have a small resin frame that I picked up from a local craft store. You can do some amazing things with theses frames besides putting a picture inside. I have a fond affection for London so I was so happy to see the Phone Box in the Feeling Sentimental Stamp Set. I stamped the image in Midnight Muse on Very Vanilla Card Stock. The hellos are form the Petite Pretties Stamp Set and are stamped in Summer Starfruit. I used the Petite Curly Label Punch, also a Sale-A-Bration item, to punch them out. Across the bottom is a piece of paper from the Print Poetry Designer Series Paper Stack. To dress that up a little bit I adhered a piece of Real Red 1/8″ Taffeta Ribbon around the back. I love the standard red and blue with the pop of Summer Starfruit. How cool is that they included a punch in this year’s Sale-A-Bration?! This is a simple project that will help dress up any little nook in your home. It definitely makes me feel sentimental for merry old England!

Frame - Control Freaks 1-2013 Blog Tour

Next up we have a bird cage. I also picked this up from a local craft store but instead of a bird I thought some flowers would look nice inside. To form the base I used two circles, one in Whisper White and one in Early Espresso. In between the two layers is a piece of floral foam. The flowers are from the Madison Avenue Stamp Set and are stamped in Primrose Petals and cut out with the Floral Frames Collection Framelits Dies. The middles are stamped in Summer Starfruit and punched out with the circle from the Itty Bitty Shapes Punch Pack. For the leaves I used the Secret Garden Framelits Dies and some Garden Green. The stems are floral wire and some Mini Glue Dots hold the flowers and Multipurpose Glue holds the leaves. For the middles I used Stampin’ Dimensionals for some depth. A poke with my Paper-Piercing Tool made putting them in the base quick and easy. The stamp around the bottom of the cage is also from the Madison Avenue Stamp Set and is stamped in Raspberry Ripple. I thought it needed some butterflies so I stamped them from the Bloomin’ Marvelous Stamp Set in Pool Party and punched them out with the Petite Butterfly Punch. Some Mini Glue Dots hold them in place. I wasn’t too sure about the flowers in the bird cage but I really like the way it looks. I think this will get to hang in my kitchen to remind that spring is on it’s way!

Cage - Control Freaks 1-2013 Blog Tour

I hope that you enjoyed my projects featuring Sale-A-Bration products for the Control Freaks January Blog Tour. Now be sure to click on to my friend Sandy Mathis’ blog to see the amazing projects she has in store for you. Thanks so much for visiting, see you soon!

tourclickhere

Stampin’ Up! products used:

Card Stock: Whisper White, Early Espresso, Garden Green and Very Vanilla

Designer Series Paper: Print Poetry Stack

Ink: Primrose Petals, Raspberry Ripple, Pool Party, Summer Starfruit and Midnight Muse

Stamp Sets: Madison Avenue, Bloomin’ Marvelous, Feeling Sentimental and Petite Pretties

Embellishments: Real Red 1/8″ Taffeta Ribbon

Framelits: Secret Garden and Floral Collection

Punches: Bitty Butterfly, Itty Bitty Shapes and Petite Curly Label

Tools: Big Shot, Paper-Piercing Tool, Stamp-a-ma-jig, Multipurpose Glue, Sticky Strip, Mini Glue Dots, Stampin’ Dimensionals and SNAIL

Control Freaks December Blog Tour!

freakwelcome

Hello there! How are all of you people doing? I’m doing great, and how could I not be?! It’s time for this month’s Control Freaks December Blog Tour featuring Winter Fun! I am the first stop on the tour but you also may have arrived here from the über talented Connie Babbert’s blog. Didn’t she have some amazing projects?! I have two projects for you this time. One is a masculine box with a lodge feel and the other is a fun card that would be good for just about anything.

First up we have the box. I used one of the Kraft Gift Boxes. These are great item from the Annual Catalog. They are great to decorate with some Designer Series Paper and embellishments. I adhered some paper from the Festival of Prints Designer Series Paper Stack around the sides. I like the plaid pattern in Cherry Cobbler, Early Espresso and Early Espresso. On the top of the box I made a paper bow from some Cherry Cobbler Card Stock. It’s 3/4″ wide and if you use your Bone Folder to “curl” it a little it tends not to crease when you make the bow. On top of the bow I stacked three of the Naturals Designer Buttons, adhering them together with Mini Glue Dots. For the tag I stamped an image from the Bring on the Cake Stamp Set in Early Espresso on a piece of Very Vanilla. I punched out a piece of Cherry Cobbler with the 1″ Circle Punch, scored it down the center and adhered it to the tag with some Sticky Strip. A quick punch through the top and some Cherry Cobbler Bakers Twine to attach it to the bow and you’re done. Quick and easy, great for a masculine treat!

IMG_2173

IMG_2175

Next up we have the card. The base of the card is Whisper White Card Stock. I embossed a piece of Pool Party with the Northern Flurry Textured Impressions Embossing Folder for the background. A piece of paper from the Festival of Prints Designer Series Paper Stack is flagged and adhered to the background. The stamped image is form the Wonderful Winterland Stamp Set stamped in Basic Black. I colored it in with Island Indigo, Pool Party, Blush Blossom, Soft Suede, Sahara Sand and Pink Pirouette Stampin’ Write Markers. The 2 3/8″ Scallop Circle Punch is used to punch it out and a piece of Pool Party cut out with the Delicate Doilies Large Sizzlit Die backs it. They are mounted to each other and to the card with Stampin’ Dimensionals. The greeting is form the Itty Bitty Banners Stamp Set and is stamped in Island Indigo. I cut it out with the Bitty Banners Framelits Dies and adhered it to the card with Stampin’ Dimensional pieces. I love the little girl and bunny sharing some cocoa, a friendly little card for someone special.

IMG_0001

I hope that you enjoyed my project for the December Control Freaks Tour featuring Winter Fun. Next up we have Yvette Ash. She has some super fun projects to share with you! Thanks so much for stopping here and enjoy the rest of the projects from the Control Freaks. Have a great day! 🙂

tourclickhere

Stampin’ Up! products used:

Card Stock: Cherry Cobbler, Ver Vanilla, Whisper White, Island Indigo and Pool Party

Designer Series Paper: Festival of Prints Designer Series Paper Stack

Ink: Early Espresso, Basic Black and Island Indigo Classic Stampin’ Ink

Stamp Sets: Bring on the Cake, Wonderful Winterland and Itty Bitty Banners Clear Mount

Embellishments: Big Shot, Bitty Banners Framelits Dies, Cherry Cobbler Bakers Twine, Naturals Designer Buttons, Delicate Doilies Large Sizzlit, 1″ Circle Punch, 2 3/8″ Scallop Circle Punch, Mini Glue Dots, Sticky Strip, Stampin’ Dimensionals and SNAIL

Control Freaks October 2012 Tour!

Welcome to the Control Freaks October 2012 Tour! You are probably arriving here from LeeAnn Greff’s blog! Didn’t she have some awesome projects?!?! This month’s theme is “The Men in our Lives” featuring masculine projects. The men in my life would be my dad, my brother… oh and me! LOL! I love to do masculine projects, there are some great stamp sets that you can use. I have featured some of my favorites, Postage Due, Fine Feathers, Nature Walk and You’re Amazing. I have two 3D projects to share with you today. The first one is a box and the second one is a banner. We’ll start off with the box.

The bottom of the box is Soft Suede and the top is Night of Navy. I used my Simply Scored Scoring Tool to create it. A great tip to remember is when you go to make the lid move your card stock ever so slightly over to the right for each side. It really helps the lid fit much better. I used a piece of burlap for the background, it gives it a nice rough feel. The greeting is from the You’re Amazing Stamp Set and is stamped in Night of Navy. I used the Apothecary Accents Framelits Dies to cut it out and the Essentials Paper-Piercing Pack and the Paper-Piercing Tool to pierce around the edge. I scored the tabs and adhered them to the sides of the lid with Sticky Strip. The two tickets poking out are stamped in Soft Suede using the Take a Ticket Wheel and cut out with my Paper Snips.I flagged a piece of Night of Navy and adhered it with Stampin’ Dimensionals to the burlap. Some Champagne Glimmer Paper is punched out with the Merry Minis Punch pack and they too are adhered to the flagged piece with Stampin’ Dimensionals. The box is not overly complicated and I think makes a nice place for your dad or brother’s birthday gift!

The banner contains a lot of elements! The base of each banner consists of a piece of Not Quite Navy that is flagged on the bottom and a piece of Crumb Cake that is also flagged on the bottom and the embossed using the Fancy Fan Textured Impressions Embossing Folder. All of the letters are stamped in Not Quite Navy using the Morning Post Alphabet and cut out with my Paper Snips. On the first and last banners we have a piece of Very Vanilla that is stamped using the Travel Journal Builder Wheel in Soft Suede and then flagged on both ends. A thin piece of Not Quite Navy is flagged and placed on top of that. The stamped image is from the Postage Due Stamp Set and is stamped in Soft Suede and punched out with the Postage Stamp Punch. The rosette is made from First Edition Designer Series Paper and has a piece of Not Quite Navy and Champagne Glimmer Paper punched out with Circle Punches. The second and sixth banners have a piece of Soft Suede punched out with the 1″ Square Punch and pierced around the edge using the Essentials Paper-Piercing Pack. A piece of Not Quite Navy is flagged on each end and pierced along the middle and placed on top of that. The stamped image is from the Fine Feathers Stamp Set and is stamped in Soft Suede and cut out with my Paper Snips. In the upper corner is a piece of Not Quite Navy that is punched out with the 1 1/4″ Scallop Circle Punch and pierced around the edge. The bee is from the Nature Walk Stamp Set and is stamped in Soft Suede and cut out with my Paper Snips. The third and fifth banners have a piece of Not Quite Navy that is punched out with the Ticket Duo Builder Punch. The stamped image is from the Postage Due Stamp Set and is stamped in Soft Suede and punched out with the Postage Stamp Punch. The 3D star is cut from a pattern and scored using the Simply Scored Scoring Tool, folded and mounted on a few Stampin’ Dimensionals. Finally the center banner has a piece of Not Quite Navy  that is punched out with the Decorative Label punch and an oval is pierced in the center. The bird is from the Language of Friendship Stamp Set and is stamped in Soft Suede on Soft Suede and punched out with the Bird Builder Punch. In the upper left corner is a Vintage Faceted Button with a piece of Champagne Glimmer Paper in the center and a piece of Not Quite Navy cut out with the Bitty Banner Framelits Dies, cut in half and adhered underneath.

WOW! That was a lot of product! LOL! I really hope that you enjoy my two projects for this month’s Control Freaks Blog Tour. Don’t forget to click on the link below and visit Cindy Major to see what great projects she has in store for you! Thank you for stopping by to see me and don’t forget to leave a comment! Have a Freaky Day! 🙂

Control Freaks September 2012 Tour!

Hello everyone and welcome to the September Control Freaks Tour featuring Fall projects! I’m so excited to be a part of this incredibly talented group. If you have arrived here from the tour you have just come from Jason Casper’s site. Didn’t he have some great projects?!?! This is my first tour with the Freaks, how awesome is that?!?! I’m a little excited, can you tell?!?!

The first project I have to show you is a card. Not just any card but a 3D window card that folds flat so that you can still mail it. The base of the card is Always Artichoke Card Stock. I used a piece of Howlstooth & Scaringbone Designer Series Paper to frame the window and I also used a piece down the right side. The images in the back are from the Spooky Bingo Bits Stamp Set and are stamped in Basic Gray, Basic Black and Early Espresso. I also cut one of the tombstones out and adhered it with a Stampin’ Dimensional. The image on the piece of Window Sheet is form the Toxic Treats Stamp Set and is stamped in Jet Black Staz-On. The little moon in the upper right corner is made with Tangerine Tango and the 1″ Circle Punch. For the greeting I used the Seasonal Sayings Stamp Set stamped in Tangerine Tango and backed with a piece of Basic Black.

The next project I have to show you is a Halloween Banner. The base of all of the banners is Basic Gray, that I flagged the ends on, with a piece of Crumb Cake that is embossed with the Chevron Textured Impressions Embossing Folder. The image on the first banner is from the Toxic Treats Stamp Set and is stamped in Basic Black on Pumpkin Pie and cut out with the Labels Collection Framelits Dies. Some Basic Black is cut out using the Paper Doily Large Sizzlits Die. I cut out a piece of Basic Gray, flagged the ends and used the Essentials Paper-Piercing Pack to pierce the edges. All of the pieces are adhered using Stampin’ Dimensionals. The next three banners all have a rosette made with Howlstooth & Scaringbone DSP and my Simply Scored. The letters are form the Broadsheet Alphabet Stamp Set and are stamped in Basic Black and punched out with the 1 1/4″ Scallop Circle Punch. The flagged pieces of Pumpkin Pie are stamped with the Border Banter Stamp Set and are backed with pieces of Basic Black that are punched out with the 1 1/4″ Scallop Circle punch and paper-pierced around the edges too.

The last project I have to show you is a wreath. I used the Autumn Accents Bigz Die to cut out all of the leaves from Crumb Cake, Pumpkin Pie, Cajun Craze and More Mustard Card Stock. They are all embossed with the Woodgrain Textured Impressions Embossing Folder. I used a hot glue gun and the Silicone Craft Sheet to attach them to the wreath. The greeting is from the Seasonal Sayings Stamp Set and is stamped in Soft Suede. I flagged the ends and paper-pierced the top and bottom. The acorns are from the Wonderfall Stamp Set and are stamped in Soft Suede and adhered to the back of the greeting with some Sticky Strip. The greeting is then adhered to the leaves with Stampin’ Dimensionals.

I hope that you enjoyed your stop here on the Control Freaks September Tour. Thanks so much for visiting. Now click below to hop on over to Yvette Ashe who is your next stop on the tour and see what fun projects she has in store for you! Enjoy!!

Stampin’ Up! products used:

Card Stock: Very Vanilla, Whisper White, Basic Black, Basic Gray, Tangerine Tango, Pumpkin Pie, Crumb Cake, Cajun Craze, More Mustard and Always Artichoke

Ink: Basic Black, Basic Grey, Early Espresso and Soft Suede

Specialty Ink: Jet Black Staz-On

Stamp Sets: Toxic Treats, Spooky Bingo Bits, Broadsheet Alphabet, Border Banter, Seasonal Sayings and Wonderfall Clear Mount

Designer Series Paper: Howlstooth & Scaringbone

Other: Window Sheets

Tools: Big Shot, Chevron Textured Impressions Embossing Folder, Labels Collection Framelits Dies, 1 1/4″ Scallop Circle Punch, 1″ Circle Punch, Paper Doily Large Sizzlits Die, Autumn Accents Bigz Die, Essentials Paper-Piercing Pack, Paper-Piercing Tool, Paper Snips, Sticky Strip, Hot Glue, Stampin’ Dimensionals and SNAIL