CCMC 220

Hello everyone and welcome to Friday! I loves me some Friday! What are you all up to for the weekend? I’m going into the city on Sunday to drop off an order and see some friends. Tonight the last of my family flies back to London. It was so much fun having so many of them here all at once. I hope to see them again soon!

Today’s post is for this week’s Create with Connie and Mary Challenge. This week we have a color challenge…

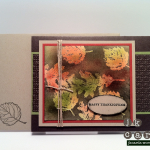
I was going to do a birthday card but at the last minute I decided that I would make a Christmas card! The base of the card is Cherry Cobbler Card Stock. I stamped a piece of Pink Pirouette with the Woodgrain Background Stamp inked in Pink Pirouette. Before I adhered it to the card I stamped the greeting from the More Merry Messages Stamp Set in Cherry Cobbler. For the flagged banners and mittens I used the Make a Mitten Stamp Set. The banners are stamped in Pink Pirouette on Whisper White, Baja Breeze on Baja Breeze and Cherry Cobbler on Cherry Cobbler. If you line the borders up they give you some really nice patterns. The mittens are stamped in Baja Breeze and backed by a piece of Whisper White that I embossed with the Northern Flurry Textured Impressions Embossing Folder after I cut it out with the Window Frames Collection Framelits Dies. I also cut out a piece of Baja Breeze and used the Festive Paper-Piercing Pack and Paper-Piercing Tool to pierce the edge. They are all mounted to the card with Stampin’ Dimensionals. I love the softness of the color combination and hope that you enjoy this week’s Create with Connie and Mary Challenge card. Thank you for stopping by and have a crafty day! 🙂

Stampin’ Up! products used:

Card Stock: Whisper White, Cherry Cobbler, Baja Breeze and Pink Pirouette

Ink: Cherry Cobbler, Baja Breeze and Pink Pirouette Classic Stampin’ Ink

Stamp Sets: Make A Mitten and More Merry Messages Clear Mount and Woodgrain Background

Tools: Big Shot, Northern Flurry Textured Impressions Embossing Folder, Window Frames Collection Framelits Dies, Mitten Builder Punch, Festive Paper-Piercing Pack, Paper-Piercing Tool, Stamp-a-ma-jig, Stampin’ Dimensionals and SNAIL

Don’t forget to check out the Anchor Rewards tab at the top. Earn 10 Anchors and get a FREE Stamp Set of your choice from any current catalog. If you purchase $150 worth of product you will be eligible for $25 in Host(ess) dollars to get one of the great new Host(ess) Sets or any other items from the NEW 2012-2013 Catalog or the NEW Holiday Catalog!

This month’s promotion is Back to Spool. Get a spool of the fantastic new In-Colors 3/8″ Stitched Satin Ribbon in Midnight Muse, Summer Starfruit, Gumball Green, Raspberry Ripple or Primrose Petals with every $40 you spend. Does not include shipping & handling or tax.

Carry On Sneak Peek

Good Saturday morning to everyone! I’m off to Manhattan today to see some of my peeps. Today’s card is a sneak peek at some of the new items from the 2012-2013 Catalog from Stampin’ Up! The set that I used for this card is called Carry On and it’s one of the new Host(ess) Sets. I really like it because the font is great and the images go with each saying. It also features two of the new In-Colors from the 2012-2014 set, Gumball Green and Midnight Muse. I started with one of the Note Card size cards for my card base. I added a piece of Basic Grey Card Stock that I ran through my Big Shot using the Perfect Polkadots Textured Impressions Embossing Folder. A piece of the new Gumball Green 3/8″ Stitched Satin Ribbon (Sneak Peek) is run down the middle from top to bottom. I stamped the greeting from the new Carry On Stamp Set (Sneak Peek) in Midnight Muse (sneak Peek 2012-2014 In-Colors) and backed it with a piece of Midnight Muse Card Stock (Sneak Peek 2012-2014 In-Colors). I then cut two 1/2″ pieces of Gumball Green Card Stock (Sneak Peek 2012-2014 In-Colors) and used the 1″ Square Punch to flag the ends and adhered them to the back. Some Stampin’ Dimensionals are used to mount it to the card. I stamped the image from the Carry On Stamp Set (Sneak Peek) in Gumball Green (Sneak Peek 2012-2014 In-Colors) and mounted it on a piece of Midnight Muse Card Stock (Sneak Peek 2012-2014 In-Colors) punched out with the 3/4″ Circle Punch. I can’t wait for you to see the new Host(ess) Sets in the catalog, I love them all! Thanks for stopping by and have an awesome day! 🙂

Stampin’ Up! products used:

Card Stock: Basic Grey, Midnight Muse (Sneak Peek 2012-2014 In-Colors) and Gumball Green (Sneak Peek 2012-2014 In-Colors) Smooth Card Stock

Ink: Midnight Muse (Sneak Peek 2012-2014 In-Colors) and Gumball Green (Sneak Peek 2012-2014 In-Colors) New Firm Foam Classic Stampin’ Pads

Stamp Set: Carry On (Sneak Peek – Host(ess)) Clear Mount Stamp Set

Embellishments: Gumball Green 3/8″ Stitched Satin Ribbon (Sneak Peek)

Tools: Big Shot, Perfect Polkadots Textured Impressions Embossing Folder, 1″ Square Punch, 3/4″ Circle Punch, Sticky Strip, Stampin’ Dimensionals and SNAIL

The Retired Accessories List is here! CLICK HERE to see it and all of the discounts on some of the products! The Retired Stamp List is here! CLICK HERE to see it and place your order for the ones that you want before May 31st!

Don’t forget to check out the Anchor Rewards tab at the top. Earn 10 Anchors and get a FREE Stamp Set of your choice from any current catalog.

Mojo 239

Happy Tuesday everyone! I’m glad to see that everyone made it through Monday. I was up early this morning to see the Stampin’ Up! 2012-2013 Catalog Demonstrator Pre-Order. I lost control just a little! But, I will have some really cool new stuff to show you next week! Now on to today’s card which is for the Mojo Monday Sketch Challenge. This weeks sketch is from Julee Tilman and she has provided us with…

Sometimes I get lucky and as soon as I see a sketch I know what I’m going to use and thankfully this was one of them. I started with a base of River Rock (a very neglected color by me) and I added a piece of Well Worn Designer Series Paper to the top. The bottom is a piece of Soft Suede that I ran through the Big Shot with the Vintage Wallpaper Textured Impressions Embossing Folder. Across the middle is a piece of Early Espresso to which I tied a piece of Soft Suede 3/8″ Satin Ribbon. The greeting is from the Word Play Stamp Set and is stamped in Soft Suede on a piece of Very Vanilla Card Stock. I used the Curly Label Punch to punch out a piece of River Rock and adhered half of it to the back of the greeting, that was then adhered to the card with Stampin’ Dimensionals. Even with the ribbon this would still make a nice masculine birthday card. I love the Well Worn DSP and am going to miss it and it’s very masculine appeal. But I’m sure that there will be something equally as nice to replace it in the new Catalog. Have a nice day and thank you for dropping by. 🙂

Stampin’ Up! products used:

Card Stock: River Rock, Soft Suede, Early Espresso and Very Vanilla Smooth Card Stock

Ink: Soft Suede Classic Stampin’ Ink

Stamp Set: Word Play Clear Mount

Designer Series Paper: Well Worn

Embellishments: Soft Suede 3/8″ Satin Ribbon

Tools: Big Shot, Vintage Wallpaper Textured Impressions Embossing Folder, Curly Label Punch, Sticky Strip, Stampin’ Dimensionals and SNAIL

The Retired Accessories List is here! CLICK HERE to see it and all of the discounts on some of the products! The Retired Stamp List is here! CLICK HERE to see it and place your order for the ones that you want before May 31st!

Don’t forget to check out the Anchor Rewards tab at the top. Earn 10 Anchors and get a FREE Stamp Set of your choice from any current catalog.

Techniques Workshop Take 2

Last night was my favorite night of the month! We went to our Techniques Workshop hosted by the super talented Sandy (stampwithsandy.com). For this class we covered three different techniques using heat embossing. The first one was just basic heat embossing using VersaMark and the gorgeous Stampin’ Up! Pewter Embossing Powder. The stamp set is from the Holiday Mini and is called Bright Hopes. It’s perfect for heat embossing because it has that regal look about it. The second project was Stained Glass. For this one we stamped onto Vellum with VersaMark and heat embossed with Black Embossing Powder. We then use the Stampin’ Up! Write Markers to color in the image. The stamp set is Delicate Doilies and is perfect for this technique. For our third project we did Emboss Resist. For this we used the Gently Falling stamp set from the Holiday Mini. First the Very Vanilla Card Stock was sponged with multiple colors and then stamped with VersaMark. We heat embossed using Clear Embossing Powder. To complete the effect we sponged on some Early Espresso and then went over the clear embossing with a paper towel. The effect is quite stunning. Pictures of all of the cards are posted below. I can’t wait for next month’s class!! Thanks, as always to Sandy and thanks for looking.

Little Square Inspiration.

I was looking around the Stampin Pretty blog (www.stampinpretty.com) and I came across a tutorial on how to make a Pizza Box for 3 x 3 cards. I sat down and made these two set over the weekend. The first one is made with the Stampin’ Up1 Retired Punch Bunch Clear Mount Set. I like the color combination because I think that anything that is black with cream or white tends to have a very elegant look about it. The second set is Holiday theme. I like the red and kraft paper together, I think it gives it a very homey feel. I use an EK Tools Postage Stamp Edger and some old Seasons Greetings stamp that I have had for ages. I also made the envelopes! I’m really happy with the way the projects came out and I can’t wait to make some more. Thanks for the tutorial Mary!