Techniques Workshop Take 2

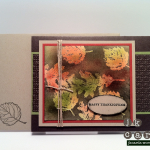
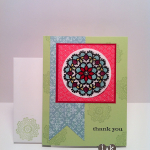
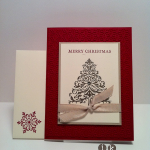
Last night was my favorite night of the month! We went to our Techniques Workshop hosted by the super talented Sandy (stampwithsandy.com). For this class we covered three different techniques using heat embossing. The first one was just basic heat embossing using VersaMark and the gorgeous Stampin’ Up! Pewter Embossing Powder. The stamp set is from the Holiday Mini and is called Bright Hopes. It’s perfect for heat embossing because it has that regal look about it. The second project was Stained Glass. For this one we stamped onto Vellum with VersaMark and heat embossed with Black Embossing Powder. We then use the Stampin’ Up! Write Markers to color in the image. The stamp set is Delicate Doilies and is perfect for this technique. For our third project we did Emboss Resist. For this we used the Gently Falling stamp set from the Holiday Mini. First the Very Vanilla Card Stock was sponged with multiple colors and then stamped with VersaMark. We heat embossed using Clear Embossing Powder. To complete the effect we sponged on some Early Espresso and then went over the clear embossing with a paper towel. The effect is quite stunning. Pictures of all of the cards are posted below. I can’t wait for next month’s class!! Thanks, as always to Sandy and thanks for looking.

Little Square Inspiration.

I was looking around the Stampin Pretty blog (www.stampinpretty.com) and I came across a tutorial on how to make a Pizza Box for 3 x 3 cards. I sat down and made these two set over the weekend. The first one is made with the Stampin’ Up1 Retired Punch Bunch Clear Mount Set. I like the color combination because I think that anything that is black with cream or white tends to have a very elegant look about it. The second set is Holiday theme. I like the red and kraft paper together, I think it gives it a very homey feel. I use an EK Tools Postage Stamp Edger and some old Seasons Greetings stamp that I have had for ages. I also made the envelopes! I’m really happy with the way the projects came out and I can’t wait to make some more. Thanks for the tutorial Mary!

Cool Seasons Greetings

And by cool I mean color wise! This is a nice simple card that has a wintry feel about it. I used the new EK Tools Snowflake Layering Punch. I really like the layering punches, they give you a great look with minimal effort. I also used another one of my favorites, the CuttleBug Snowflake Embossing Folder for the background. The stamp I actually found in a box from years ago, still in great shape and very nice. For a final subtle touch, a nice thin natural string bow. I’m looking forward to making many more holiday  cards!

Mojo Monday 207

It seems like forever since the last Mojo Monday, but it’s only been two weeks. I’m glad that they are back and hope they all had a nice vacation! This weeks sketch challenge is a nice one. I love all of the pieces that are on the card. I have been trying to get into the Christmas spirit early this year so I can start making my Christmas cards now. This sketch was a perfect one for a holiday card. I used the CuttleBug Snow Embossing Folder for the background and the red rectangle. I also used the CuttleBug Dots Embossing Folder for the oval. The homemade “designer” paper was made using a Martha Stewart Holiday stamp set that I got from Michael’s in March for $.01! It has bout 14 stamps in it. I also used it for the Season’s Greetings. The Holly and Snowflakes are Mini EK Tools punches. I love all of the texture on the card. I think it gives it a nice warm feeling. Thanks for looking!

Techno Stamper Sketch Challenge 191

It’s been really cold the past few days so it’s making think about saying goodbye to summer and getting ready for the holidays. I’m not really a big fan of the winter, especially not the snow. The holidays however are one of my favorite times of the year. This weeks Techo Stamper layout is quite nice. I’m starting to make a few more holiday cards and I really love my little GingerBread Man Punch from EK Tools. He’s such a happy little guy. I used the CuttleBug Snowflake Embossing Folder and I stamped the “ribbon” with an Inkadinkado snowflake stamp. The Scalloped Circle Punch from EK Tools was the perfect size for the right side background. I finished it off with the 1 inch Scalloped Circle Punch and Snowflake punch from EK Tools. I can almost smell the gingerbread when I look at him!

Pals Paper Arts 110

This weeks Pals Paper Arts Challenge is a Halloween card. This is my second one, I did a Halloween theme for one a few weeks ago. I decided on a more subtle orange black and kraft paper color scheme. I used the Wavy Circle and Zig Zag Chain Edger Punches from EK Tools and Martha Stewart Embossed Pumpkin Double and Bats Punches. The stamps are from Inkadinkado and studio g. Happy Haunting!

First Holiday Card of the Year

It’s hard to believe that the summer is gone and the days are getting shorted and the weather a little cooler. Before you know it the holidays will be upon us so I decided that I would get myself started on Christmas cards. I love the Gingerbread Man Punch from EK Tools, it’s a builder punch so all you need to do is punch out a few different colors and assemble your gingerbread man. I love the traditional holiday colors of red and white. I’m also liking buttons a lot lately. The postage stamp edge punch is something that I have been looking for for a while and I was happy when I found it in Michael’s! Finally the stamp is from a Martha Stewart Holiday set from last year that I got for a penny! He almost looks good enough to eat!

Mojo Monday 206

I really liked the layout for this weeks Mojo Monday. I decided that this would be the perfect layout for my very first Halloween card. I didn’t think I would like the square card but I do. I used some studio g Halloween stamps for the Skelly-Kids, spider web and lettering. Martha Stewart Crafts spider web edge punch made a great dividing line. The three black brads on the green rectangle complete the card. Hope you like it!