OSAT Blog Hop – Halloween & Fall

OSAT Header

Buy panerai replicas watches Cheap Automatic Watches clone watch Cheap Designer fake watches Gold replica jacob watches sale usa best rolex replica replica With 68 percent Discount Cheap replica hamilton tank watches Free Shipping

Hello! I hope that you are all having a good week! I had a nice day yesterday hanging out at The Ink Pad in Manhattan with Anna. You get to meet some really interesting people in a stamp store in the West Village! It was another beautiful day, the sun was shining and it was nice and warm! When I got home I had a sandwich with some ham, cheese and Salad Cream that I brought back from England, delicious! Then it was time for TV and bed!

Today I’m participating in a blog hop with a bunch of my friends from one of the Facebook groups that I belong to. It’s called One Stamp at a Time Cards and More. The focus this month is Halloween! If you have arrived here from Raquelle Clifton welcome! She had some great projects, didn’t she?! I have two cards and a fun treat bag for you today so let’s get to it!

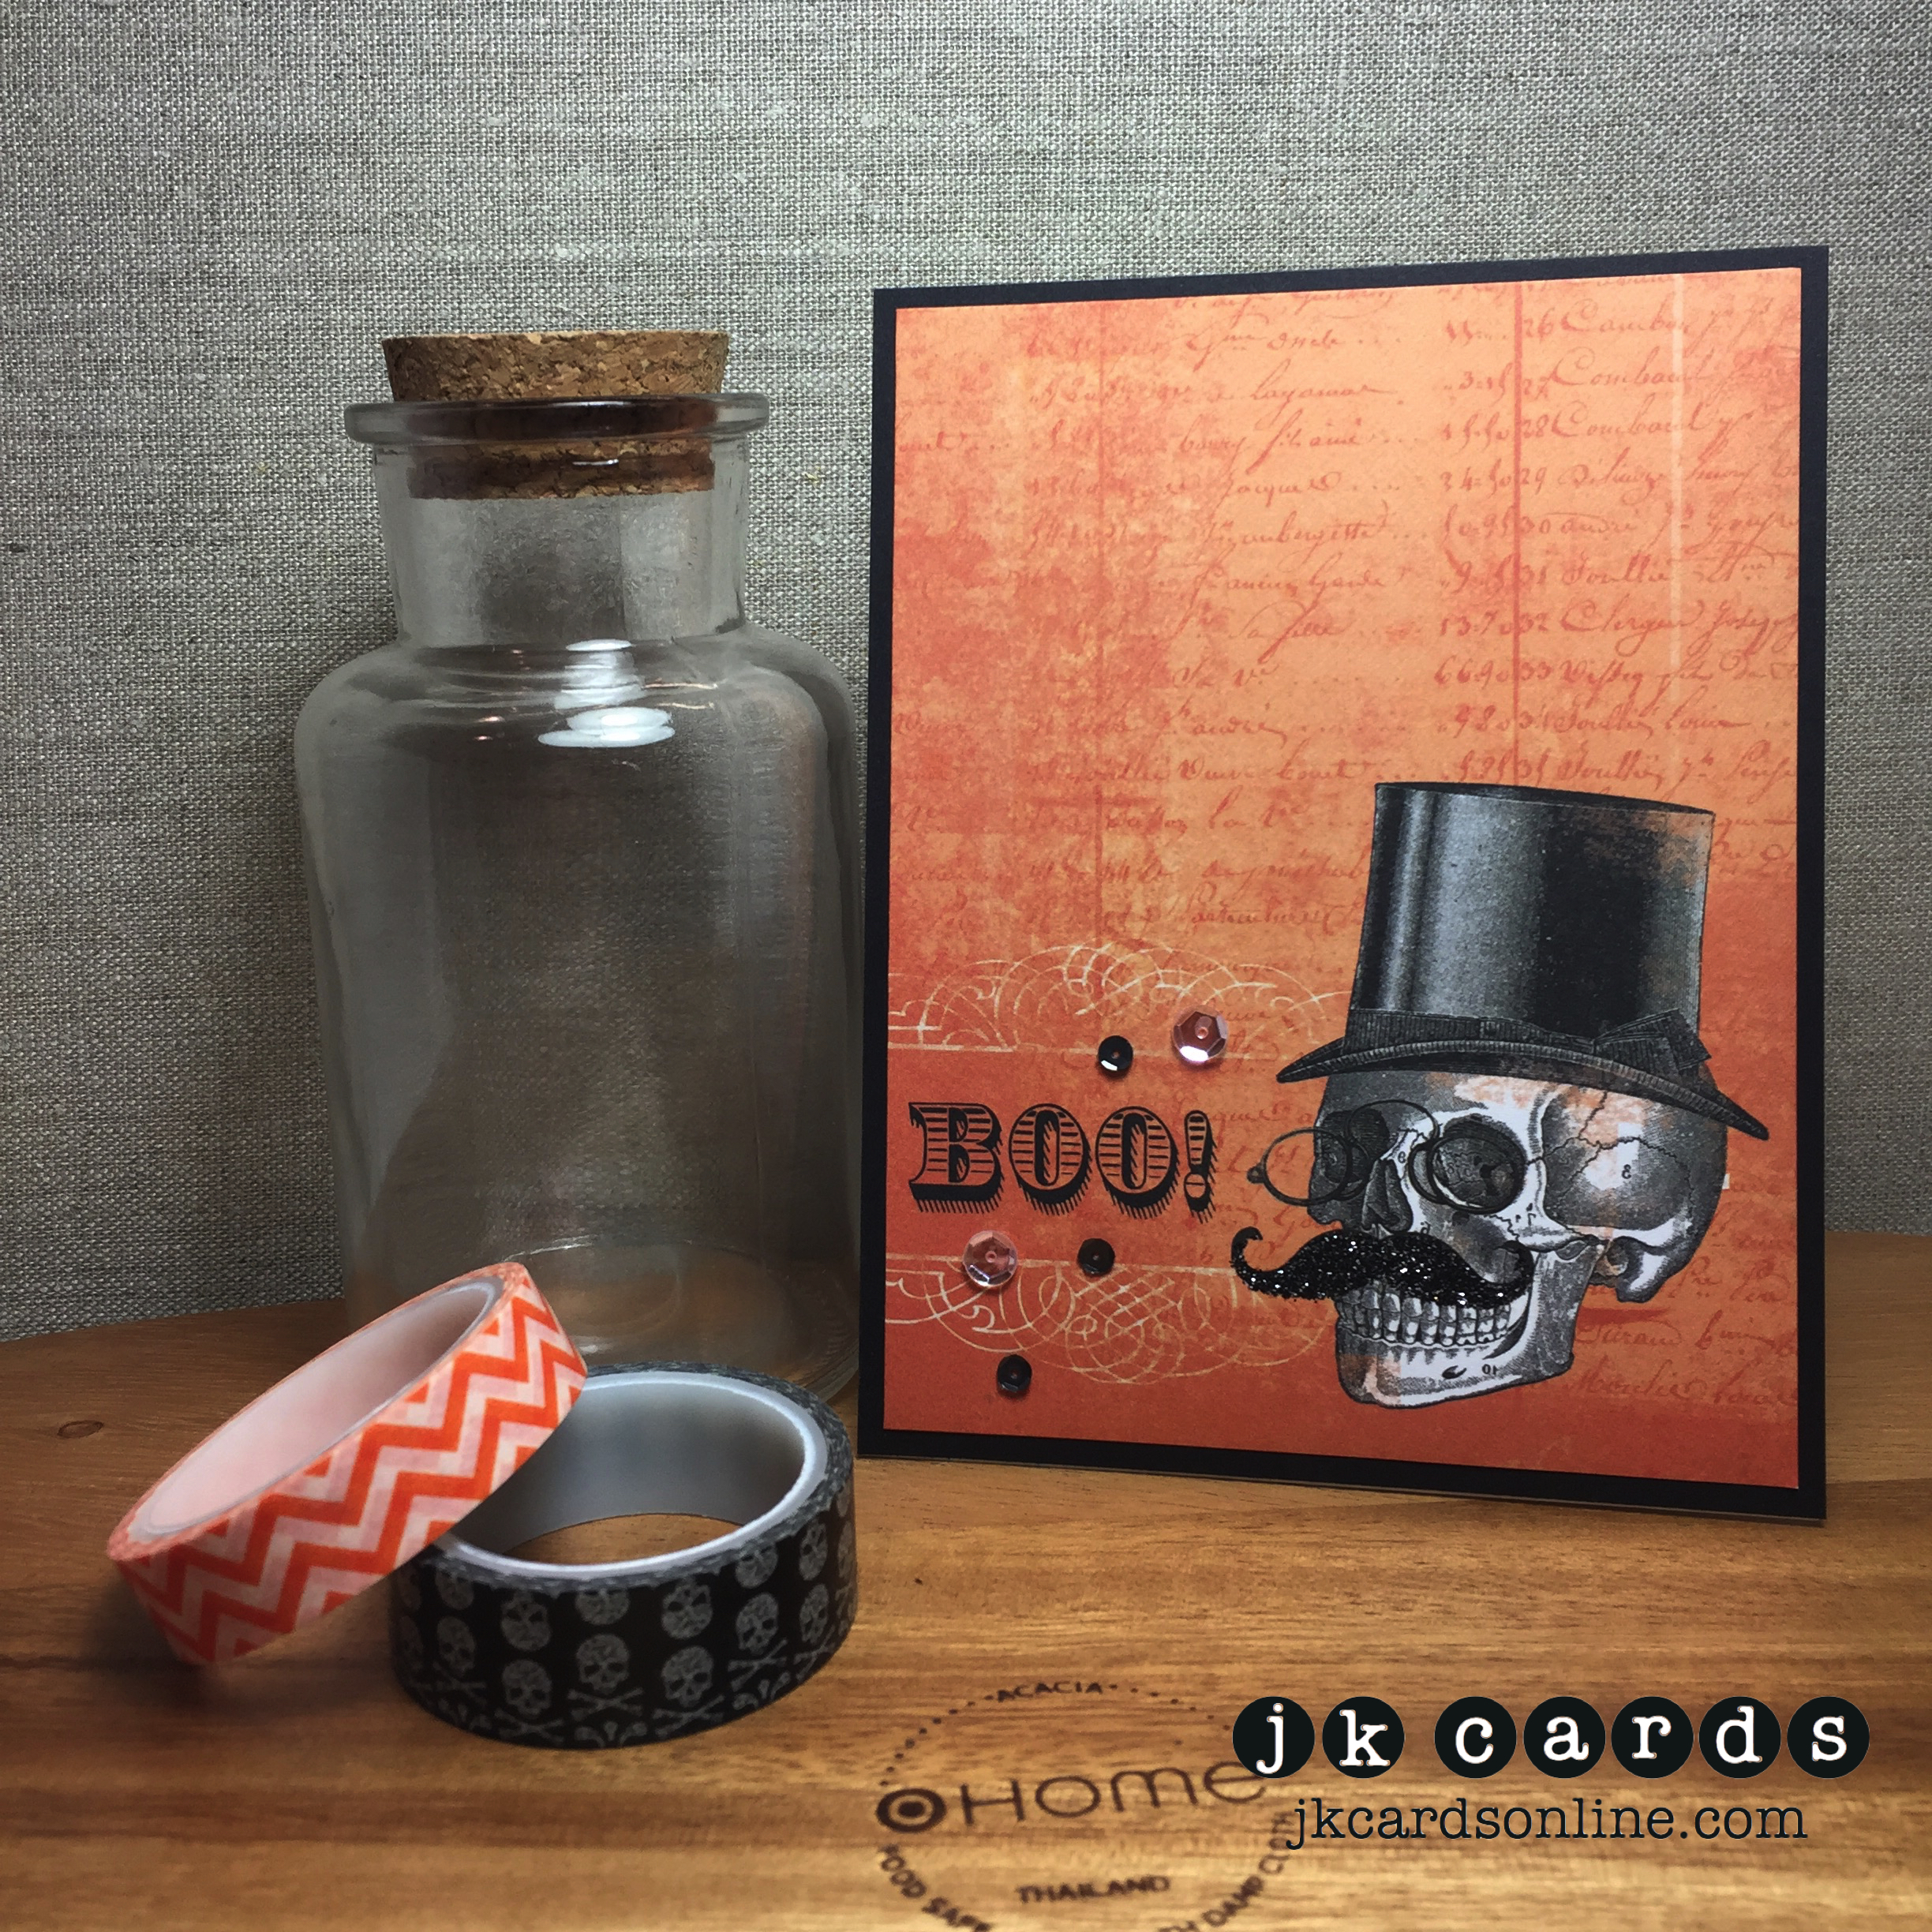
First up is a super simple card, probably the simplest card that I have ever made! The card base is Neenah Solar White 110lb Card Stock with the front covered in a piece of Black. I used a piece of paper from the My Mind’s Eye Something Wicked 6×6 Paper Pad and adhered it to the card with Fun Foam and SNAIL. A few Pretty Pink Posh Charcoal and Sparkling Clear Sequins and done! It’s not often that you can find a piece of pattered paper that doesn’t need anything else! Love the sparkly mustache and top hat on the skull too!

OSAT October Blog Hop Dapper Skull Card-WM

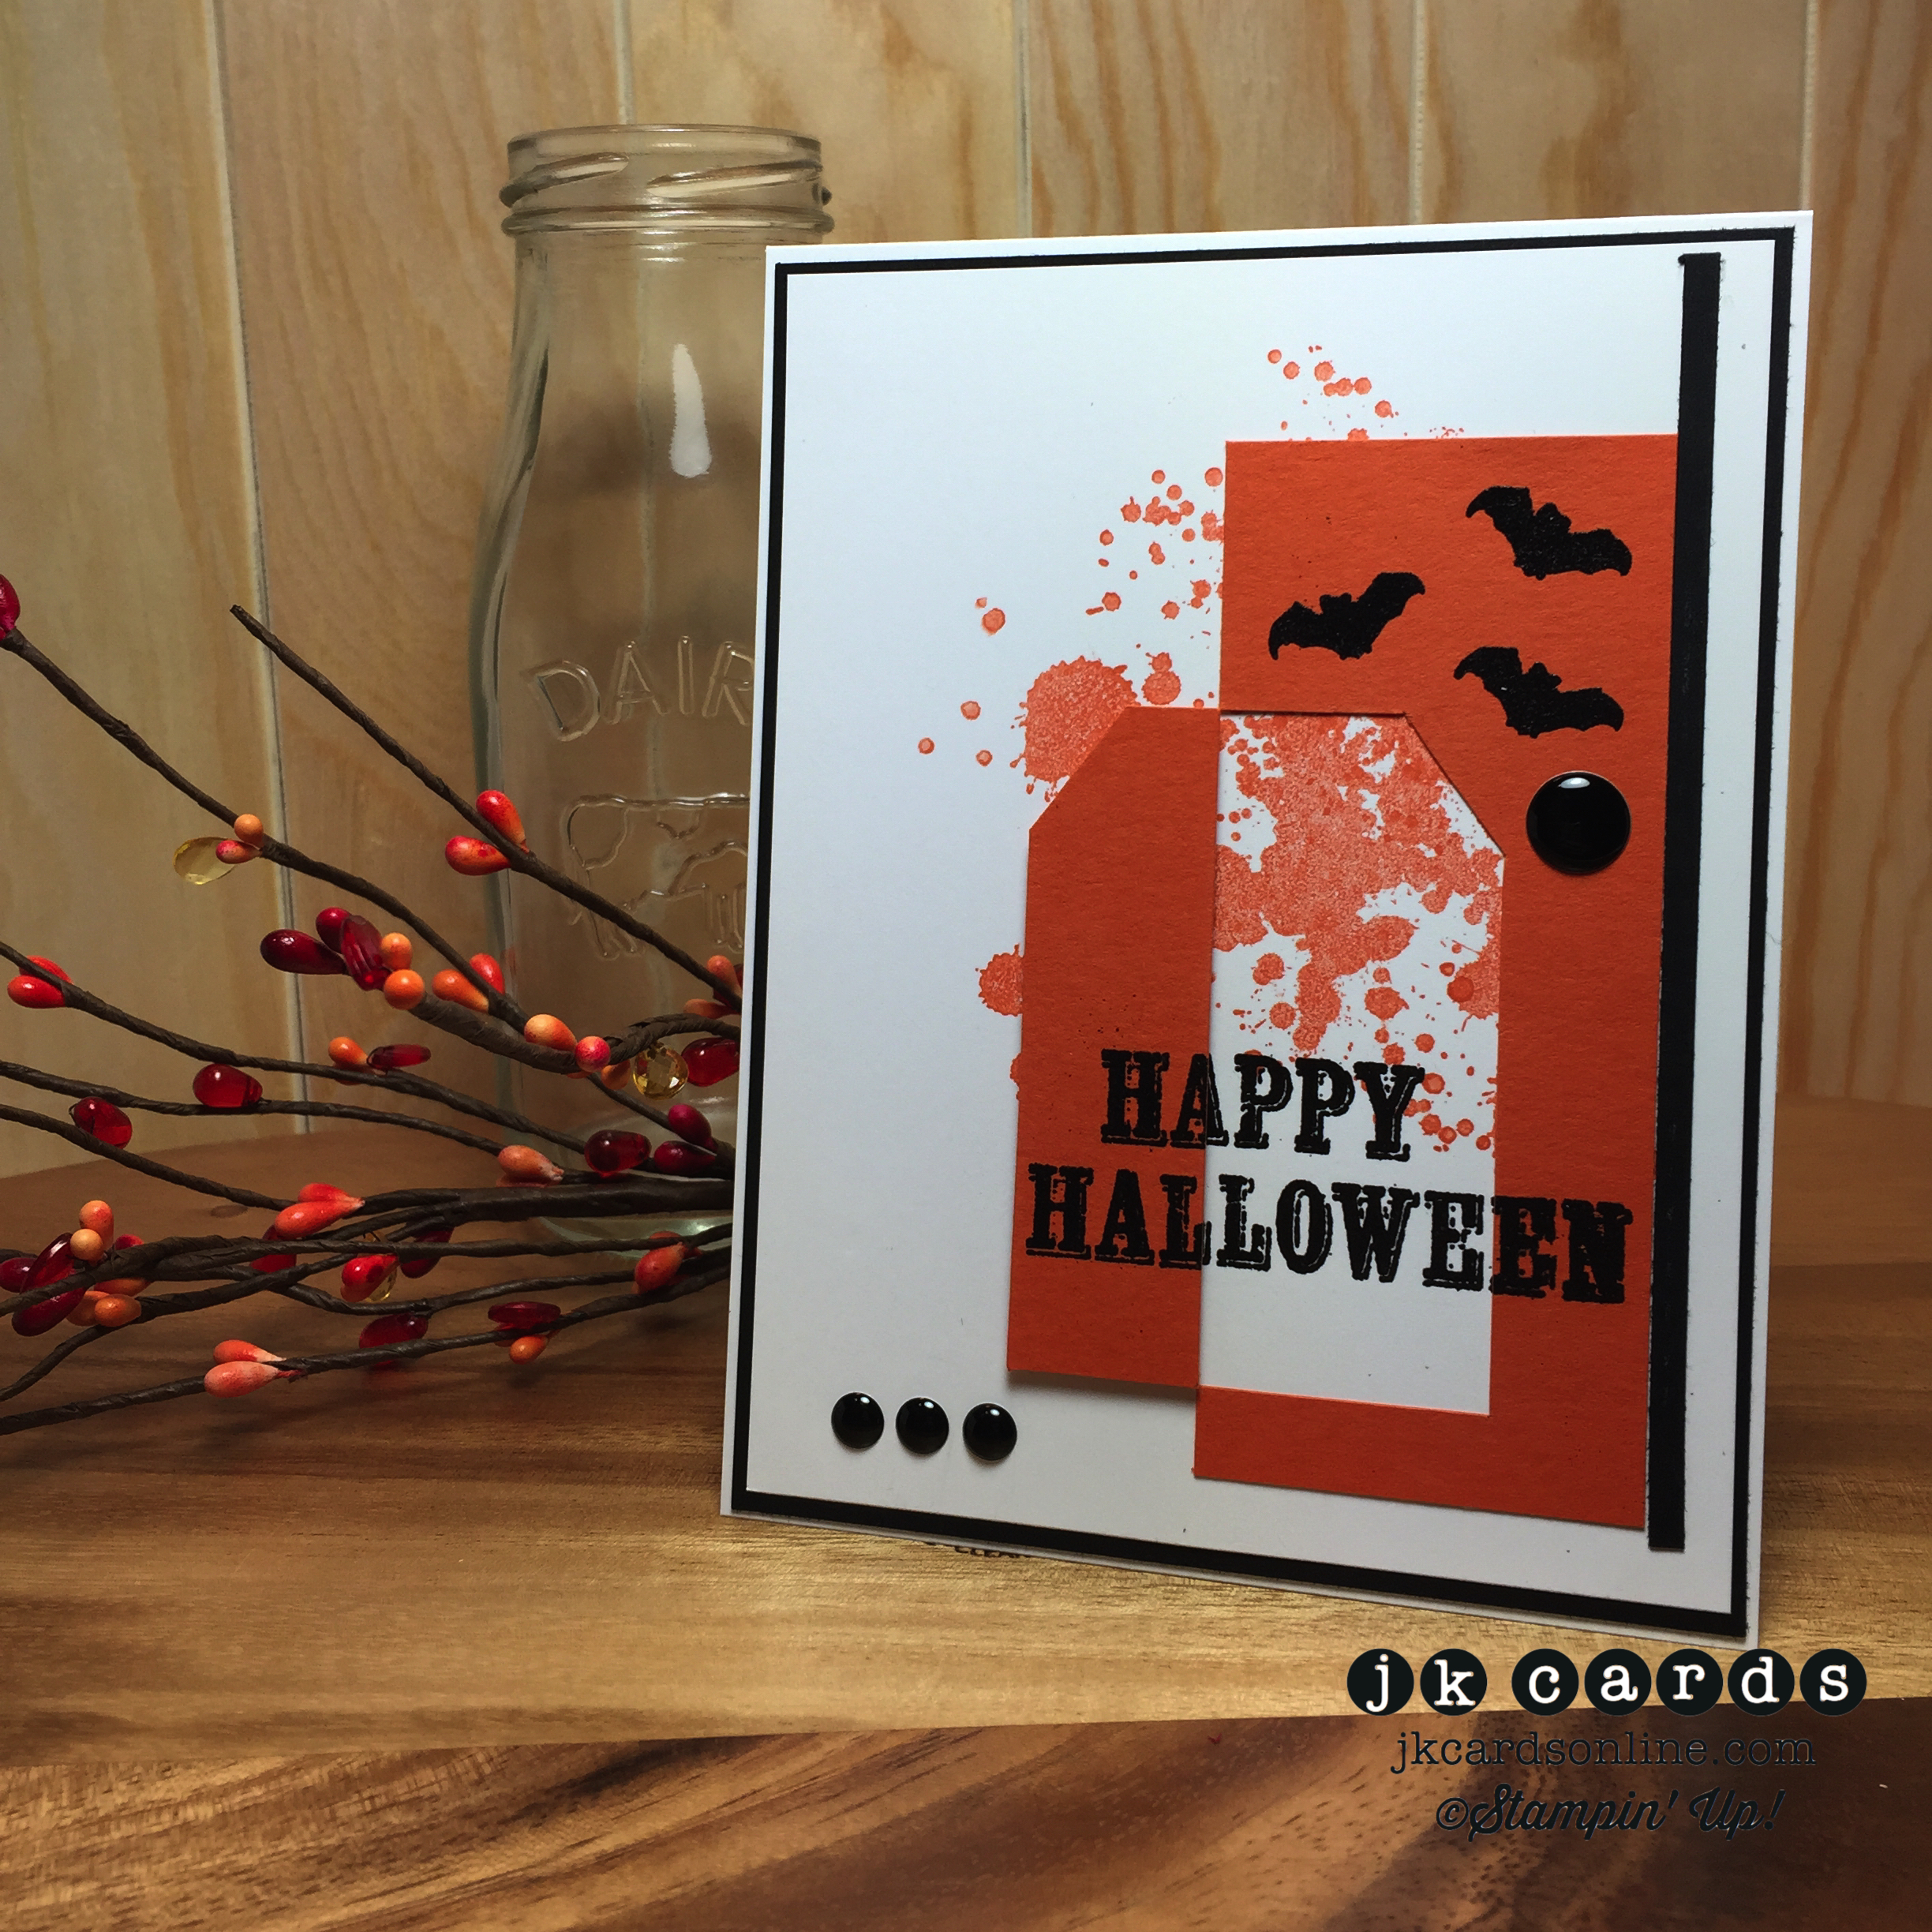
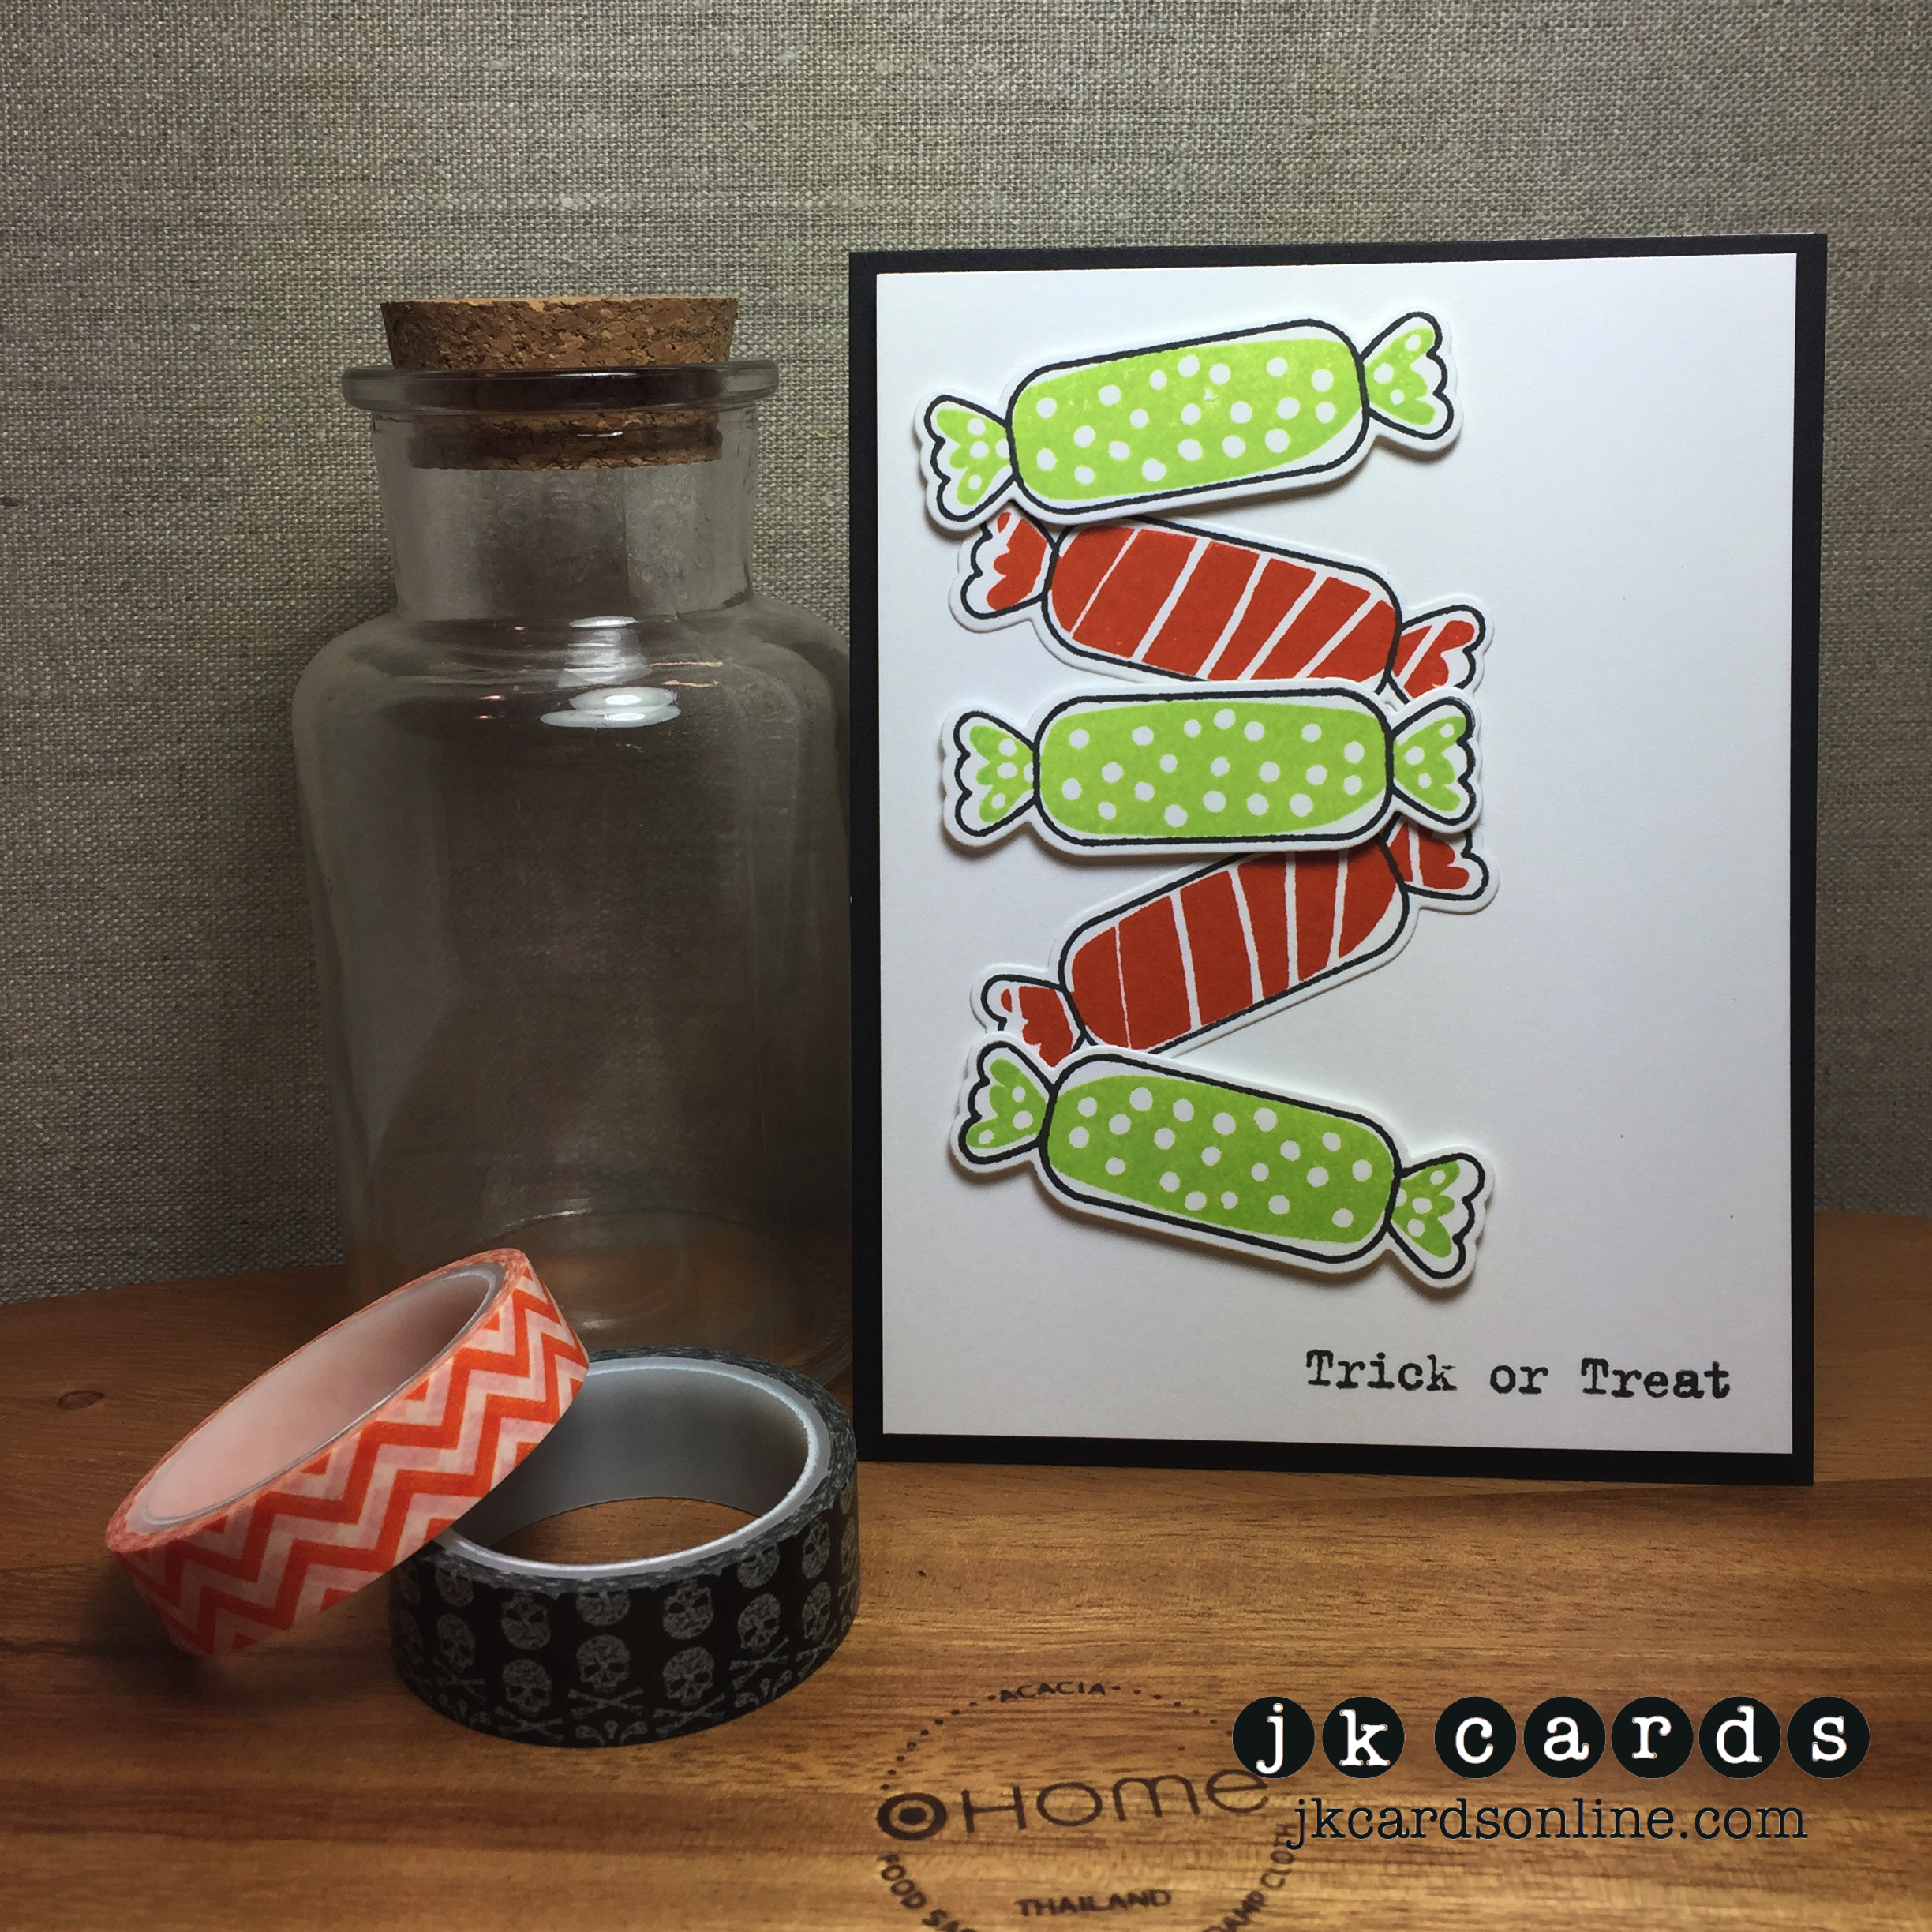
The second card has the same base and also a piece of Black covers the front. A simple piece of Neenah Solar White 80lb Card Stock is the background with a “Vintage” Paper Pumpkin stamp for the greeting. My candies are from the Exclusive Simon Says Stamp with Waffle Flower How We Roll Photopolymer Stamp Set. They are stamped in Simon Says Stamp Jellybean Ink and Stampin’ Up! Tangerine Tango Classic Stampin’ Ink with the outlines stamped in Memento Tuxedo Black. I cut them out with the Coordinating Die and adhered them to the card with SNAIL and Foam Tape. I love those brightly colored candies!

OSAT October Blog Hop Candy Card-WM

Last but not least is my treat bag! I used the Lawn Fawn Goodie Bag Die and some Black 100lb Card Stock for the bag itself. Before I assembled it I cut out a circle from the front with the Lawn Fawn Stitched Circles Dies and adhered a piece of Window Sheet to the inside. Some 1/4″ Score Tape is used to assemble the bag. My ghost is stamped in Memento Tuxedo Black and colored in with Copics, he is form the Lawn Fawn Booyah! Photopolymer Stamp Set. I used the coordinating Lawn Fawn Booyah! Lawn Cuts to cut him, the bow tie and bag out. Some Foam Tape adheres him to the card and the bow tie to him, a little dab of Multi-Matte Medium adheres the bag. For the BOO I used the Lawn Fawn Owen’s ABC’s Photopolymer Stamp Set, stamped them in Tangerine Tango and cut the out with the Coordinating Dies. Some more Foam Tape adhered them to the treat bag. Fill it with some candy and you’re all set for your trick or treaters!

OSAT October Blog Hop Booyah Treat Bag-WM

I hope that you enjoyed my cards and treat bag for the OSAT Halloween Blog Hop! You can click on the button below to continue on with the tour and you will go on to see what Lori Mueller has come up with! Thank you so much for stopping by to see me today. Have a thoroughly awesome Thursday! 🙂

OSAT Next

Products used:

Dapper Skull Card:

Card Stock: Solar White 110lb (Neenah) and Black 100lb (Recollections)

Pattered Paper: Something Wicked 6×6 Pad (My Mind’s Eye)

Embellishments: Charcoal and Sparkling Clear Sequins (Pretty Pink Posh)

Adhesives: SNAIL and Multi-Matte Medium (Ranger)

Tools: Fun Foam

Candy Card:

Stamp Sets: Paper Pumpkin (Vintage/Stampin’ Up!) and How We Roll (Simon Says Stamp with Waffle Flower Exclusive)

Ink: Memento Tuxedo Black, Jellybean (Simon Says Stamp) and Tangerine Tango (Stampin’ Up!)

Card Stock: Solar White 110lb and 80lb (Neenah) and Black 100lb (Recollections)

Dies: How We Roll (Simon Says Stamp with Waffle Flower Exclusive)

Adhesives: SNAIL and 3M Foam Tape

Tools: Big Shot and Fun Foam

Booyah! Treat Bag:

Stamp Sets: Booyah! and Owen’s ABC’s Photopolymer (Lawn Fawn)

Ink: Memento Tuxedo Black and Tangerine Tango (Stampin’ Up!)

Markers: Copics

Card Stock: Solar White 80lb (Neenah) and Black 100lb (Recollections)

Specialty: Window Sheet (Stampin’ Up!)

Dies: Booyah!, Owen’s ABC’s, Goodie Bag and Stitched Circles Lawn Cuts (Lawn Fawn)

Adhesives: SNAIL, 1/4″ Score Tape and 3M Foam Tape

Tools: Big Shot and Fun Foam

Piglet MAT

Mojo Monday 408 and More Manhattan!

Well, I had THE best 4 days off! My weekend was fantastic! Yesterday morning Maggie said our goodbyes to Kim and Maggie and headed downtown to have breakfast with Michael. Around 12:30 I walked Maggie to the Subway so she could get to JFK for her flight back to Cali. It was so nice to have Maggie here with me, love her to pieces. She is so happy and funny and I’m glad that she got to meet Michael and Kim! I can’t wait for her to come back!! It was also a lot of fun working at The Ink Pad with Michael. So many people from different countries stop in. We met a sweet lady from France who gave us some really cool tags that she used as business cards! After we closed the store we took a nice long walk along the Hudson and watched all of the boats and people. So relaxing and it was a gorgeous evening. I dropped Michael off in Midtown and then headed home. I really didn’t want to weekend to end! As promised here are some pictures that I took from the High-Line yesterday. It was an amazing sunset!

Albert High-Line

Albert Einstein on the side of a building, now that’s just cool!

High-Line Sunset 1

Just a sliver between the buildings.

High-Line Sunset 2

Look at that sun!

One good thing about Monday’s, it’s time for this week’s Mojo Monday sketch…

Mojo408

Oh how I love a tall & skinny! LOL! My card base is Neenah Solar White 110lb Card Stock and the background is a piece of paper from the Typeset Designer Series Paper Pack. Across the lower half is a piece of Pear Pizzaz that I used the Simon Says Stamp Bundle of Stitched Shapes dies along the top and bottom. My main panel is a piece of Basic Black that is cut out with the Simon Says Stamp Stitched Rectangles Dies with another piece of Typeset DSP on top. I adhered a sliver of Basic Black along the bottom and then adhered the panel to the card with Fun Foam and SNAIL. The neat cup is from this month’s Paper Pumpkin Kit and is stamped in Memento Tuxedo Black and the succulent in Pear Pizzaz. It’s cut out with the Simon Says Stamp Stitched Circles and adhered to the card with more Fun Foam and SNAIL. I say it all the time but I really do love the stamps in the Paper Pumpkin Kits! I hope that you enjoyed my Design Team card for this week’s Mojo Monday sketch challenge! Take a minute to head on over the blog and check out the rest of the Design Team’s cards and enter yours in the gallery! Oh, I hope that you enjoyed the pictures too, I’ll have some more tomorrow! I will also be catching up on my comments today, thanks for writing! Have a magnificent Monday! 🙂

Mojo Monday 408-JK-WM

Products used:

Stamp Set: July Paper Pumpkin (Stampin’ Up!)

Ink: Pear Pizzaz Classic Stampin’ Ink (Stampin’ Up!) and Memento Tuxedo Black

Card Stock: Solar White 110lb and 80lb (Neenah), Basic Black and Pear Pizzaz (Stampin’ Up!)

Designer Series Paper: Typeset Specialty (Stampin’ Up!)

Dies: Stitched Rectangles, Stitched Circles and Bundle of Stitched Shapes (Simon Says Stamp)

Adhesives: SNAIL

Tools: Big Shot and Fun Foam


Built for Free Using: My Stampin Blog

It’s here! The 2015-2016 Stampin’ Up! Annual Catalog! Get your lists ready and place your orders by clicking on the catalog to the right!!

Piglet MAT

Paper Craft Crew 147

We are supposed to get a break from the rain today, they say some sun in the afternoon but then right back to the rain for Thursday and Friday. As long as it’s nice at the weekend! Today was dreary but you make the most of it right?! Work was a little busy but I still managed to get a bunch of things done. Dinner tonight was bacon cheeseburgers and beer battered french fries! YUM! After I came home and Skyped with Andrea and made a card using some new goodies that I recently acquired! I like when I can just sit down and play for a little while! Taylor came by and we ran to Target to get some soy milk and eggs, I also picked up some Twizzlers because, well, they make mouths happy! LOL! How is your week going?

Before I get to my card for today I wanted to share some cards that a friend of mine sent to me along with some goodies including some brochures on London! Her name is Nicole Watt, better known as the Pixel Maven! She is a very talented card maker and a whiz with computers! In my package was a cool little surprise. We lost the Color Coach in this year’s Catalog, not to worry, Nicole has an ingenious solution for us! She came up with her own color chart! You can see it by clicking here and heading over to her blog. She has it available as a download or you can purchase one of the handy cards! Speaking of cards, here are the two that she sent me…

NW Card JK

This one actually uses the placemat from the restaurant that we had lunch in while I was in Florida for Leadership in January!

NW Watercolor Card

And this one is just gorgeous! I love the watercoloring!! Thank you Nicole!!

Today it’s Wednesday and that means that I’m over on the Paper Craft Crew for our sketch challenge for this week…

PCCCS147 DY Sketch 6-03-2015

I used a bunch of different goodies on my card! The base is Neenah Solar White 110lb Card Stock and the background is a piece of the Sale-A-Bration Best Year Ever Designer Series Paper. My panel is a piece of Bermuda Bay with some Vellum adhered behind the embellishments on top of it. The panel is adhered to the card with SNAIL and Fun Foam. My three feathers are cut from Pool Party with the Feathers Framelits, I spattered them with Heidi Swapp Color Shine in Teal and Gold. They are adhered to the panel with Foam Tape. The stamped greeting is from one of the Paper Pumpkin Kits and is heat embossed in Pool Party Stampin’ Emboss Powder on Coastal Cabana and adhered with more Foam Tape. The die cut greeting is cut from Gold Foil Sheet with the Papertrey Ink Wonderful Words Birthday Die and adhered with Ranger Multi-Matte Medium. A scattering of Hazel & Ruby The Makery Green with Envy and Pretty Pink Posh Sparkling Clear Sequins finishes the card. I love the blues and all of the different texture on the card! I hope that you enjoyed my Design Team card for this week’s Paper Craft Crew sketch challenge! Stop by the blog and check out the rest of the design teams projects! I also hope that you enjoyed the cards from Nicole and that you check out her blog too! Thank you so much for sharing in my day! Have a wonderful Wednesday! 🙂

PCCCS147-JK-WM

Products used:

Stamp Set: Happy from Paper Pumpkin (Stampin’ Up!)

Specialty Ink: Versa-Mark

Embossing Powder: Pool Party (Stampin’ Up!)

Card Stock: Solar White 110lb (Neenah) and Bermuda Bay, Pool Party and Coastal Cabana (Stampin’ Up!)

Specialty Paper: Gold Foil Sheet and Vellum Card Stock (Stampin’ Up!)

Designer Series Paper: Best Year Ever (Vintage-Stampin’ Up!)

Dies: Feathers Framelits (Stampin’ Up!) and Wonderful Words – Birthday (Papertrey Ink)

Embellishments: Teal and Gold Color Shine (Heidi Swapp), Green with Envy Sequins (Hazel & Ruby The Makery) and Sparkling Clear Sequins (Pretty Pink Posh)

Adhesives: Multi-Matte Medium (Ranger), 3M Foam Tape, Crystal Effects (Stampin’ Up!) and SNAIL (Stampin’ Up!)

Tools: Big Shot, Heat Tool and Fun Foam


Built for Free Using: My Stampin Blog

Current Promotions:

It’s here! The 2015-2016 Stampin’ Up! Annual Catalog! Get your lists ready and place your orders by clicking on the catalog to the right!!

Piglet MAT

Freshly Made Sketches 188 & Pals Paper Arts 253

Well, my trend of sleeping in on Saturdays continues! Not that 7:30 is late but it is for me! Yesterday was another nice day, warm, a little humid but the sun felt nice! My friend Danielle stopped by after work to pick up two birthday cards. I am being good and using ones that I already have in my stash! I Skyped with Andrea for a while and we crafted together. I made my two cards for today and she worked on some swaps. Taylor stopped by and watched some Netflix, she is a little addicted to it! I spent a little time watching TV and then called it a day. Today I’m not sure what I’m doing, which sometimes is nice!

So of the two cards that I have for you today my first one is for this week’s Freshly Made Sketches challenge…

Freshly Made Sketches 188

Thanks to Jen B. for choosing my card for last week’s challenge! The card base is Neenah Solar White 110lb. I used the Simon Says Stamp Stitched Rectangles to cut out a piece of Early Espresso for the frame and also a piece of Window Sheet. Thin strips of foam tape around the frame adheres it to the card. Some American Crafts Gold Glitter Paper is backed with some Stick-it and cut out with the Simon Says Stamp Hello Die and then adhered to the window. My flowers are created with the Tim Holtz Sizzix Tiny Tattered Florals Thinlits from Cherry Cobbler and the leaves from Old Olive. They are adhered to the window frame with Glue Dots. I was going to make it a shaker card but I really like the way the hello just seems to float above the card with nothing behind it!

FMS 188-WM

The second card I made is for this week’s Pals Paper Arts sketch challenge…

PPA 253

A neat sketch and I’m loving that funky edge! The card base on this one is also Neenah Solar White 110lb. The background is a piece of paper from the NEW Cherry on Top Designer Series Paper Stack and I just used a ruler to draw the angled edge and cut it with my Paper Snips. My panel in the middle is a piece of Whisper White that I cut out with the Simon Says Stamp Flag Card Die. The greeting is from the May Paper Pumpkin Kit and is stamped in Island Indigo. I adhered the card to the base with SNAIL and Fun Foam. The flag at the top is also cut out with the same die from a piece of Gold Glimmer Paper. I doubled up the Fun Foam to adhere it and give it a little more dimension. A scattering of Pretty Pink Posh Gold Sequins adhered with Crystal Effects gives the card some sparkle. I love the simplicity and that funky edge!

PPA 253-WM

So there you have your double dose of my creativity for your Saturday! I hope that you like both the Freshly Made Sketches and Pals Paper Arts card for this week’s challenges! I really do appreciate you taking the time to come by and visit with me, you always make my day! Now go and have yourselves an amazing Saturday! 🙂

Products used:

Freshly Made Sketches card:

Card Stock: 110lb Solar White (Neenah) and Early Espresso, Cherry Cobbler and Old Olive (Stampin’ Up!)

Specialty Paper: Window Sheet (Stampin’ Up!) and Gold Glitter Paper (American Crafts)

Dies: Stitched Squares and Small Hello (Simon Says Stamp) and Tiny Tattered Florals (Tim Holtz/Sizzix)

Adhesives: Stick-it Adhesive Sheets (Ken Oliver), Bling Glue Dots (Therm-O-Web) and 3M Foam Tape

Tools: Big Shot

Pals Paper Arts card:

Stamp Set: May 2015 Paper Pumpkin (Stampin’ Up!)

Ink: Island Indigo Classic Stampin’ Ink (Stampin’ Up!)

Card Stock: Solar White 110lb (Neenah) and Whisper White (Stampin’ Up!)

Specialty Paper: Gold Glimmer (Stampin’ Up!)

Designer Series Paper: Cherry on Top Stack (Stampin’ Up!)

Die: Flag Card (Simon Says Stamp)

Embellishments: Gold Sequins (Pretty Pink Posh)

Adhesives: SNAIL and Crystal Effects

Tools: Big Shot and Fun Foam


Built for Free Using: My Stampin Blog

Current Promotions:

With our personalized stamps you can create a cool address label or even use it for everything from marking your territory on books or other belongings to having a fun way to give a personal touch to gifts and goodies. Click HERE for a PDF of the flyer.

It’s here! The 2015 Occasions Catalog is ready for you to place your order! It’s packed with fun trendy products and quick kits! Click on the image in the sidebar and place your order today!

Need some cards quicky? Stampin’ Up! has a brand new kit that allows you to create 20 cards, all you need is some adhesive and you’re all set. Click here for the Everyday Occasion Card Kit!

Make your own stamp! New Undefined stamp carving kit. Available now! Click here for the PDF.

Check out all of the Photopolymer Stamp Sets! The newest set is Lovely Amazing You. It’s a completely clear stamping option you are going to love!

Piglet MAT

Control Freaks April Blog Tour

freakwelcome2013

Hello there and welcome to this month’s Control Freaks Blog Tour! The theme for this month’s tour is Time to Celebrate! It’s always nice to acknowledge someone for an accomplishment or even just for a special day don’t you think?! If you are following along with the tour then you have arrived here from the talented Connie Babbert’s blog, she had some great projects didn’t she?! Today, I have three cards, two congratulations and one Mother’s Day so lets get to them!

The first card that I made is a wedding card. I don’t know why but I have been stuck on weddings lately! The card base is Very Vanilla Card Stock. I heat embossed the Dotty Angles Photopolymer Stamp Set in Gold Stampin’ Emboss Powder on the top. The greeting and the cake are from my new favorite set the Your Perfect Day Photopolymer Stamp Set. I heat embossed the cake on Brushed Gold Metallic Card Stock with White Stampin’ Emboss Powder and then used my Paper Snips to cut it out. A few Stampin’ Dimensionals adhere it to the card. The Congrats is also heat embossed but this time with Gold Stampin’ Emboss Powder on Vellum and yes, I fussy cut it out too! It took a little time but I think that the end result is well worth it! I adhered both parts of the greeting to the card with some Clear Foam Tape. To finish off the card I adhered some Champagne Sequins in the lower right. I love all of the different textures of gold on the card and I really do think that the greeting looks fabulous cut out!!

CF April Blog Tour Congrats Card-WM

CF April Blog Tour Congrats Card Close-WM

My next card is also a Congratulations card but I think this one would work for just about any occasion! The card base for this card is Whisper White Card Stock. I took a piece of Basic Black and embossed it with the Lucky Stars Textured Impressions Embossing Folder and adhered to to the card with SNAIL. My two tags are created buy punching the top of a piece of Silver Glimmer Paper and some Vellum that I heat embossed the greeting from the Bravo Photopolymer Stamp Set in Black Stampin’ Emboss Powder with the Ornate Tag Topper Punch. The two tags are tied together at the top with some black twine from a previous Paper Pumpkin Kit. I punched out a star from some more Silver Glimmer Paper with the Itty Bitty Accents Punch Pack and adhere it to the greeting and hid a piece of Stampin’ Dimensional behind it to keep the tags together. Finally some wood stars from the Hooray it’s Your Day Project Kit are adhered to the background with Multi-Purpose Glue. A fun card with some earthy sparkle to it!

CF April Blog Tour Congrats Tag Card-WM

Finally I have a simple Mother’s Day card. The card base for this one is also Whisper White Card Stock. I used the Circles Collection Framelits to cut out multiple different pieces of paper from the Painted Blooms Designer Series Paper pack. I also stamped some images form the Painted Petals Photopolymer Stamp Set in Blackberry Bliss and punched them out with the 1″ Circle Punch. All of the pieces are adhered to the card with Stampin’ Dimensionals and SNAIL. My greeting is from another Paper Pumpkin Kit from last year and is stamped in Rose Red and then again with Versa-Mark and heat embossed with Clear Stampin’ Emboss Powder. The Photopolymer Stamps make it nice and easy to line up the greeting and get perfect coverage! Finally I used a piece of Blackberry Bliss and flagged the ends under the greeting. It seemed a bit plain so I dug out some “Vintage” Gingham Garden Designer Washi Tape and adhered it to it. A few sequins sprinkled around the card finish of with a little sparkle! A fun floral card the most special lady in your life!

CF April Blog Tour Mother's Day Card-WM

CF April Blog Tour Mother's Day Card Close-WM

I hope that you enjoyed my cards for this month’s Control Freaks Blog Tour! Thank you very much for stopping by! Now to continue on with the tour I’ll send you off to my very clever and crafty friend Patty Bennett! Have a wonderful day everyone! 🙂

clickhere2013

Stampin’ Up! products used:

Gold Congrats Card:

Stamp Sets: Your Perfect Day and Dotty Angles Photopolymer

Specialty Ink: Versa-Mark

Stampin’ Emboss Powder: Gold and White

Card Stock: Very Vanilla

Specialty Card Stock: Brushed Gold Metallic and Vellum

Tools: Paper Snips, Heat Tool, Crystal Effects, Stampin’ Dimensionals and SNAIL

Congrats Tag Card:

Stamp Set: Bravo Photopolymer

Specialty Ink: Versa-Mark

Stampin’ Emboss Powder: Black

Card Stock: Whisper White and Basic Black

Specialty Card Stock: Vellum and Silver Glimmer Paper

Punch: Ornate Tag Topper and Itty Bitty Accents Pack

Embellishments: Hooray it’s Your Day Kit and Black Twine (Paper Pumpkin)

Tools: Heat Tool, Multi-Purpose Glue, Stampin’ Dimensionals and SNAIL

Mother’s Day Card:

Stamp Sets: Painted Petals and Paper Pumpkin Photopolymer

Ink: Blackberry Bliss and Rose Red Classic Stampin’ Ink

Specialty Ink: Versa-Mark

Stampin’ Emboss Powder: Clear

Card Stock: Whisper White and Blackberry Bliss

Designer Series Paper: Painted Blooms

Framelits: Circles Collection

Punch: 1″ Circle

Embellishments: Gingham Garden Designer Washi Tape (Vintage)

Tools: Big Shot, Heat Tool, Paper Snips, Crystal Effects, Stampin’ Dimensionals and SNAIL

Piglet MAT

Germaine’s Paper Pumpkin Class

Am I happy to be back in freezing NY… that would be a no! LOL! I’m glad to get to see my peeps again but I’m really missing the Florida sunshine and much warmer temps! I had a nice flight home last night, the plane actually left 10 minutes early and it didn’t take forever to get my luggage. Andrew picked me up and came in for a little while once we got back to my house. I will miss all of my friends, especially Maggie, Nicole and Brian, but I’ll see them again soon. As you can see I’m a little late today, I think I went to bed at 2:00am. I will also get all caught up on all of my comments today, yesterday I got caught up on my emails at the airport and on the plane, all 620 of them!! I needed a little vacation from it for a while!

Today I’m sharing the cards that were made at my friend Germaine’s Paper Pumpkin class. She was nice enough to let me play along with them last Monday and I had so much fun! I made three cards, Germaine made one and her friend Susan made four cards and the treat bags. So enjoy the pictures of the cards, they use supplies from the kit and some other punches, stamps and card stock. I hope that they give you lots of ideas as to what else you can do with the amazing little Paper Pumpkin kits! Enjoy!

Here are the ladies from left to right starting in the front, Dawn Walker-Randall, Dale Strileckis, Germaine Meilach, Barbara Jones, Mary Lou Kopinj

GM PP Class Ladies

Here is Germaine’s card

GM PP Card

My three

GM PP Class JK Card 1-WM

GM PP Class JK Card2-WM

GM PP Class JK Card 3-WM

And the four cards and treat bags that Germaine’s friend Susan Superak made

GM PP Class Susan Card 5

GM PP Class Susan Card 4

GM PP Class Susan Card 3

GM PP Class Susan Card 1

GM PP Class Susan Card 2


I hope that you enjoyed them all! Thank you so much for coming by today! I’ll have more pictures from Leadership tomorrow! Have a super Sunday! 🙂

Current Promotions:

With our personalized stamps you can create a cool address label or even use it for everything from marking your territory on books or other belongings to having a fun way to give a personal touch to gifts and goodies. Click HERE for a PDF of the flyer.

It’s here! The 2015 Occasions Catalog is ready for you to place your order! It’s packed with fun trendy products and quick kits! Click on the image in the sidebar and place your order today!

Need some cards quicky? Stampin’ Up! has a brand new kit that allows you to create 20 cards, all you need is some adhesive and you’re all set. Click here for the Everyday Occasion Card Kit!

Make your own stamp! New Undefined stamp carving kit. Available now! Click here for the PDF.

Check out all of the Photopolymer Stamp Sets! The newest set is You’re Wonderful. It’s a completely clear stamping option you are going to love!

Piglet MAT

Control Freaks January Blog Tour

freakwelcome2013

Hello! I hope that your week is off to a good start! I had a nice day at work and another crafty evening when I got home apart from my little Target run. Guess what?! It’s time for another Control Freaks Blog Tour! This month our theme is Love and just in time for Valentine’s day! There are lots of fun new products in the 2015 Occasions Catalog with a love theme and I hope that you get some inspiration from my projects today. If you are following along with the tour you have arrived here from my talented friend Debbie Henderson’s blog. I have two cards and a little treat holder for you this time around so let’s get to them!

The first card that I have is a fun Valentine that would work for anyone. The base of the card is Whisper White Card Stock. I took a piece of Soft Sky and used the Word Bubbles Framelits to cut out the negative in the upper right corner. I also used the dies for the clouds that are cut from more Whisper White. The greeting is from the You Plus Me Stamp Set and is stamped in Real Red, using the negative cut out for placement and my Stamp-a-ma-jig. The ballon and the bow are cut out from Real Red and Red Glimmer paper using the Balloons Framelits. I cut out the heart in the middle of the ballon and another one from Red Glimmer Paper using the Hearts Collection Framelits. The basket is stamped in Soft Suede from the Celebrate Today Photopolymer Stamp Set. A piece of Stacked With Love Designer Series Paper is adhered behind the negative heart in the ballon and the balloon and red glimmer heart are adhered with Stampin’ Dimensionals. Finally I adhered my clouds to the background and the background to the base using Stampin’ Dimensionals. I think that this card would work for just about any age, don’t you?

Control Freaks January Blog Tour Love Balloon Card-WM

My second card is a nice simple one that would work for many different occasions. It begins with a base of Sahara Sand Card Stock. I used the You Plus Me Stamp Set and repeatedly stamped the ampersand in Pool party on Pool Party for the background. A piece of Vellum Card Stock cut to the same size as the Pool Party and has one of the greetings from the same set heat embossed in Gold Stampin’ Emboss Powder. I used the Spiral Border Punch along the left side and a Mini Metallic Clothespin holds the two sheets together. Some Stampin’ Dimensionals along the back of the Pool Party piece adhere the background to the card. A simple card that would make a great birthday, thank you or Valentine!

Control Freaks January Blog Tour Sweet Notebook Paper Vellum Card-WM

My last project for today is a little treat holder. I used some Vellum Card Stock and the Curvy Keepsake Box Thinlits for the holder. I cut another piece of Vellum out with the Hearts Collection Framelits for my topper. All of the stamps are from the January Paper Pumpkin Kit and are heat embossed in Gold Stampin’ Emboss Powder. Some Gold Glimmer paper is punched out with the heart from the Itty Bitty Accents Punch Pack and adhered to the Vellum heart with Glue Dots. A Mini Metallic Clothespin is adhered to the back of the heart with Sticky Strip and holds it to the handle on the that box. I would have filled this up with some M&M’s but unfortunately I finished the bag the other day! Time to get some more!

Control Freaks January Blog Tour Vellum Gold Lover Treat Holder-WM

So there you have my projects for this month’s Control Freak Blog Tour. I hope that you enjoyed them and that you are inspired to get started on some of your Valentine’s Day Cards! Next up is Clever Julie Davidson! Enjoy the rest of the tour and thanks so much for spending some time with me! Have a wonderful Tuesday!! 🙂

clickhere2013

Stampin’ Up! products used:

Love Balloon Card:

Stamp Sets: You Plus Me Clear Mount and Celebrate Today Photopolymer

Ink: Real Red and Soft Suede Classic Stampin’ Ink

Card Stock: Whisper White, Soft Sky and Real Red

Specialty Paper: Red Glimmer

Designer Series Paper: Stacked with Love stack

Framelits: Word Bubbles, Hearts Collection and Balloons

Tools: Bog Shot, Stampin’ Dimensionals and SNAIL


Sweet Notebook Paper Vellum Card:

Stamp Set: You Plus Me Clear Mount

Ink: Pool Party Classic Stampin’ Ink

Specialty Ink: Versa- Mark

Stampin’ Emboss Powder: Gold

Card Stock: Sahara Sand and Pool Party

Specialty Card Stock: Vellum

Punch: Spiral Border

Embellishments: Mini Metallic Clothespins

Tools: Sticky Strip, Stampin’ Dimensionals and SNAIL


Vellum Gold Love Treat Holder:

Stamp Set: January paper Pumpkin Kit

Specialty Ink: Versa-Mark

Stampin’ Emboss Powder: Gold

Specialty Card Stock: Vellum

Thinlits: Curvy Keepsake Treat Box

Framelits: Hearts Collection

Embellishments: Mini Metallic Clothespins

Tools: Big Shot, Fast Fuse, Sticky Strip and Glue Dots

Piglet MAT


Pals Paper Arts 236

A late happy Saturday to you! I don’t know why but I just can’t seem to get up on the weekends anymore! I guess the bed was little too comfy with all of the blankets! So yesterday was a nice sunny but chilly day again. I got a lot done at work and then came home and Andrew stopped by for a bit. He’s out in the Hamptons this weekend for the Satellite Lane retreat. They rehearse and get ready for Harmony Sweeps all weekend. A little chilly for the Hamptons but maybe that help them concentrate! I went out to dinner to Friday’s with Anthony and Bill, that’s always a good time! Tonight I have a work Holiday party to go to so Danielle is going to come by here so we can go together. I’m off to Scrap-A-Latte in a bit to help Renee get ready for some classes, that will be fun! What are you up to this weekend?

As promised here is another video from the concert. This is the opening and the song is called Life Support…

My card for today is for this weeks Pals Paper Arts sketch…

PPA 236

I got my Paper Pumpkin Kit in the mail yesterday and love the stamps that came in it so I used one of them on today’s Valentine’s card. The base of the card is Whisper White Card Stock and the background is a piece of paper from the Stacked with Love Designer Series Paper stack that I adhered a piece of 1/4″ Whisper White Cotton Ribbon around the back before adhering it to the base. For my greeting I used the You Plus Me Stamp Set and heat embossed it in White Stampin’ Emboss Powder on Real Red. I used an element from the Mini Treat Bag Thinlits to cut it out. The heart on the top right is the one from the Paper Pumpkin Kit and is heat embossed in White Stampin’ Emboss Powder on Vellum and cut out with my Paper Snips. Some Stampin’ Dimensionals adhere the banner and heart to the card. I drew a few lines down from the tag and used another one of the elements from the Mini Treat Bag Thinlits to cut out three hearts from Red Glimmer Paper, they are also adhered with Stampin’ Dimensionals. Finally I sprinkled some sequins in the upper right and adhered them with Crystal Effects. I love the way the heart looks “clipped” to the side of the banner! A fun simple Valentine for your love! I hope that you enjoyed today’s card for this week’s Pals Paper Arts sketch challenge and the opening video from the concert! Thanks very much for coming by and enjoy your Saturday my friends! 🙂

PPA 236-WM

Stampin’ Up! products used:

Stamp Sets: You Plus Me Clear Mount and January Paper Pumpkin Photopolymer

Specialty Ink: Versa-Mark

Stampin’ Emboss Powder: White

Card Stock: Whisper White and Real Red

Specialty Paper: Red Glimmer and Vellum Card Stock

Designer Series Paper: Stacked with Love Stack

Thinlits: Mini Treat Bag

Embellishments: 1/4″ Whisper White Cotton Ribbon

Tools: Big Shot, Heat Tool, Paper Snips, Crystal Effects, Stampin’ Dimensionals and SNAIL

NON-Stampin’ Up!: Pretty Pink Posh Classic Christmas and Sparkling Clear 4MM Sequins

Built for Free Using: My Stampin Blog

Current Promotions:

With our personalized stamps you can create a cool address label or even use it for everything from marking your territory on books or other belongings to having a fun way to give a personal touch to gifts and goodies. Click HERE for a PDF of the flyer.

It’s here! The 2015 Occasions Catalog is ready for you to place your order! It’s packed with fun trendy products and quick kits! Click on the image in the sidebar and place your order today!

Need some cards quicky? Stampin’ Up! has a brand new kit that allows you to create 20 cards, all you need is some adhesive and you’re all set. Click here for the Everyday Occasion Card Kit!

Make your own stamp! New Undefined stamp carving kit. Available now! Click here for the PDF.

Check out all of the Photopolymer Stamp Sets! The newest set is You’re Wonderful. It’s a completely clear stamping option you are going to love!

Piglet MAT

Happy Halloween!!

It’s a Friday and it’s Halloween!! I had a nice evening last night, I went to a class at The Playground that my friend Michael taught. We made four Christmas cards and had a very good time. After we went out for some coffee at Starbucks and just hung out. I had a bit of a headache last night and didn’t get much sleep so I took the day off from work and   am going to try and go back to bed for a while. I haven’t had a really bad headache in years. Oh well, hopefully I can get some rest and it will be all gone later. Did you all finish you preparations for the trick or treaters tonight?! I love to see all of the little kids in their costumes, I wonder what Daniel will be. Hopefully I will see him later and get to take a few pictures!

I had to make a fun Halloween card to post today. I had see a card on Pinterest a while back that did a fun thing with a tag so that is my inspiration for today’s card. The base is Whisper White Card Stock with a piece of Basic Black on top. My background is a piece of Whisper White and I used the Gorgeous Grunge Stamp Set and some Tangelo Twist ink for my splotches. I stamped them off so they wouldn’t be too bold. A piece of Tangelo Twist is is used to make my tag along with the Angled Tag Topper Punch. I cut a strip of Tangelo Twist and used some temporary adhesive so I could cut around the tag with a craft knife to create the negative space. The greeting and the bats are from the September Paper Pumpkin Kit and are heat embossed in Black Stampin’ Emboss Powder. I adhered the negative part of the tag to the card with SNAIL, along with a thin strip of Basic Black and the positive part of the tag with Stampin’ Dimensionals.  A few black enamel dots finish off the card. I love the layout and the negative and positive parts of the tag. I hope that you enjoyed today’s card and that you all have a fantastic Friday and a safe and Happy Halloween! Thanks so much for visiting! 🙂

Halloween Half Tag-WM

Stampin’ Up! products used:

Stamp Sets: September Paper Pumpkin Kit and Gorgeous Grunge Clear Mount

Ink: Tangelo Twist Classic Stampin’ Ink

Specialty Ink: Versa-Mark

Stampin’ Emboss Powder: Black

Card Stock: Whisper White, Basic Black and Tangelo Twist

Punch: Angled Tag Topper

Tools: Heat Tool, Craft Knife, Stampin’ Dimensionals and SNAIL

NON-Stampin’ Up!: Black Enamel Dots


Current Promotions:

With our personalized stamps you can create a cool address label or even use it for everything from marking your territory on books or other belongings to having a fun way to give a personal touch to gifts and goodies. Click HERE for a PDF of the flyer.

It’s here! The 2014 Holiday Catalog is ready for you to place your order! It’s packed with fun trendy products and quick kits! Click on the image in the sidebar and place your order today!

Need some cards quicky? Stampin’ Up! has a brand new kit that allows you to create 20 cards, all you need is some adhesive and you’re all set. Click here for the Everyday Occasion Card Kit!

Make your own stamp! New Undefined stamp carving kit. Available now! Click here for the PDF.

Check out all of the Photopolymer Stamp Sets! The newest set is You’re Wonderful. It’s a completely clear stamping option you are going to love!

Creation Station Tour – Fall Fest

creation station header

Hello peeps! How is your weekend going so far? Mine is going well! I was in Manhattan most of the day yesterday and despite it being dreary and rainy I had a nice time seeing my friend Isabella! After I took the subway down to the Ink Pad and made a new friend. Michael is another crafty person and I had a nice chat with him. Hopefully I will see him again soon! After I came home I made a card, I had to it was World Card Making Day after all! Did you get to make a card or two yesterday?!

Sometimes Sunday’s mean it’s time for another Creation Station Blog Tour! Today is one of those Sundays! This time around we are doing a Harvest theme focusing on the Fall Fest Photopolymer Stamp Set and the Tiny Treat Boxes. If you are following the tour then you have arrived here from the very talented Jennifer Downey’s Blog. I have three projects for you today, two cards and a little box. Lets get to them shall we?!

My first card uses the night sky technique that I did a little while ago. I really loved the way it looked and had to do it again! The base of the card is Night of Navy Card Stock. I used a piece of Watercolor Paper and the Tim Holtz Mini Ink Blending Tool with some Daffodil Delight first to create the moon. I then took some Post-it Tape and used the 1 1/4″ Punch to punch out a piece to mask over the moon.

Creation Station Tour 11 6-WM

Night of Navy and Blackberry Bliss are used to create the rest of the sky. The stars are Perfect Pearls mixed with a little water and dotted on with a paintbrush.

Creation Station Tour 11 7-WM

To make my ghost I took my Smoky Slate Stampin’ Write Marker and colored around just the edge of the ghost stamp and stamped it on some more Watercolor Paper.

Creation Station Tour 11 2-WM

I then used a paintbrush and water to pull the ink into the middle of the ghost.

Creation Station Tour 11 3-WMCreation Station Tour 11 4-WM

A quick trip through the Big Shot with the Fun Fall Framelits and some black eyes that are punched out with the 1/8″ Circle Punch and he’s ready to go on the card.

Creation Station Tour 11 5-WM

But first I heat embossed one of the greetings from the September Paper Pumpkin Kit in White Stampin’ Emboss Powder. A simple mailable card that uses two fun techniques!

Creation Station Tour 11 Boo Night Sky-WM

Next up is another neat card. The base of this one is Basic Black Card Stock and the background is a piece of paper from the Motley Monsters Designer Series Paper Pack. The panel is Sahara Sand and I used the Project Life Corner Rounder to round the corners. My partial circle is cut out with the Circles Collection Framelits. The greeting is from the For All Things Stamp Set and is stamped in Memento Tuxedo Black. For a little extra detail I used the Essentials Paper-Piercing Pack to pierce all around the edges before adhering the panel to the base with Stampin’ Dimensionals. The pumpkin and leaves are all from the Fall Fest Photopolymer Stamp Set and are stamped in Tangerine Tango, Crushed Curry and Pear Pizzaz. I cut them out with the Fun Fall Framelits and adhered the to the card with more Stampin’ Dimensionals. Another simple card but I love the piercing detail and the circle cut out!

Creation Station Tour 11 Hello Fall Pierced-WM

My last project is a box that I made using the Tiny Treat Boxes. They are 25 in a pack for $6.95! How can you go wrong?! To make my box I first separated it at the seam by prying the two pieces apart. I did this so I could cut out the pumpkins using the Fun Fall Framelits from the opposite sides of the box.

Creation Station Tour 11 1-WM

I then took some Vellum Card Stock and glued it to the inside of the box before using some Sticky Strip to adhere it back together. The embellishment on the top of the box is a piece of 1 1/4″ Burlap Ribbon that I trimmed the sides off of and pulled some threads out. I adhered it to the box top with some more Sticky Strip. Next up is some of the Tangelo Twist Sequin Trim from the September Paper Pumpkin Kit adhered with some Glue Dots. My pumpkin is from the Fall Fest Set and is cut out with the Fun Fall Framelits. I cut out one of the leaves stamped in Pear Pizzaz and used one of the Autumn Wooden Elements along with some of the black twine from the Paper Pumpkin Kit. A Stampin’ Dimensionals holds it in place.  Again, I have forgotten to pick up some of the tea lights! When I do get some I will take pictures of the place card holder and this box! LOL! I love all of the elements and simplicity of the box!

Creation Station Tour 11 Tiny Harvest Box Side-WM


Creation Station Tour 11 Tiny Harvest Box Top-WM

Creation Station Tour 11 Tiny Harvest Box Side-WM

And there you have my three projects for the Creation Station Blog Tour for our Fall Fest theme. I really hope that you enjoyed the projects and are inspired to make some of your own. Now continuing on with the tour your next stop is our fearless leader Jen Arkfeld. She’s a clever one isn’t she?! Thank you for coming by to see my projects! I appreciate your visit and hope you have an amazing Sunday! 🙂

creation station backcreation station next


Jen Arkfeld

Ilina Crouse


Stampin’ Up! products used:


Boo Night Sky Card:

Stamp Sets: Fall Fest and September Paper Pumpkin Photopolymer

Ink: Blackberry Bliss, Night of Navy and Daffodil Delight Classic Stampin’ Ink

Specialty Ink: Versa-Mark

Stampin’ Emboss Powder: White

Stampin’ Write Marker: Smoky Slate

Card Stock: Night of Navy

Specialty Paper: Watercolor

Framelits: Fun Fall

Punch: 1 1/4″ Circle

Tools: Big Shot, Heat Tool, SNAIL

NON-Stampin’ Up!: Tim Holtz Mini Ink Blending Tool, Perfect Pearls


Hello Fall Pierced Card:

Stamp Sets: Fall Fest Photopolymer and For All Things Clear Mount

Ink: Tangerine Tango, Crushed Curry, Pear Pizzaz Classic Stampin’ Ink and Memento Tuxedo Black

Card Stock: Basic Black, Sahara Sand and Whisper White

Designer Series Paper: Motley Monsters

Framelits: Circles Collection and Fun Fall

Punch: Project Life Corner Rounder

Tools: Big Shot, Essentials Paper-Piercing Pack, Paper-Piercing Tool, Stampin’ Dimensionals and SNAIL


Tiny Harvest Box:

Stamp Set: Fall Fest Photopolymer

Ink: Tangelo Twist and Pear pizzaz Classic Stampin’ Ink

Card Stock: Whisper White

Specialty Card Stock: Vellum

Accessories: Tiny Treat Boxes and September Paper Pumpkin Kit

Framelits: Fun Fall

Embellishments: 1 1/4″ Burlap Ribbon and Autumn Wooden Elements

Tools: Big Shot, Sticky Strip, Glue Dots, Multi-Purpose Glue, Stampin’ Dimensionals and SNAIL