Category: Stylin’ Stampin’ Squad

  • Stylin’ Stampin’ Squad September Blog Hop!

    SSSHeader

    Before I get to today’s post I wanted to thank all of the wonderful people that stopped by yesterday to wish me a Happy Birthday! It really means a lot to me! A huge thank you to Brian who is just awesome, sneaky but awesome, but you know that already! So yes, today is my birthday and it has been a really great one so far! 🙂

    Thank you so much for joining us for the September Stylin’ Stampin’ Squad Blog Hop! This month we are focusing on the tools of the stampin’ trade. Specifically, each of our favorite stamping tools. It’s amazing the kinds of tools that have been created to help us along in our paper-crafting addictions. This month’s blog hop will showcase many of the Stampin’ Up! tools that are now available to us in the 2013-2014 Stampin’ Up! Idea Book and Holiday Catalog and even a couple of products that are so new they aren’t in either catalog. We hope you enjoy seeing how we use the old and new tools and are inspired to come up with some great projects of your own.

    You should have just left Kim R. of Stamping with Kim on the Stylin’ Stampin’ Squad blog hop. If so, you are in the right spot. If a link doesn’t work or you get off track, you will find the full blog hop lineup below.

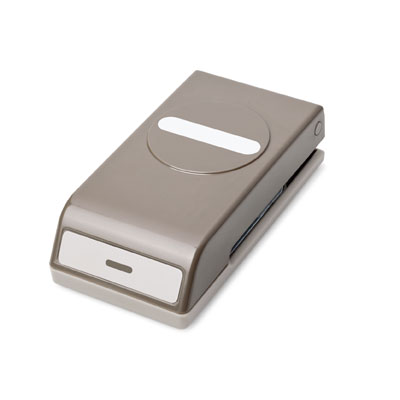
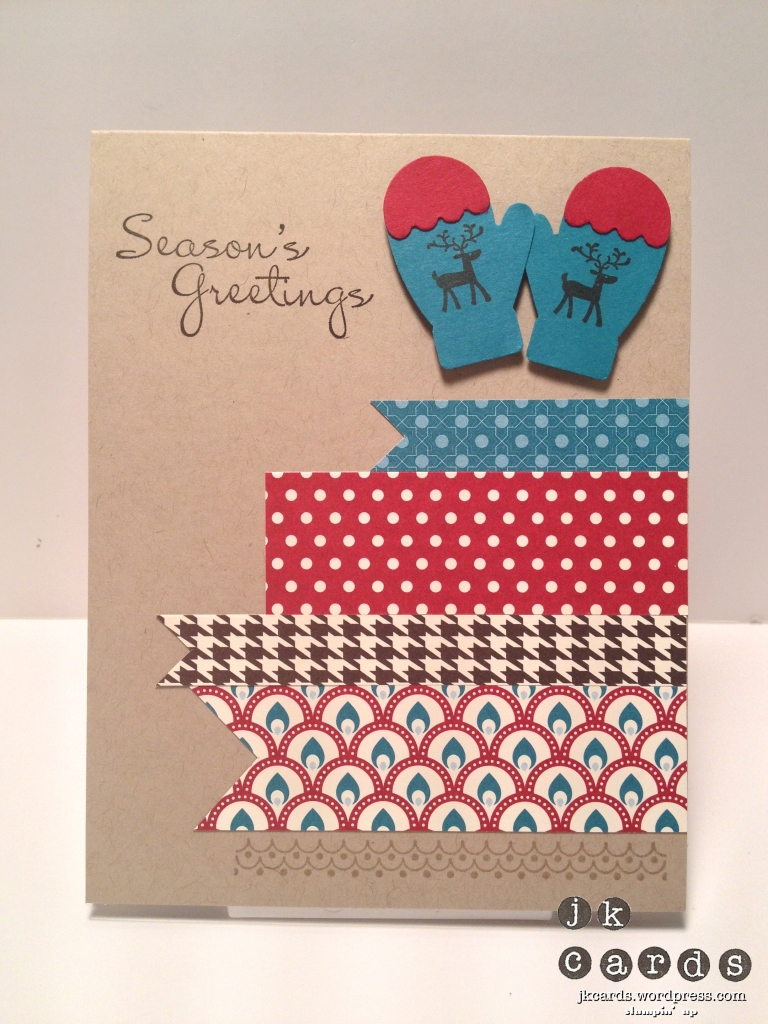
    For my project I used more than one of my favorite tools. My all time favorite tool is definitely my Big Shot, I think I use it in almost every card that I make! One of the new things they have for the Big Shot is the Thinlits Dies. They are just the coolest thing to come along in a while. You can make a flip card in minutes and variations on it too! My second favorite tool is my Stamp-a-ma-jig, I used that one an awful lot too!

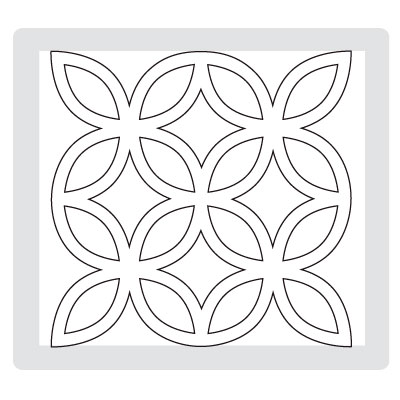
    My card uses the Circle Card Thinlits Dies with a little extension on the end. It’s actually quite easy to do, just leave 2 7/8″ extra card stock over the top of the right edge when you run it through the Big Shot, it even scores it for you! The base of my card is Basic Gray Card Stock. I used some Birthday Basics Designer Series Paper for the background that I trimmed using the Circles Collection Framelits. The front of the circle flip is a piece of Raspberry Ripple that I stamped with a stamp from the Cycle Celebration Stamp Set in Raspberry Ripple using my Stamp-a-ma-jig. The soda bottle is stamped in Summer Starfruit, the banner in Island Indigo and I cut them both out with my Paper Snips. The inside circle is a piece of Summer Starfruit that I embossed with the Stylish Stripes Textured Impressions Embossing Folder. For the greeting I stamped the Celebrate a Sweet Birthday in Raspberry Ripple and Island Indigo. The Decorative Label Punch and Scallop Oval Punch cut them out and some Stampin’ Dimensionals hold them in place. I really do love the Circle Card Thinlits, especially with the extra piece on the right! Thanks for hopping by to my blog to see my project for this month’s project. Now you are off to see Heidi B. of Stuck on Stampin’, she will have some good stuff for you too! Just another thanks for all of the birthday wishes! Have a great day and a pice of cake for me! 🙂

    Stylin' Stampin' Blog Hop

    Stylin' Stampin' Blog Hop

    SSSNext

    Stampin’ Up! products used:

    Card Stock: Basic Gray, Raspberry Ripple, Summer Starfruit and Very Vanilla

    Designer Series Paper: Birthday Basics

    Ink: Summer Starfruit, Island Indigo and Raspberry Ripple Classic Stampin’ Ink

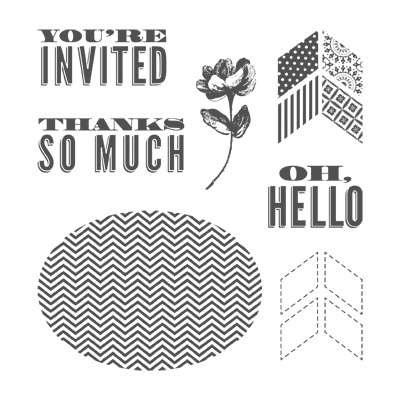
    Stamp Set: Cycle Celebration Clear Mount

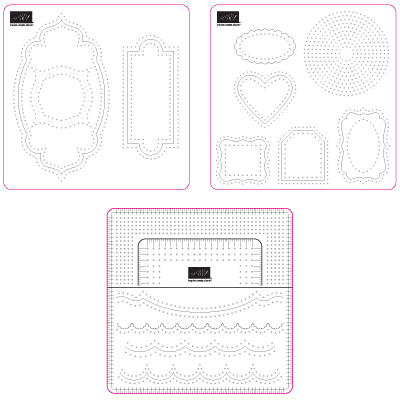
    Thinlits: Circle Card

    Framelits: Circles Collection

    Tools: Big Shot, Stamp-a-ma-jig, Stampin’ Dimensionals and SNAIL

    Cycle Celebration CM

    Birthday Basics DSP

    Circle Card Thinlits Dies

    Circles Collection Framelits

    1. Shellie G. of Craft Smashup

    2. Pam S. of Stampin’ in the Sun!

    3. Tonya B. of Stampin’ with Tonya

    4. Dawn S. of Dawn’s Creative Chalet

    5. Darcy J. of DJ’s Stampin’ Place

    6. Pamela W. of Stinky Tofu

    7. Kim R. of Stamping with Kim

    8. Justin K. of JK Cards

    9. Heidi B of Stuck on Stampin’

    10. Jennifer B. of NW Stamper

    11. Bree R. of Craft-somnia

    12. Diana E. of Stampin’ Fun with Diana

    13. Jennifer C. of Happy 2 Scrap 4 Life

    14. Jamie H. of Unique Ink

    15. Kristina M. of Mama’s Sanity

  • Stylin’ Stampin’ Blog Tour March 2013

    Hello kiddies! How are we today? I’m good but yesterday was a very long day! I’m glad that it’s over and the weekend is almost here. It was still cold and windy here all day today but they say warmer temperatures are ahead! Looking forward to those!

    Blog Hop Header

    Today is the March Stylin’ Stampin’ Squad Blog Tour. If you are following the tour then you have arrived here from Kim R.’s Stamping with Kim blog. Didn’t she have some great projects?! The theme for this month’s projects is Wedding and Anniversary. I have a wedding and a christening card for you today.

    First up is the wedding card. I wanted a very simple but eye catching card. The base of my card is Basic Black Card Stock. The background is a piece of Whisper White and on top of that is a piece of Basic Gray that I embossed with the Chevron Textured Impressions Embossing Folder. The middle is created by cutting out a piece of Silver Glimmer Paper using two dies from the Apothecary Accents Framelits Dies. I then stamped a piece of Window Sheet with the Mr. & Mrs. Single Stamp in Opaque White Staz-On. Some SNAIL holds it behind the glimmer piece. Then I cut a piece of Basic Black to fit behind and adhered it with Stampin’ Dimensionals and then some SNAIL holds it in place. I really like the white ink with the silver and black behind it. It gives the card a nice elegant feel, and who doesn’t like a little sparkle!

    Stylin' Stampin Squad Blog Hop Glimmer
    buynoprescriptionrxonline.net
    buynoprescriptionrxonline.net/amitriptyline.html
    buynoprescriptionrxonline.net/cialis_professional.html
    buynoprescriptionrxonline.net/cozaar.html

    My second card is one that I made for my friend Kim’s daughter Savannah’s upcoming Christening. I made 40 of these. When I mass produce a card I cut all of the pieces and then assemble them. The last thing I do is use MDS to print the insides. The base of the card is Naturals White Card Stock. For the background I used a piece of So Saffron, just pain. Next up we have a Tea Lace Paper Doily and on top of that is a piece of Pink Pirouette that I flagged the ends on with my Paper Snips. The greeting is from the My Special Day Stamp Set and is stamped in Chocolate Chip on a piece of Whisper White that I cut out with the Labels Collection Framelits Dies. The “Christening” is also stamped in Chcocolate Chip on So Saffron and cut out with the Bitty Banners Framelits Dies. Some Stampin’ Dimensionals adhere it to the card. The 5/8″ Flower Trim is backed by a piece of Pink Pirouette that I punched out with the 7/8″ Scallop Circle Punch. They are adhered to each other and the card with Mini Glue Dots. You can see in the second picture all of the pieces waiting to be put together. I tried to keep it simple but I still made 80 passes though the Big Shot and the ends were all flagged with my Paper Snips!

    Stylin' Stampin' Blog Hop Christening

    Stylin' Stampin' Blog Hop Assembly

    I hope that you enjoyed my projects for this month’s Stylin’ Stampin’ Squad Blog Tour. Next up is Jennifer B. of N.W. Stamper, I’m sure you’ll love her projects! Thanks for stopping by and have a nice day!

    Next

    Stampin’ Up! products used:

    Card 1:

    Card Stock: Basic Black, Whisper White and Basic Gray

    Specialty: Window Sheets and Silver Glimmer Paper

    Ink: Opaque White Staz-On

    Embossing Folder: Chevron

    Framelits: Apothecary Accents

    Tools: Big Shot, Stampin’ Dimensionals and SNAIL

    Card 2:

    Card Stock: Natural White, Whisper White, So Saffron and Pink Pirouette

    Ink: Chocolate Chip Classic Stampin’ Ink

    Stamp Set: My Special Day Clear Mount

    Framelits: Labels Collection and Bitty Banners

    Embellishments: Tea Lace Paper Doilies and 5/8″ Flower Trim

    Punch: 7/8″ Scallop Circle

    Tools: Big Shot, Stampin’ Dimensionals and SNAIL

    Here is a list of the full tour!

    1. Shellie G. of Craft Smashup
    2. Pam S. of Stampin’ in the Sun!
    3. Nancy B. of Lady Stamps-A-Lot
    4. Tonya B. of Stampin’ with Tonya
    5. Dawn S. of Dawn’s Creative Chalet
    6. Darcy J. of DJ’s Stampin’ Place
    7. Pamela W. of Stinky Tofu
    8. Kim R. of Stamping with Kim
    9. Justin K. of JK Cards
    10. Jennifer B. of NW Stamper
    11. Bree R. of Craft-somnia
    12. Diana E. of Stampin’ Fun with Diana
  • Stylin’ Stampin’ Blog Tour February 2013

    Blog Hop 2-2013

    Good morning! How are you today? Everything is chugging right along this week so no complaints from me! Today I have my post for this month’s Stylin’ Stampin’ Blog Tour. This month we are featuring projects that use fabric. You may have arrived here from Kim Ryden’s blog. She had some neat projects didn’t she?! Today I have two cards for you and both contain some linen fabric.

    First up I have what I like to call the mummy card. The card starts off with a base of Primrose Petals Card Stock. For the background I used a piece of River Rock, which has to be my most under used color. To give it a little extra detail I used the Essential Paper-Piercing Pack and Paper-Piercing Tool to make the scallop along the bottom. The panel is created with some linen fabric that I picked up at a craft store. I cut it into strip and used some Sticky Strip to hold it in place around the back and also to adhere it to the card. The little bandaids are form the Patterned Occasions Stamp Set and are stamped in River Rock and Primrose Petals. I cut them out with my Paper Snips and adhered them to the linen strips with Stampin’ Dimensionals. The greeting is form the same set and is stamped in Primrose Petals and punched out with the Word Window Punch. I really like the Primrose with the River Rock. They go quite nicely together. After seeing the card you can see why I call it the mummy card!

    Stylin' Stampin' Squad Blog Hop 2-2013

    Next up is a card that contains an item that I forgot I had and it’s the first time I’m using it! The base of this card is Whisper White Card Stock. I cut out a piece of Whisper White with The Lattice Bigz Die and backed it with a piece of Bashful Blue. Before I adhered it to the Gumball Green piece I used some White Stampin’ Emboss Powder to emboss the Thanks so much form the Oh, Hello! Stamp Set. The butterfly is a piece of burlap that I cut out with the Beautiful Butterflies Bgz L Die. For the body I made a paper bead from some First Edition Specialty Designer Series Paper. A Mini Glue Dot holds the butterfly and body in place. The flower is some more of the linen fabric that I used on the first card that I cut out with the Fun Flowers Bigz L Die. I used a Stampin’ Spritzer that I filled with some Primrose Petals Re-Inker and half water and half rubbing alcohol to spray the flowers to color them. I put them under my desk lamp to speed the drying and they curled up a little which I was quite happy about. I used some more Mini Glue Dots to hold them on the card and a Large Basic Jewel Pearl is placed in the middle. The card has a nice slightly vintage yet modern feel about it. I really did like making the flower, it was fun!

    Stylin' Stampin' Squad Blog Hop 2-2013

    I hope that you enjoyed my projects for this month’s Stylin’ Stampin’ Squad Blog Tour. Click below to head on over to Heidi Boos blog to see what amazing projects she has to share with you today! Thank you so much for visiting and I hope that you have a wonderful day! 🙂

    Next Blog

    Blog Tour List:

    1. Shellie G. of Craft Smashup
    2. Annie L. of Love Me Cards
    3. Nancy B. of Lady Stamps-A-Lot
    4. Rose C. of Stamp with Rose
    5. Tonya B. of Stampin’ with Tonya
    6. Dawn S. of Dawn’s Creative Chalet
    7. Pamela W. of Stinky Tofu
    8. Kim R. of Stamping with Kim
    9. Justin K of JK Cards
    10. Heidi B of Stuck on Stampin’
    11. Jennifer B of NW Stamper
    12. Bree of Craft-somnia
    13. Diana E of Stampin’ Fun with Diana
    14. Darcy J of Dj’s Stampin Place

    Stampin’ Up! products used:

    Recover Rapidly Card:

    Card Stock: Primrose Petals, River Rock and Whisper White

    Ink: River Rock and Primrose Petals Classic Stampin’ Ink

    Stamp Set: Patterned Occasions Clear Mount

    Punch: Word Window

    Tools: Essentials paper-Piercing Pack, Paper-Piercing Tool, Paper Snips, Stampin’ Dimensionals and SNAIL

    Patterned Occasions

    Essentials Paper-Piercing Pack

    Word Window Punch

    Thanks So Much Card:

    Card Stock: Whisper White, Gumball Green and Bashful Blue

    Specialty Ink: Versa-Mark

    Stamp Set: Oh, Hello! Clear Mount

    Big Shot Dies: Beautiful Butterflies L and Lattice

    Embellishments: Large Basic Jewel Pearls

    Tools: Big Shot, Stampin’ Spritzer, Mini Glue Dots, Crystal Effects, Stampin’ Dimensionals and SNAIL

    Oh, Hello CM

    Lattice Bigz Die

    Beautifile Butterflies Bigz Die

    Fun Flowers Bigz L Die

    First Edition DSP

    White Stampin' Emboss Powder

    Large Pearl Basic Jewels

    For a limited time you can get the Sent with Love Bundle now through April 30, 2013. It comes with the Sent with Love Clear Mount Stamp set, Sent with Love Designer Series Paper and a package of Calypso Coral Bakers Twine for only $25.50. That’s 20% off the price if you bought them individually!

    Sale-A-Bration is here! If you spend $150 you will also get a pack of Silver Glimmer Paper to celebrate Stampin’ Up!’s 25 Anniversary in addition to $25 in Hostess money. Spend $400 (or host a party with $400 in total sales) and you get 8 FREE Sale-A-Bration items, the Silver Glimmer Paper and a Sycamore Street Product Bundle (Stamp Set, Ribbon, Buttons, Designer Series Paper) plus $65 in Hostess money and one item at 50% off. How cool is that?! (Does not include tax and shipping)

    Do you ever feel the need to make something that means something but don’t think you have the time? Or you like to be creative but don’t want to buy a ton of supplies? Well, you don’t have any excuses anymore! Introducing Paper Pumpkin from Stampin’ Up! Each month you will receive a kit that contains all of the items (except adhesive) that you need to make a project, all for just $19.95. Each kit will ship out on or around the 15th of each month. You can cancel at any time, but who would want to?! Go ahead, sign up and get some crafting therapy for only $19.95 including shipping! Click here now! Don’t forget to choose me as your Demonstrator, Justin Krieger – Bethpage, NY! :-)

    Don’t forget to check out the Anchor Rewards tab at the top. Earn 10 Anchors and get a FREE Stamp Set of your choice from any current catalog. If you purchase $150 worth of product you will be eligible for $25 in Host(ess) dollars to get one of the great new Host(ess) Sets or any other items from the NEW 2012-2013 Catalog or the NEW Spring Catalog!

  • Stylin’ Stampin’ Squad January Blog Hop!

    Blog Hop Banner January 2013

    Good day to you and welcome to the January edition of the Stylin’ Stampin’ Squad Blog Hop featuring products from the Stampin’ Up! 2013 Spring Catalog. We have some great projects in store for you today! If you are following the tour you have arrived here from Terry Blais‘ blog, didn’t she have some great stuff to share with you? I have two projects for you today, a card and a box that would be great for some chocolates!

    First up we have the card. The base of it is Raspberry Ripple Card Stock. The background is created with the Woodgrain Background Stamp, in Summer Starfruit, and some Whisper White Card Stock. A strip of paper from the Print Poetry Designer Series Paper Stack goes across the bottom. The flowers and leaves are from the Secret Garden Stamp Set and are cut out with the Secret Garden Framelits Dies. The leaves are stamped in Gumball Green and the flowers in Raspberry Ripple on Primrose Petals. I used the Boho Blossom Punch for the centers in Summer Starfruit and a Basic Jewel Pearl is adhered in the middle of each. The flowers are mounted to the card with Stampin’ Dimensionals. For the greeting I stamped the happy birthday from the Made for You Stamp Set in Raspberry Ripple. I love the woodgrain as a background for the flowers and the framelits make cutting them out so easy. I have a few people in mind that might like this for their birthday!

    Stylin' Stampin' Blog Hop 1-10-2013

    Next we have a box. It definitely would be great for some chocolates but you could also fit a host of other more “precious” gifts inside. The box measures 3 1/4″ x 5 1/4″ x 1 1/2″ and is created using Crumb Cake Card Stock and my Simply Scored Scoring Tool. To decorate the box I used the Adorning Accents Textured Impressions Embossing Folders with some Primrose Petals. The flags are made from pieces of More Amore Specialty Designer Series Paper. For the heart I stamped the image from the You are Loved Stamp Set in Primrose Petals and cut it out with the Hearts Collection Framelits Dies. I pierced around the edge with the Occasions Paper-Piercing Pack and Paper-Piercing Tool and adhered it to the box with Stampin’ Dimensionals. The love is from the same set and is stamped in Pool Party and Primrose Petals. I used the Decorative Label Punch and the Large Oval Punch to punch them out and layered them for more dimension. I still vote that we fill the box with some chocolate!

    Stylin' Stampin' Blog Hop Box 1-10-2013

    Stylin' Stampin' Blog Hop Box Open 1-10-2013

    I hope that you are inspired by my projects today. Thanks for spending some time with me on the Stylin’ Stampin’ Squad January Blog Hop. Now you are off to see the fun things that Heidi Boos has for you! Enjoy the rest of the tour!

    Blog Hop Badges Jan Next

    Stampin’ Up! products used:

    Card Stock: Raspberry Ripple, Summer Starfruit, Very Vanilla and Primrose Petals

    Designer Series Paper: Print Poetry Stack and More Amore Specialty

    Ink: Gumball Green, Summer Starfruit, Raspberry Ripple, Pool Party and Primrose Petals Classic Stampin’ Ink

    Stamp Sets: Secret Garden, Made for You and You are Loved Clear Mount

    Embossing Folder: Adorning Accents

    Punches: Boho Blossom and Decorative Label

    Framelits: Secret Garden and Hearts Collection

    Embellishments: Basic Jewels Pearls

    Tools: Big Shot, Occasions Paper-Piercing Pack, Paper-Piercing Tool, Sticky Strip, Stampin’ Dimensionals and SNAIL

    Blog Hop Participants:

    1. Annie L. of Love Me Cards
    2. Pam S. of Stampin’ in the Sun!
    3. Nancy B. of Lady Stamps-A-Lot
    4. Rose C. of Stamp with Rose
    5. Tonya B. of Stampin’ with Tonya
    6. Dawn S. of Dawn’s Creative Chalet
    7. Patricia T. of Sunnyone Stampin’
    8. Pamela W. of Stinky Tofu
    9. Darcy J. of DJ’s Stampin’ Place
    10. Kim R. of Stamping with Kim
    11. Terry B of Goin’ Over the Edge
    12. Justin K of JK Cards
    13. Heidi B of Stuck on Stampin’
    14. Jennifer B of NW Stamper
    15. Bree R. of Craft-somnia
    16. Diana E of Stampin’ Fun with Diana
  • Stylin’ Stampin’ Squad Bog Hop!

    Blog Hop Badges December 2012

    Hello everyone and welcome to this month’s Stylin’ Stampin’ Squad Blog Hop. Most likely you have arrived here from Terry Blais’ Blog, didn’t she have some great projects?! This is my first time out with these talented ladies and I hope that you enjoy my projects. This month we have a holiday theme and I have a card and a 3D project for you today.

    First up is the card that I CASE’d it from Stampin’ Success. The base of the card is Crumb Cake Card Stock. I stamped the greeting from the More Merry Messages Stamp Set in Early Espresso. The border that is stamped across the bottom in Crumb Cake is from the Make a Mitten Stamp Set. All of the paper is from the Festival of Prints Designer Series paper Stack, cut into strips and some ends are flagged. The mittens are punched out from Island Indigo and Cherry Cobbler with the Mitten Builder Punch. The reindeer are from the Make a Mitten Set and are stamped in Early Espresso. I really like the simplicity of the card and it’s a great way to use some of your scraps of DSP.

    IMG_2061

    Next up we have the 3D project. I was in one of the local craft stores and I saw this small printer’s tray. I thought it would be great to fill with some Stampin’ Up! goodies to make a little Christmas display. All of the interior of the tray is lined with Crumb Cake Card Stock that I embossed with the Chevron Textured impressions Embossing Folder. They are adhered to the inside with Sticky Strip. The gingerbread men and the mug are from the Scentsational Season Stamp Set and are stamped in Soft Suede and Island Indigo. I cut them out with the Holiday Collection Framelits Dies and adhered them with some Stampin’ Dimensionals. In the other side we have a piece of Island Indigo that I punched the edge with the Scallop Edge Border Punch. A piece of Raspberry Ripple Stitched Satin Ribbon is adhered around the back with Sticky Strip. I punched a piece of Soft Suede with the 2 3/8″ Scallop Circle Punch and embossed it with the Delicate Designs Textured Impressions Embossing Folder. A set of mittens in Island Indigo and Raspberry Ripple are punched out with the Mitten Builder Punch and the reindeer is from the Make a Mitten Stamp Set and is stamped in Early Espresso. They are all adhered together and the the tray with Stampin’ Dimensionals. The greeting is form the More Merry Messages and is stamped in Raspberry Ripple on Very Vanilla and the corners rounded with the 3/16″ Corner Rounder. I backed it with a piece of Raspberry Ripple and adhered it with some more Stmapin’ Dimensionals. I love this and will definitely make some more to give as gifts. How cute would this be hanging up for the holidays?!

    Stylin' Stampin' Squad Blog Hop 3D

    I hope that you enjoyed my projects and the rest on the hop. Click on the graphic below to visit the talented Heidi Boos over at Stuck on Stampin’ who is the next stop on the hop:

    Blog Hop Badges Next

    Thank you to the Stylin’ Stampin’ Squad for inviting me to join them this month and thank you to all of you for visiting! I hope you have found some inspiration and that you have a wonderful day! 🙂

    Stampin’ Up! products used:

    Card Stock: Crumb Cake, Very Vanilla, Island Indigo, Raspberry Ripple, Soft Suede and Cherry Cobbler

    Designer Series Paper: Festival of Prints Stack

    Ink: Soft Suede, Crumb Cake, Island Indigo and Early Espresso

    Stamp Sets: Make a Mitten, Scentsational Season and More Merry Messages Clear Mount

    Embellishments: Raspberry Ripple 3/8″ Stitched Satin Ribbon

    Tools: Big Shot, Chevron Textured Impressions Embossing Folder, Delicate Designs Textured Impressions Embossing Folder, Holiday Collection Framelits Dies, Mitten Builder Punch, 2 3/8″ Scallop Circle Punch, Paper Snips, Sticky Strip, Stampin’ Dimensionals and SNAIL