Birthday Dresser

I know that my friend Sandy’s birthday is in October. I wanted to make her something special and a little different. I was looking around the SplitCoastStampers site the other day and I came across this really neat box with three drawers. I think it looks a to like a dresser. It’s perfect for hiding little surprises like chocolates. I have really been into blues and browns lately, I think it gives a nice rich clean look. The project was pretty straight forward and very easy to follow. It didn’t take long at all and I think the end result is great. Sandy really seemed to like it and I was very happy that she did. I used the Stampin’ Up! sets Happiest Birthday Wishes and the Retired Birthday Bliss. The paper is Marina Mist as well as the ink. I had to go out and get some 12 x 12 paper to do the project, I’ll have to order some from Stampin’ Up! next time. I also used the Scallop Trim Border Punch for the “runner” on the top. The knobs were made from tiny wooden Thread spools that I had and some Rhinestones for a little bling. Thanks for taking a look.

Techniques Workshop Take 2

Last night was my favorite night of the month! We went to our Techniques Workshop hosted by the super talented Sandy (stampwithsandy.com). For this class we covered three different techniques using heat embossing. The first one was just basic heat embossing using VersaMark and the gorgeous Stampin’ Up! Pewter Embossing Powder. The stamp set is from the Holiday Mini and is called Bright Hopes. It’s perfect for heat embossing because it has that regal look about it. The second project was Stained Glass. For this one we stamped onto Vellum with VersaMark and heat embossed with Black Embossing Powder. We then use the Stampin’ Up! Write Markers to color in the image. The stamp set is Delicate Doilies and is perfect for this technique. For our third project we did Emboss Resist. For this we used the Gently Falling stamp set from the Holiday Mini. First the Very Vanilla Card Stock was sponged with multiple colors and then stamped with VersaMark. We heat embossed using Clear Embossing Powder. To complete the effect we sponged on some Early Espresso and then went over the clear embossing with a paper towel. The effect is quite stunning. Pictures of all of the cards are posted below. I can’t wait for next month’s class!! Thanks, as always to Sandy and thanks for looking.

Pumpkin Card Box.

I have been really into 3D Projects this weekend. I am really loving all that you can do with some card stock and some glue. I think I will call it engineering paper instead of paper crafting form now on, has a little more of a manly ring to don’t you think?!?! Anyway, I decided that sets of cards are a great idea for holiday gifts. Who couldn’t use a nice set of Thank You cards. These were made using the Retired Stampin’ Up! Set Afterthoughts and the Wood Mount Set For All You Do. I also used some Brights Stack DSP and the Scallop Trim Border Punch. They have fall like cheery feel to them. Thanks for stopping by!

Little Square Inspiration.

I was looking around the Stampin Pretty blog (www.stampinpretty.com) and I came across a tutorial on how to make a Pizza Box for 3 x 3 cards. I sat down and made these two set over the weekend. The first one is made with the Stampin’ Up1 Retired Punch Bunch Clear Mount Set. I like the color combination because I think that anything that is black with cream or white tends to have a very elegant look about it. The second set is Holiday theme. I like the red and kraft paper together, I think it gives it a very homey feel. I use an EK Tools Postage Stamp Edger and some old Seasons Greetings stamp that I have had for ages. I also made the envelopes! I’m really happy with the way the projects came out and I can’t wait to make some more. Thanks for the tutorial Mary!

Happy Birthday Mom!

Today is my mom’s birthday. She is the best mom anyone could ever ask for. I know a lot of people say that about their moms but she really is. I wanted to make her a really special card and I was looking around on the Stampin’ Pretty (http://www.stampinpretty.com/) blog yesterday and I came across a link to Mikki’s Creative Corner (http://mikkiscreativecorner.blogspot.com/) and a tutorial for a Tri Shutter Card. This is one of the coolest cards I have seen in a long time. I love the way it looks and the instructions were nice and easy to follow. I made mine with White Card Stock and a Deep Purple. I used some printed paper that I had (waiting for my DSP from Stampin’ Up!, think how much better it will look when I get that!) and some EK Tools Punches that I have. The sentiment is from the Stampin’ Up! Retired Afterthoughts Set. I’m so happy with the way it come out, I hope mom likes it!

Mojo Monday 208

This weeks Mojo Monday challenge is a sketch. I love all of their sketch challenges but I really like this one because it appeals to my neat and orderly side! It’s a great layout and as soon as I saw it I knew what I wanted to do. The Open Seas is by far one of my favorite Stampin’ Up! sets from the Summer Mini Catalog. It was carried over after the catalog expired so I think that you can still get it now. I love the masculine feel and I always need to use a nice dark blue paper with it. I usually use a beige background but I opted for white to give it a crisper look. The stamps are extremely detailed and have a bit of a vintage feel to them. I used Basic Black Classic Stampin’ Ink for the images. The Sentiment is from the retired set Afterthoughts. I like the nice clean lines and uncomplicated simple look, hope you like it too. 🙂

PPA 113

Ahh.. how I love a good Pals Paper Arts Challenge! Especially when there are no specific colors to follow! This weeks challenge is to use heat embossing, something I haven’t done for years. I love all of the new Stampin’ Up! stuff that I have and my favorite items are the Builder Punches. I decided to go with the Cupcake Builder Punch. I embossed the red sprinkles and cherry as well as the sentiments. I like the card but I guess I need to get some Stampin’ Up! embossing powder because the stuff I have isn’t that great. I also need to get an Embossing Buddy! Here are the list of  “ingredients” for the card and the picture is below. Thanks for stopping by!

Stampin’ Up! Products Used:

Card Stock: Whisper White and Delightful Daffodil

Designer Series Paper: Brights Stack

Punches: Cupcake Builder Punch and Scallop Trim Border

Stamp Sets: Create a Cupcake

Ink: Real Red Classic Stampin’ Ink and VersaMark

Embossing Powder: Not the best!

Inch For You

The Starter Kit that you get when you sign up to be a Stampin’ Up! Demonstrator comes with a lot of stuff but paper is not one of them! I have ordered some more so in the mean time I’m using what I have. This card is made with a retired set called Cute By the Inch. I like it because it comes with 9 stamps and it really is cute and they fit on inch squares! I used Pumpkin Pie and Old Olive Stampin’ Ink. The Brights Designer Series Paper Pack is great, I turned the Old Olive Stripe 90 degrees for a little more interest. The Card Stock is also Old Olive and Pumpkin Pie with some Whisper White. I like the simplicity and fall colors are appropriate for this time of year. Thanks for looking!

My First Workshop!

So tonight was the big night! LOL! I had my first Workshop. My good friend Melissa was kind enough to host the Workshop. It was a small gathering, Melissa, Kim (My BFF!), Linda (Melissa’s mom) and Gina (Melissa’s sister). We had a really nice time. The only complaint was that there was too much to choose from in the Idea Book & Catalog! That’s a good gripe if you ask me! I have posted some pictures of the card that I made for the Workshop below. The first one is the Thank You card I made for Melissa for being kind enough to host the Workshop. The second one is the Make & Take. The rest of them are just cards I made to show off some of the products. I think everyone had fun. I know that Gina filled out her Make & Take thank you card and sent it off to a friend. I think that might be a first!!

Melissa’s Thank You Card. 🙂 I used Whisper White, Early Espresso and Basic Black Smooth Card Stock. Brights Stack Designer Series Paper. Basic Black Stampin’ Pad. For All You Do Wood Mount Stamp Set. Owl Builder and Ticket Corner Punch. Stampin Dimensionals.

The Make & Take. Whisper White and Old Olive Smooth Card Stock. Brights Stack Designer Series Paper. Old Olive Stampin’ Ink. Kindness Matters and Pretty Postage Clear Mount Stamp Sets. Scalloped Trim Border and Postage Stamp Punches. Stampin’ Dimensionals.

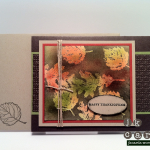
For All You Do Wood Mount Set. Pumpkin Pie and Old Olive Stampin’ Ink. Whisper White, Pumpkin Pie and Old Olive Smooth Card Stock. Brights Stack Designer Series Paper. Stampin’ Dimensionals.

Whisper White Smooth Card Stock. Brights Stack Designer Series Paper. For All You Do Wood Mount and Delightful Dozen Stamp Sets. Real Red Stampin’ Ink. Marina Mist and Delightful Daffodil Stampin’ Write Markers. Cupcake Builder and Ticket Corner Punches. Whisper White Satin Ribbon. Stampin’ Dimensionals.

Whisper White, Basic Black, Old Olive, Real Red and Early Espresso Smooth Card Stock. Brights Stack Designer Series Paper. Delightsful Dozen Clear Mount Stamp Set. Real Red Stampin’ Ink. Owl Builder Punch. Stampin’ Dimensionals.

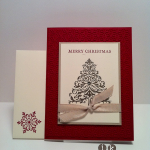
3 X 3 Tag Card. Whisper White Smooth Card Stock. Brights Stack Designer Series Paper. For All You Do Clear Mount Stamp Set. Real Red and Basic Black Stampin’ Ink. Ticket Corner Punch.

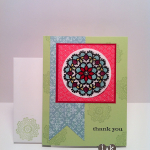
Whisper White and Real Red Smooth Card Stock. Brights Stack Designer Series Paper. Happiest Birthday Wishes Clear Mount Host(ess) Stamp Set. Real Red Stampin’ Ink. Scalloped Trim and Tag Punches.

Maritime Birthday

Today was my good friend Brian’s birthday. He’s a really nice guy and will do anything for anyone. He a real manly man, being he’s a fireman and all! So, for his card I got to use one of my favorite Stampin’ Up! Sets, Open Sea. I love the detail in the stamps and the set has a nice masculine quality about it. The greeting is from the Happiest Birthday Wishes set. I’m huge fan of navy blue and vanilla card stock and those colors work well with this set. The silver star brad in the corner balances out the card front and gives it a little shine. Thanks for looking!