Category: Crafts

  • Butterfly Blossom Happy Birthday

    Ahh… it’s so nice when the work week skips right over Monday! Every week should be like that! LOL! I hope that you all had a nice three day weekend. I had a relaxing Saturday and Monday and a fun Sunday! I went into the city and spent the day with my friend Kim. We had lunch at the Diner and the went to PC Richard to get her a new Stove and Microwave, she has been without one for about six months so it was time! We sat by the river for a bit and then had some Thai for dinner. If you are ever in Manhattan there is a great teeny Thai place called Lennox Thai in the 60’s on 1st Avenue! We have been there a few times and the food is delicious and the service wonderful.

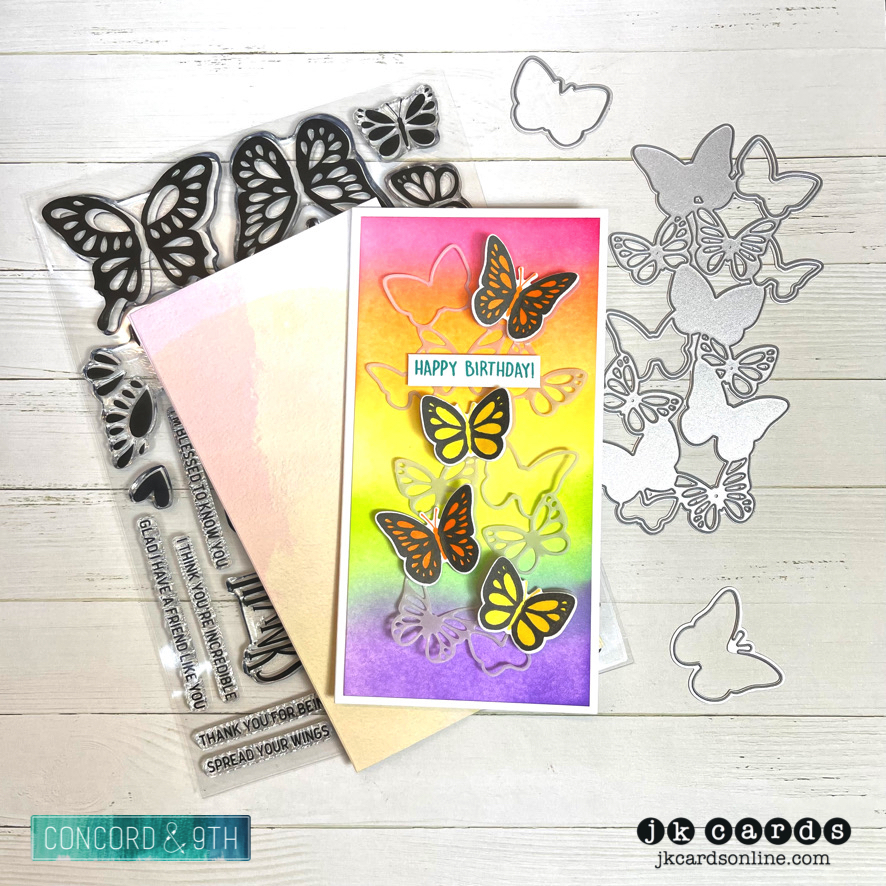
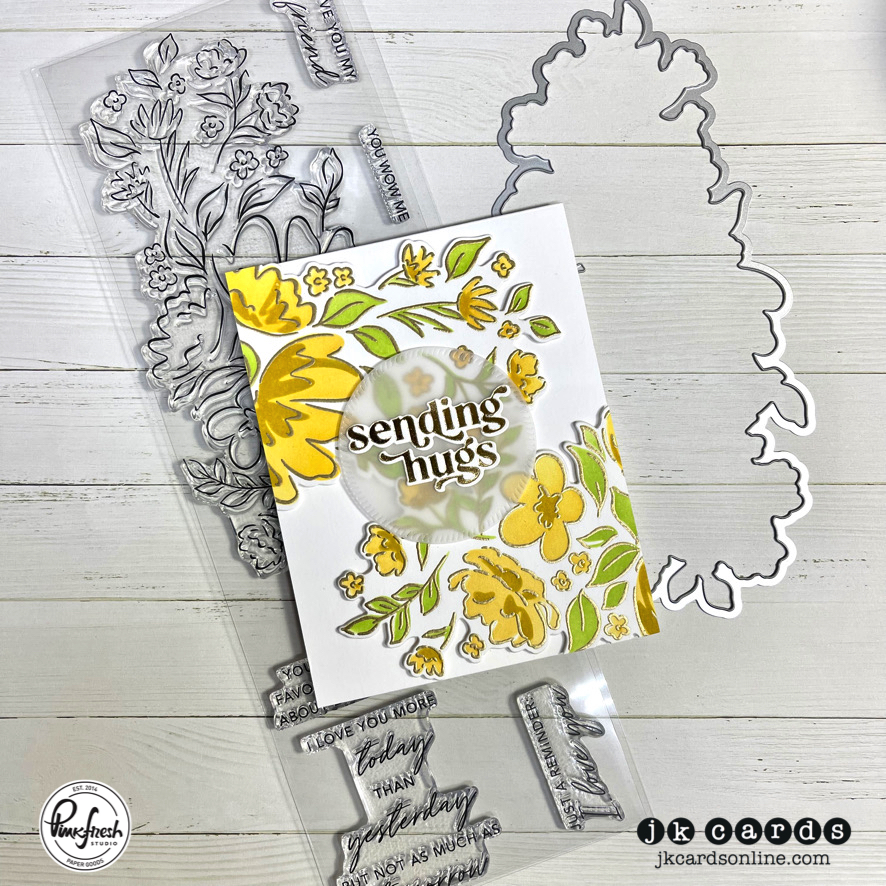
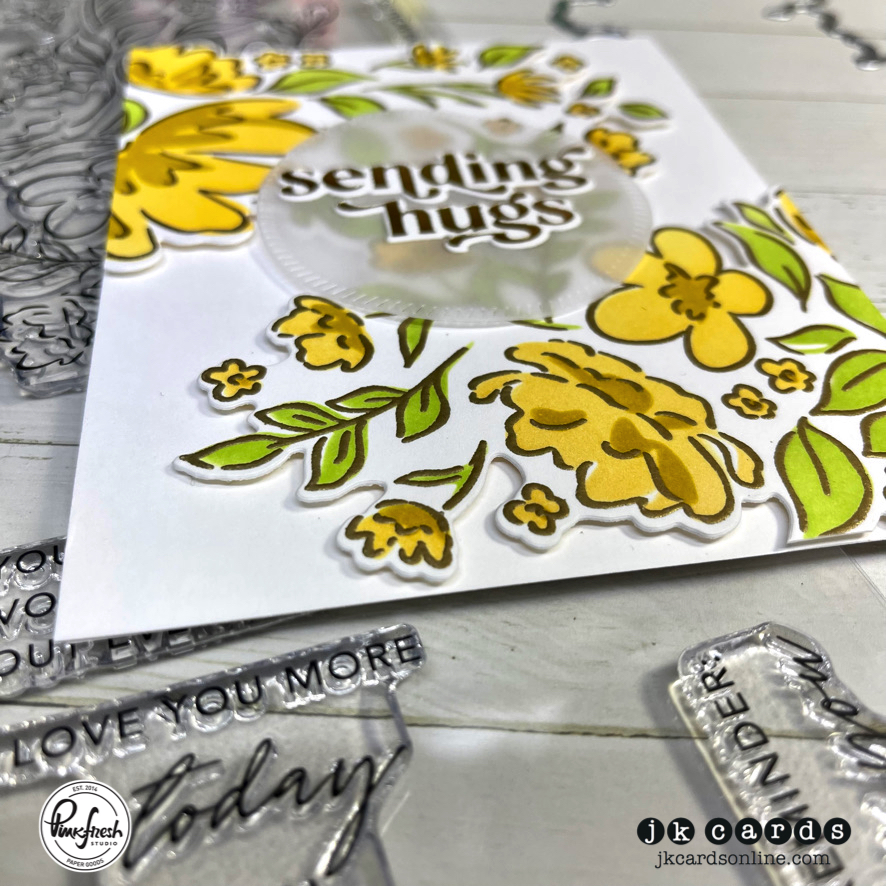
    As promised here is my other card that I made using the Simon Says Stamp Butterfly Blossom Stamp Set from the April Card Kit. The images and greeting are from the above mentioned Stamp Set and are stamped in Memento Tuxedo Black Ink onto Hammermill 100lb Paper. The butterflies are stamped onto a piece of Hammermill that I stamped with the Simon Says Stamp Old Text Background Stamp first. I used the coordinating Simon Says Stamp Butterfly Blossoms Stencils and Various Simon Says Stamp Pawsitively Saturated Inks with blender brushes to color them in. The greeting is stamped in Simon Says Stamp Nocturne Black VersaFine Clair Ink. The coordinating Simon Says Stamp Butterfly Blossoms Dies are used to cut everything out. I used the Simon Says Stamp Window Trio Wafer Dies from the Simon Says Stamp July Card Kit to cut out a pice of Black 100lb Card Stock. That is adhered to a card base of Neenah Solar White 110lb Card Stock. My images and greeting are added with 3M Foam Tape. In keeping with my need for sparkle I added some Simon Says Stamp Gumdrops Confetti Sequins.

    I really do like that Butterfly Blossoms Stamp Set. It’s a great one for making quick easy to color cards! I hope that you liked my post for today. I’m going to try and get some more creative time in this week so hopefully I will be back soon with another post! Have a great day!

    • Stamp Set
      • Simon Says Stamp Butterfly Blossoms
      • Simon Says Stamp Old Text Background
    • Ink
      • Memento Tuxedo Black
      • Simon Says Stamp Nocturne Black VersaFine Clair Ink
      • Simon Says Stamp Peachy, Aspen, Orchid and Guava Pawsitively Saturated Ink
    • Card Stock
      • Neenah Solar White 110lb
      • Hammermill 100lb
    • Dies
      • Simon Says Stamp Butterfly Blossoms
      • Simon Says Stamp Window Trio Wafer
    • Stencils
      • Simon Says Stamp Butterfly Blossoms
    • Adhesives
      • Bearly Arts Glue
      • 3M Foam Tape
    • Embellishments
      • Simon Says Stamp Gumdrops Confetti Sequins
    • Tools
      • Anna Griffin Empress Elite
      • Simon Says Stamp Place and Pierce Tool
      • Blending Brushes
  • Butterfly Blossom Thinking of You

    Hello and Happy Friday! I can’t believe that it’s the last weekend of August already! That Summer just flew by! I’m a big fan of the summer, love my flip flops and not wearing coats. I’m not ready for the cooler weather just yet but it seems to be here already. We have a three day weekend and that’s always nice. I think I may try to get into Manhattan to see my friend Kim!

    I have had the idea for this card for a while. There are actually two cards, I’ll post the other one over the weekend. I used products from the Simon Says Stamp April 2025 Card Kit. The images and greeting are from the Simon Says Stamp Butterfly Blossoms Stamp Set and are stamped in Memento Tuxedo Black Ink onto Hammermill 100lb Paper. The butterflies are stamped onto a piece of Hammermill that I stamped with the Simon Says Stamp Old Text Background Stamp first. I used the coordinating Simon Says Stamp Butterfly Blossoms Stencils and Various Simon Says Stamp Pawsitively Saturated Inks with blender brushes to color them in. The greeting is stamped in Simon Says Stamp Nocturne Black VersaFine Clair Ink. The coordinating Simon Says Stamp Butterfly Blossoms Dies are used to cut everything out. I added all of the images and greeting to a card base of Neenah 110lb Solar White Card Stock with 3M Foam Tape. You know I have to have a little sparkle so I added some Simon Says Stamp Cottontail Embellishment Mix Sequins.

    I do love a nice simple card and the stencils make coloring in the images so quick and easy! That Simon Says Stamp Nocturne Black VersaFine Clair Ink is definitely my favorite ink for stamping, especially greetings. They are nice and dark and crisp!

    Thinking of you cards are always good to have on hand, they work for birthday’s, thank you’s or just because! I hope that you enjoyed my little bit of creativity for today! Thank you so much for spending some of your day with me and have a fabulous Friday!

    • Stamp Set
      • Simon Says Stamp Butterfly Blossoms
      • Simon Says Stamp Old Text Background
    • Ink
      • Memento Tuxedo Black
      • Simon Says Stamp Nocturne Black VersaFine Clair Ink
      • Simon Says Stamp Peachy, Aspen, Butter and Guava Pawsitively Saturated Ink
    • Card Stock
      • Neenah Solar White 110lb
      • Hammermill 100lb
    • Dies
      • Simon Says Stamp Butterfly Blossoms
    • Stencils
      • Simon Says Stamp Butterfly Blossoms
    • Adhesives
      • Bearly Arts Glue
      • 3M Foam Tape
    • Embellishments
      • Simon Says Stamp Cottontail Embellishment Mix Sequins
    • Tools
      • Anna Griffin Empress Elite
      • Simon Says Stamp Place and Pierce Tool
      • Blending Brushes
  • Tree Delivery Xmas

    Hello peeps and a happy Saturday to you! More importantly Happy World Card Making Day! I managed to get a little crafty time in last night and get a card finished for today! I had started this card a while ago, the car has been on my desk for about a week! I chatted with my friend Sue last night and it all came together!

    I used the Spellbinders Special Delivery Dies to cut out my car. It’s cut from a piece of Blue 110lb and again from a piece of Neenah Solar White 110lb. I did a little ink blending on the windows and then pieced all of the white into the blue car. The bumpers, door handle and hubcaps are cut from Silver Card Stock and the lights also from White. I color in the lights with Copics, adhered them to the card and added some Nuvo Crystal Glaze to them. The wheels are cut from Black 110lb, I added then to the car and then the hub caps. My trees are cut from 2 colors of Green 110lb Card Stock and White Glimmer Paper using the Spellbinders Bottle Brush Trees Dies. For my background I used a Blending Brush to add Broken China Distress Oxide Ink to a piece of Neenah Solar White 110lb Card Stock. It’s adhered to a Slimline Card Base. The snowy hill and road are cut from Black 110lb and White 110lb using Trinity Stamps Slimline Series: Scenic Borders. I adhered them to each other with Bearly Arts Glue and then to the card With Foam Tape. The trees are glued in place and the car added with more Foam Tape. The other small tree is added to the top of the car and then the ribbon. I was digging through my stash and found a really old Pinkfresh Stamp Set called Christmas Wishes and stamped the greeting from the set in Versafine Clair Nocturne Ink with my Misti.

    I do really like the little car die and putting it all together was fun! I reminded me a little of making models back when I was little! I hope that you enjoyed my Christmas card for World Card Making Day! Here’s to hoping that you get to be crafty today too! Thanks for stopping by and have a wonderful weekend!

    • Stamp Set
      • Pinkfresh Christmas Wishes (2015)
    • Ink
      • Versafine Clair Nocturne
      • Broken China Distress Oxide
    • Dies
      • Spellbinders Special Delivery and Bottle Brush Trees
      • Trinity Stamps Slimline Series: Scenic Borders
    • Card Stock
      • Neenah Solar White 110lb
      • Recollections Blue Skies, Green Gardens and Black 110lb
      • Stampin’ Up! Real Red
    • Specialty
      • Stampin’ Up! Silver and White Glitter
    • Adhesives
      • Bearly Arts Glue
      • 3M Foam Tape
    • Embellishments
      • Nuvo Crystal Glaze
    • Tools
      • Crafter’s Companion Gemini Jr.
      • Misti
      • Blending Brush
  • Simple Hope Oval Ornaments

    Happy Wednesday peeps! I hope that you are all having a good week! I have been relatively busy which is a good thing! The weather has gotten chilly here overnight. I guess the fall is finally here. I’m not a fan of the cold as you all know! I hate to give up my flip-flops! LOL!

    Today I have a simple card that is nice and mailable. I started off by using the Pinkfresh Holiday Ornaments Stencils to ink blend two of the ornaments and the pine bough onto a piece of Neenah Solar White 110lb Card Stock. I used Hero Arts Mint Julep, Tide Pool, Soft Vanilla, Butter Bar and Lime Green Ink. Next I cut out the Pinkfresh Fancy Oval Frame from a piece of Topical Sea Card Stock and adhered it the my stenciled panel. To create a border I added a piece of Hunter Green to my card base and then added the panel to the card with fun foam to give it some dimension. My greeting is from the Pinkfresh Thrill of Hope Wreath Hot Foil Plates and is foiled with Spellbinders Moondust Foil. I used the coordinating Pinkfresh Thrill of Hope Wreath Dies to cut it out and added it to the card with Bearly Arts Glue. A few Little Things by Lucy Shimmering Pool Mix Gems give the card some shine!

    I’m loving using stencils and my blending brushes to create detailed and beautiful images! I hope that you enjoyed today’s card and I thank you very much for visiting! Enjoy the rest of your Wednesday! 🙂

    • Stencils
      • Pinkfresh Holiday Ornaments
    • Ink
      • Hero Arts Mint Julep, Tide Pool, Soft Vanilla, Butter Bar and Lime Green Ink
    • Hot Foil Plates
      • Pinkfresh Thrill of Hope Wreath
    • Foil
      • Spellbinders Moondust
    • Dies
      • Pinkfresh Thrill of Hope Wreath and Fancy Oval Frame
    • Card Stock
      • Neenah Solar White 110lb
      • My Colors Tropical Sea and Hunter Green
    • Embellishments
      • Little Things by Lucy Shimmering Pool Mix Gems
    • Adhesives
      • Bearly Arts Glue
    • Tools
      • Crafter’s Companion Gemini Jr.
      • Crafter’s Companion Foilpress
      • Blending Brushes
    • Other
      • Fun Foam
  • Best Day Painted Peony

    Happy Friday! I woke up to a rainy morning but it’s supposed to clear up later in the day. I think I will be taking a trip into Manhattan tomorrow to see some peeps. Maybe a little Street Fair on Sunday?! Definitely some crafty time today, I have a few projects started and need to get them finished. When I used to make cards I would sit down and do one start to finish, now I find that I will start a few things and then finish them much later! LOL!

    Today’s card features the Concord & 9th Painted Peony Layering Stamp Set. I actually made this card a while back when I used the set to make a Slimline card. I always stamp extras when I’m using layering sets! The flowers and leaves are stamped in Concord & 9th Ballet Slipper, Grapefruit, Honeysuckle, Poppy, Cranberry, Buttercup, Stardust, Sprout, Parsley, Clover and Evergreen Ink. I do love a layering set and using a Misti makes lining everything up and stamping it multiple times super easy! I used the coordinating Concord & 9th Painted Peony Dies to cut the flowers and leaves out. They are adhered to a card base of Black 110lb Card Stock with Bearly Arts Glue and Foam Tape. My greeting is from the Concord & 9th Geometrics Stamp Set and is heat embossed on Black 110lb Card Stock with Hero Arts White Embossing Powder. I added it to the card with Foam Tape. A few Clear Droplets finish off the card.

    I love the way the black really brightens up the flowers and makes them pop! I hope that you enjoyed today’s card! Thanks for stopping by and have a wonderful weekend! 🙂

    • Stamp Sets
      • Concord & 9th Painted Peony and Geometrics
    • Ink
      • Concord & 9th Ballet Slipper, Grapefruit, Honeysuckle, Poppy, Cranberry, Buttercup, Stardust, Sprout, Parsley, Clover and Evergreen
    • Card Stock
      • Neenah Solar White 80lb
      • Recollections Black 110lb
    • Dies
      • Concord & 9th Painted Peony
    • Embellishments
      • The Stamp Market Clear Droplets
    • Adhesives
      • Bearly Arts Glue
      • 3M Foam Tape
    • Tools
      • Misti
      • Crafter’s Companion Gemini Jr.
      • WOW! Heat Tool
  • Sending US Love

    Happy Tuesday! I hope that you all enjoyed your weekend! I had a nice dinner with Jim and Heather on Saturday night and celebrated my friend Kathie’s birthday on Sunday! Feels good to get together with people again, safely, outside! LOL!

    Today’s card features a Hero Arts Fancy Die. I do love them! You can make then as detailed or as simple as you want! I cut the Mailbox die from a piece of Blue 110lb Card Stock and added a little Prize Ribbon Distress Oxide Ink to the edges to give it a little depth. The envelopes are cut from White 110lb Card Stock and I added a little detail to two of them with my Copic Markers. For the background I stamped the Hero Arts Mail Jumble Background Cling Stamp in Hero Arts Stone Wash Ink onto a piece of Blue 110lb Card Stock. I added the background to a card base of White 110lb Card Stock and then used Foam Tape to adhere the Mailbox. All of the letters are adhered with Bearly Arts Glue, some to the front and a few are inserted into the door. My greeting is from the June 2016 My Monthly Hero Kit and is stamped in Red Royal onto some more White 110lb Card Stock and adhered to the card with Foam Tape.

    You can see the depth that the Distress Ink gives the Mailbox better in the second photo.

    A simple card with some impact thanks to the Hero Arts US Mailbox Fancy Die! I hope that you like today’s card! Thank you so much for spending some time with me today! Enjoy the rest of your Tuesday! 🙂

    • Stamp Set
      • Hero Arts June 2016 My Monthly Hero Kit
    • Ink
      • Hero Arts Stone Wash and Red Royal Shadow Ink
      • Prize Ribbon Distress Oxide Ink
    • Markers
      • Copic
    • Dies
      • Hero Arts US Mailbox Fancy Die
    • Card Stock
      • Neenah Solar White 110lb
      • Recollections Blue Skies 110lb Card Stock
    • Adhesives
      • Bearly Arts Glue
      • 3M Foam Tape
    • Tools
      • Misti
      • Crafter’s Companion Gemini Jr.
  • Sunflower Tri-Fold Hello

    Ahh… another week done. Happy Friday peeps! I had a rather uninteresting week but sometimes that’s ok! No big plans for the weekend either. Guess getting crafty is always a good way to spend some time. My Craft Closet needs to be organized in the worst way and I really do need to part with some of my stamp sets, but it’s so hard. Do you feel that way? Are you a stamp hoarder?! LOL!

    I haven’t purchased a My Monthly Hero Kit in a while. Not that I haven’t liked them but this month’s kit is awesome and that’s what I used for my card. It was inspired by Jennifer McGuire’s partial die cutting video that I watched the other day. I cut a piece of Neenah Solar White 110lb Card Stock to 6 1/4 x 9 3/4 and scored it at 3 1/4 and 6 1/2. I arranged the dies for the Sunflower on both of the front panels and die cut it using the partial die cutting technique and my Spellbinder’s Platinum Machine. Once I trimmed of the excess with my Fiskars Paper Trimmer I used my Misti to Stamp the Sunflowers in Gina K Amalgam Ink. Then I used the coordinating stencils included in the kit along with Hero Arts Butter Bar, Pumpkin Pie, Green Apple, Lime Green, Cup O Joe and Root Beer Ink and my Blender Brushes to add color to them. To hold everything in place while I was Inking I used my Wendy Vecchi Make Art Stay-tion. I scored along the edges of the sunflowers and folded them in on each other. I decided that I wanted a green background so I cut a piece of Green 110lb Card Stock to 3 1/8 x 6 1/2 and scored along the top adding adhesive to the flap and adhered it to the card. To hide the green on the back I added another piece of 110lb Card Stock with some Bearly Arts Glue. My greeting is also from the kit and is cut from Super Gold Curious Metallic Card Stock and a piece of Green 110lb for the shadow. I adhered them to each other and the card with more Bearly Arts Glue. I decided I wanted another greeting on the green panel so I stamped one from the Kit in Black.

    I love a coordinating envelope and I thought a Kraft one would be perfect so I got out my Pinkfresh Mini Slimline Envelope dies and some Stampin’ Up! Kraft Card Stock and made one. I really do think the card is pretty cool and different, I enjoyed making it! I hope that you like it too and I thank you for stopping by and visiting with me today! Have a great weekend!

    • Kit
      • Hero Arts My Monthly Hero for September 2021 (Includes Stamps, Dies and Stencils)
    • Ink
      • Hero Arts Butter Bar, Pumpkin Pie, Green Apple, Lime Green, Cup O Joe and Root Beer
      • Gina K Amalgam
    • Dies
      • Pinkfresh Mini Slimline Envelope
    • Card Stock
      • Neenah Solar White 110lb
      • Recollections Garden Greens 110lb
      • The PaperCut Super Gold Curious Metallic
      • Stampin’ Up! Kraft
    • Adhesives
      • Bearly Arts Glue
    • Tools
      • Spellbinder’s Platinum
      • Misti
      • Wendy Vecchi Make Art Stay-tion
      • Fiskars Paper Trimmer
      • Scor-Pal Scor-Buddy 8ths
  • Bold Bright Birthday Butterflies

    Hi there and happy mid-week to you! I had a wonderful time in Pennsylvania over the weekend with my friends! We went out for breakfast, lunch and dinner, went for a local wine tasting and just relaxed. A perfect way to spend a birthday! Thanks to Jim, Lauretta and Cathy! I can’t believe that the season is almost over and we will be closing up the house for the winter in a few weeks. This year is just flying by.

    My card for today is actually one that I made for my friend Sue back in June. It’s a Mini Slimline measuring 6 1/4 x 3 1/4. To create my background I used Tim Holtz Distress Ink in Wilted Violet, Twisted Citron, Squeezed Lemonade, Carved Pumpkin and Picked Raspberry. I applied them to a piece of Neenah Solar White 110lb with my Blending Brushes and added the completed panel to my card base. The strip of butterflies is cut out of a piece of Pink Vellum using the Concord & 9th Butterflies Perfect Pairings Dies. That die has solid butterflies that coordinate with the Concord & 9th Bold Butterflies Stamps and Dies. I stamped those butterflies in Gina K Amalgam Ink and Concord & 9th Buttercup and Marmalade Ink. Those are added to the butterfly strip with Bearly Arts Glue and then to the card. My greeting is also from the Concord & 9th Bold Butterflies Stamp Set and is stamped in Concord & 9th Peacock Ink. It’s then adhered to the card with Foam Tape.

    I had a piece of watercolor patterned paper in my stash and I used the Pinkfresh Mini Slimline Envelope Die to create my envelope for the card. A nice bright cheery Birthday card that my friend Sue loved!

    Thank you for coming by to check in with me today! I hope that you have a wonderful rest of your Wednesday!

    • Stamp Set
      • Concord & 9th Bold Butterflies
    • Ink
      • Concord & 9th Buttercup, Marmalade and Peacock
      • Tim Holtz Distress Wilted Violet, Twisted Citron, Squeezed Lemonade, Carved Pumpkin and Picked Raspberry
      • Gina K Amalgam
    • Card Stock
      • Neenah Solar White 110lb
    • Specialty
      • That PaperCut Pink Vellum
    • Dies
      • Concord & 9th Bold Butterflies and Butterflies Perfect Pairings
      • Pinkfresh Mini Slimline Envelope
    • Tools
      • Crafter’s Companion Gemini Jr.
      • Blender Brushes
    • Adhesives
      • Bearly Arts Glue
      • 3M Foam Tape
  • Sending Favorite Hugs

    Sending Favorite Hugs

    Hello peeps and happy Friday! I’m off to PA for the weekend because it’s my birthday on Sunday! It’s supposed to be a nice weekend weather wise too. Maybe a hike or stroll through town?! Definitely some top down time in the convertible!

    As I have mentioned I’m really loving the coordinating stamps and stencils that Pinkfresh has. I used one of those sets today for my card. I started by heat embossing the large floral image from the Pinkfresh You are my Favorite Stamps Set in Hero Arts Gold Embossing Powder onto a piece of Neenah Solar White 110lb Card Stock. To color in the image I used the coordinating Pinkfresh You are my Favorite Stencil and some Concord & 9th Buttercup, Stardust and Sprout Ink with my Blending Brushes. The image is then die cut with the coordinating Pinkfresh You are my Favorite Die. I cut the image in half and added it to a card base of Neenah Solar White 110lb with Foam Tape. My greeting is from the Pinkfresh Perfect Sentiments Hot Foil Plate and it’s foiled in Gold Glimmer Foil and cut out with the coordinating Pinkfresh Perfect Sentiments Die. To make it stand out a bit more I cut out a piece of Vellum with the circle die from the Pinkfresh Mini Slimline Essentials Bundle. I adhered the sentiment to the vellum and then to the card with Bearly Arts Glue.

    I do love a slimline specific set especially when you can alter it to work on a standard A2 card!

    I hope that you enjoyed my card for today and got some ideas on how you can stretch your supplies a little! Thanks so much for coming by and I wish you a wonderful weekend!

    • Stamp Set
      • Pinkfresh You are my Favorite
    • Ink
      • Concord & 9th Buttercup, Stardust and Sprout
      • Versamark
    • Embossing Powder
      • Hero Arts Gold
    • Hot Foil Plate
      • Pinkfresh Perfect Sentiments
    • Foil
      • Spellbinders Gold Glimmer
    • Dies
      • Pinkfresh You are my Favorite, Perfect Sentiments and Mini Slimline Essential Bundle
    • Card Stock
      • Neenah Solar White 110lb
      • Heavyweight Vellum
    • Tools
      • Crafter’s Companion Gemini Jr.
      • Crafter’s Companion Gemini Foilpress
      • WOW! Heat Tool
      • Blending Brushes
    • Adhesives
      • Bearly Arts Glue
      • 3M Foam Tape
  • Old Parisian Floral Greetings

    Old Parisian Floral Greetings

    Happy mid-week peeps! The weather has been nice here, warm but good convertible weather which still is my favorite way to get around! I did get a different car, still a convertible, and I love it even more! Also high on the agenda, I have been trying organize the Craft Closet and it’s a little overwhelming! It’s so hard to part with anything. LOL! But sometimes you come across something that you completely forgot about and remember how much you loved it. I used just such a find on my card for today!

    I started out by using the Spellbinders Diamond Floral Frame Set from Yana. All of the flowers and frame are foiled with Spellbinders Gold Hot Foil using my Crafter’s Companion Foilpress and Gemini Jr onto two shades of green and two shades of purple 110lb Card Stock. I used Neenah Solar White 110lb for the frame. The coordinating dies in the set are used to cut out all of the elements. My greeting is from the Spellbinders Yana’s Sentiments Hot Foil Set. It’s also foiled in gold and I cut out three blanks to add to it to give it some dimension. The card base is Neenah Solar White 110lb and to that I added a piece of Purple 110lb Card Stock that I embossed with the Cuttlebug Old Paris Embossing Folder. It’s an oldie but still so cool! Next I added the elements to the card with Bearly Arts Glue and 3D Foam Tape. To finish it off I added some Pretty Pink Posh Gold Sequins.

    I do really still love that Embossing Folder, unfortunately it’s hard to find as it’s from 2015! But you can always do a google search and get it! I hope that you enjoyed today’s card and I thank you for stopping by! Enjoy the rest of your Wednesday!

    • Hot Foil Plates
      • Spellbinders Yana’s Sentiments and Diamond Floral Frame (includes coordinating dies)
    • Hot Foil
      • Spellbinders Gold
    • Card Stock
      • Neenah Solar White 110lb
      • Recollections Very Violet and Garden Greens 110lb
    • Embossing Folder
      • Cuttlebug Old Paris
    • Embellishments
      • Pretty Pink Posh Gold Sequins
    • Adhesives
      • Bearly Arts Glue
      • 3M Foam Tape
    • Tools
      • Crafter’s Companion Gemini Jr.
      • Crafter’s Companion Foilpress