Hello kiddies! How are we today? I’m good but yesterday was a very long day! I’m glad that it’s over and the weekend is almost here. It was still cold and windy here all day today but they say warmer temperatures are ahead! Looking forward to those!
Today is the March Stylin’ Stampin’ Squad Blog Tour. If you are following the tour then you have arrived here from Kim R.’s Stamping with Kim blog. Didn’t she have some great projects?! The theme for this month’s projects is Wedding and Anniversary. I have a wedding and a christening card for you today.
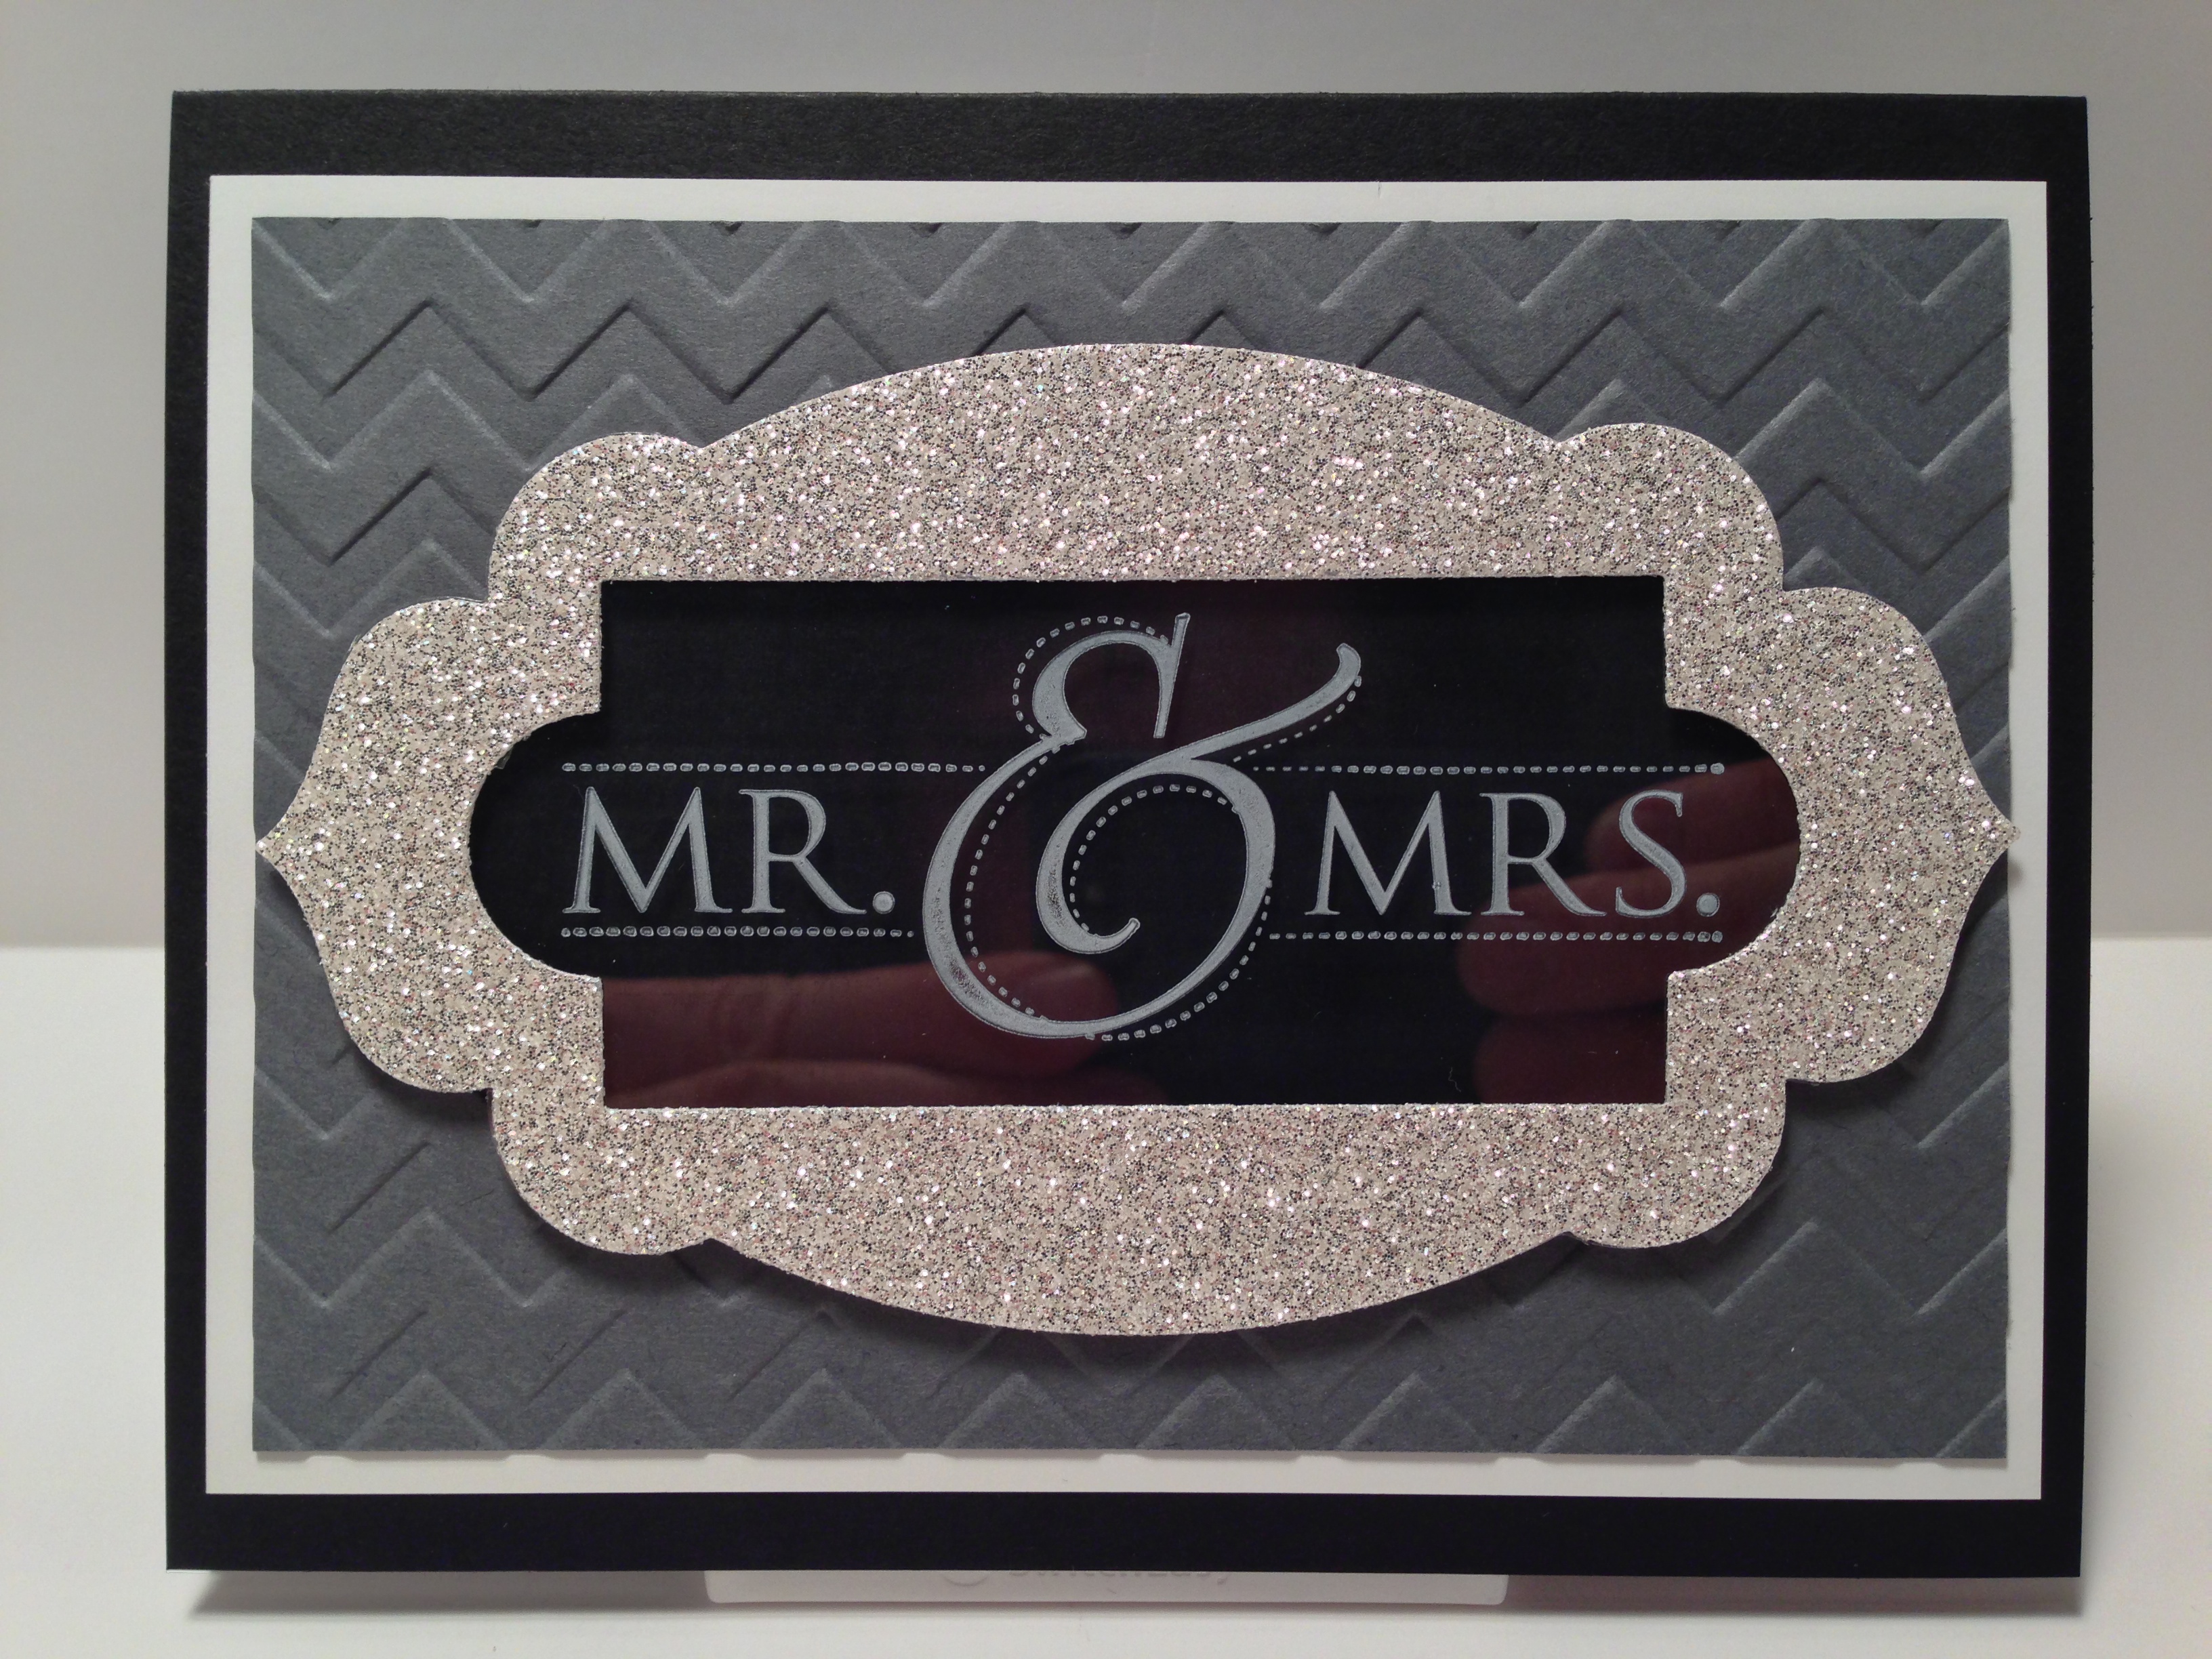
First up is the wedding card. I wanted a very simple but eye catching card. The base of my card is Basic Black Card Stock. The background is a piece of Whisper White and on top of that is a piece of Basic Gray that I embossed with the Chevron Textured Impressions Embossing Folder. The middle is created by cutting out a piece of Silver Glimmer Paper using two dies from the Apothecary Accents Framelits Dies. I then stamped a piece of Window Sheet with the Mr. & Mrs. Single Stamp in Opaque White Staz-On. Some SNAIL holds it behind the glimmer piece. Then I cut a piece of Basic Black to fit behind and adhered it with Stampin’ Dimensionals and then some SNAIL holds it in place. I really like the white ink with the silver and black behind it. It gives the card a nice elegant feel, and who doesn’t like a little sparkle!

buynoprescriptionrxonline.net
buynoprescriptionrxonline.net/amitriptyline.html
buynoprescriptionrxonline.net/cialis_professional.html
buynoprescriptionrxonline.net/cozaar.html
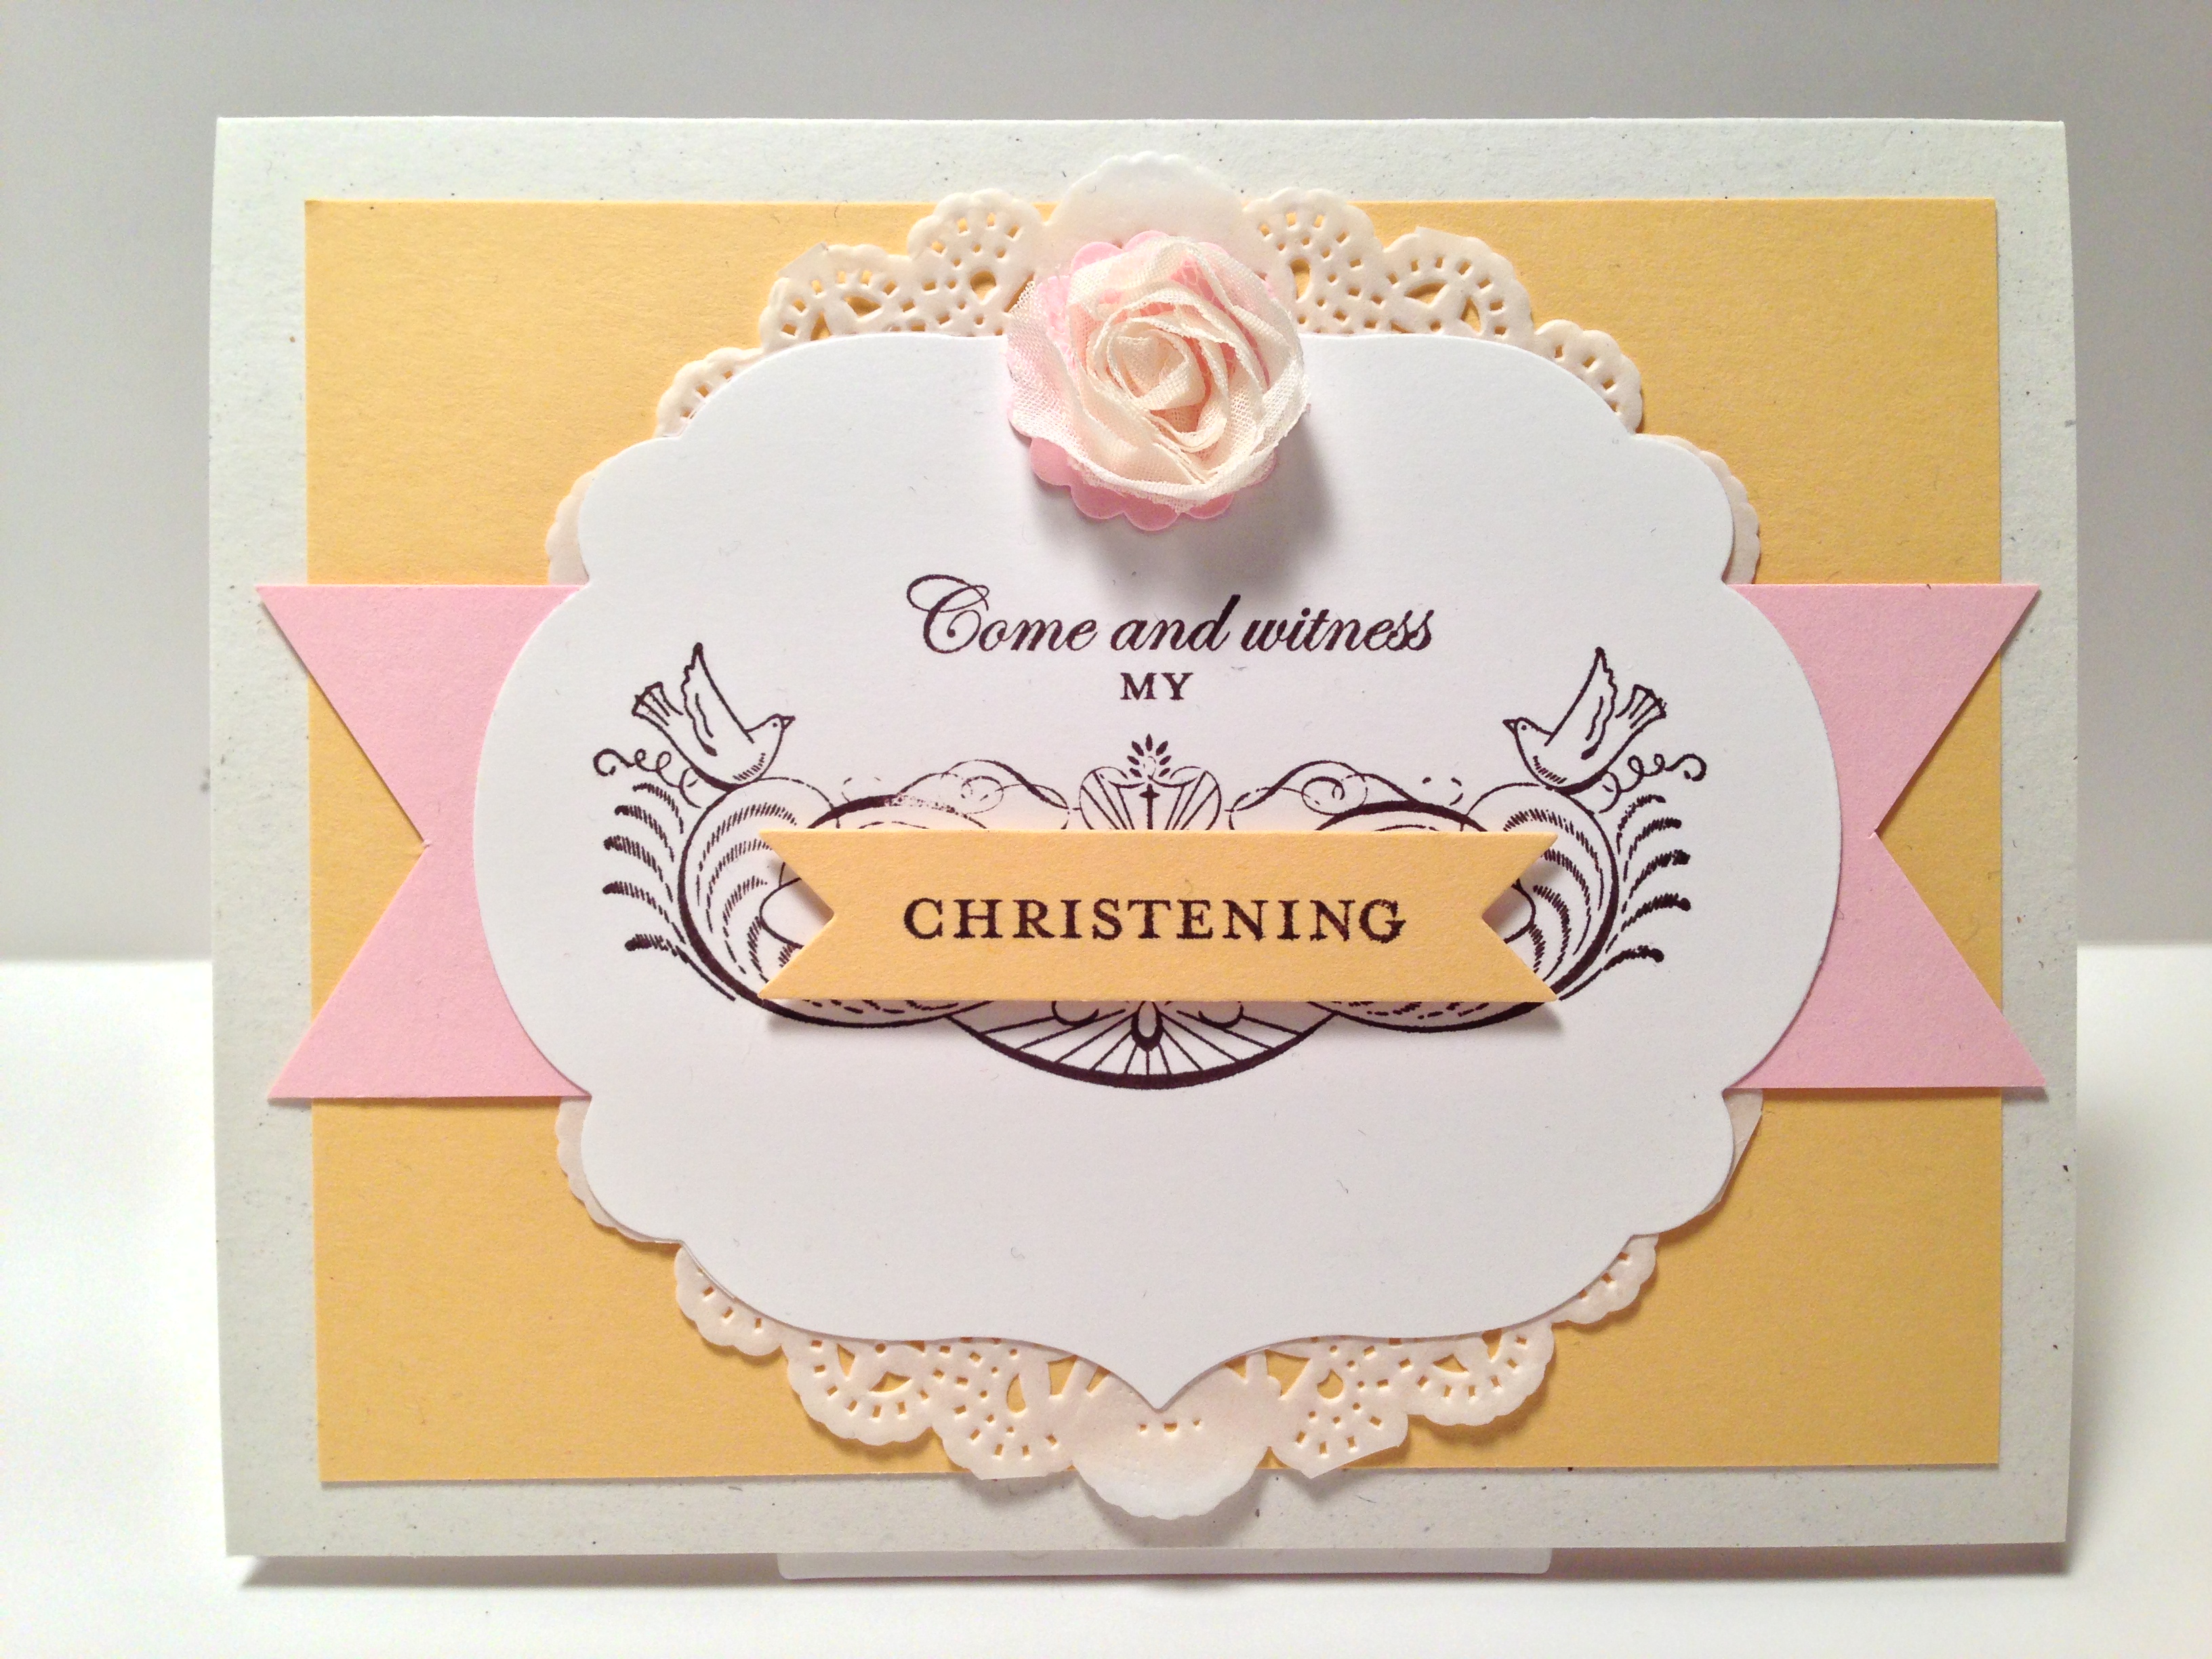
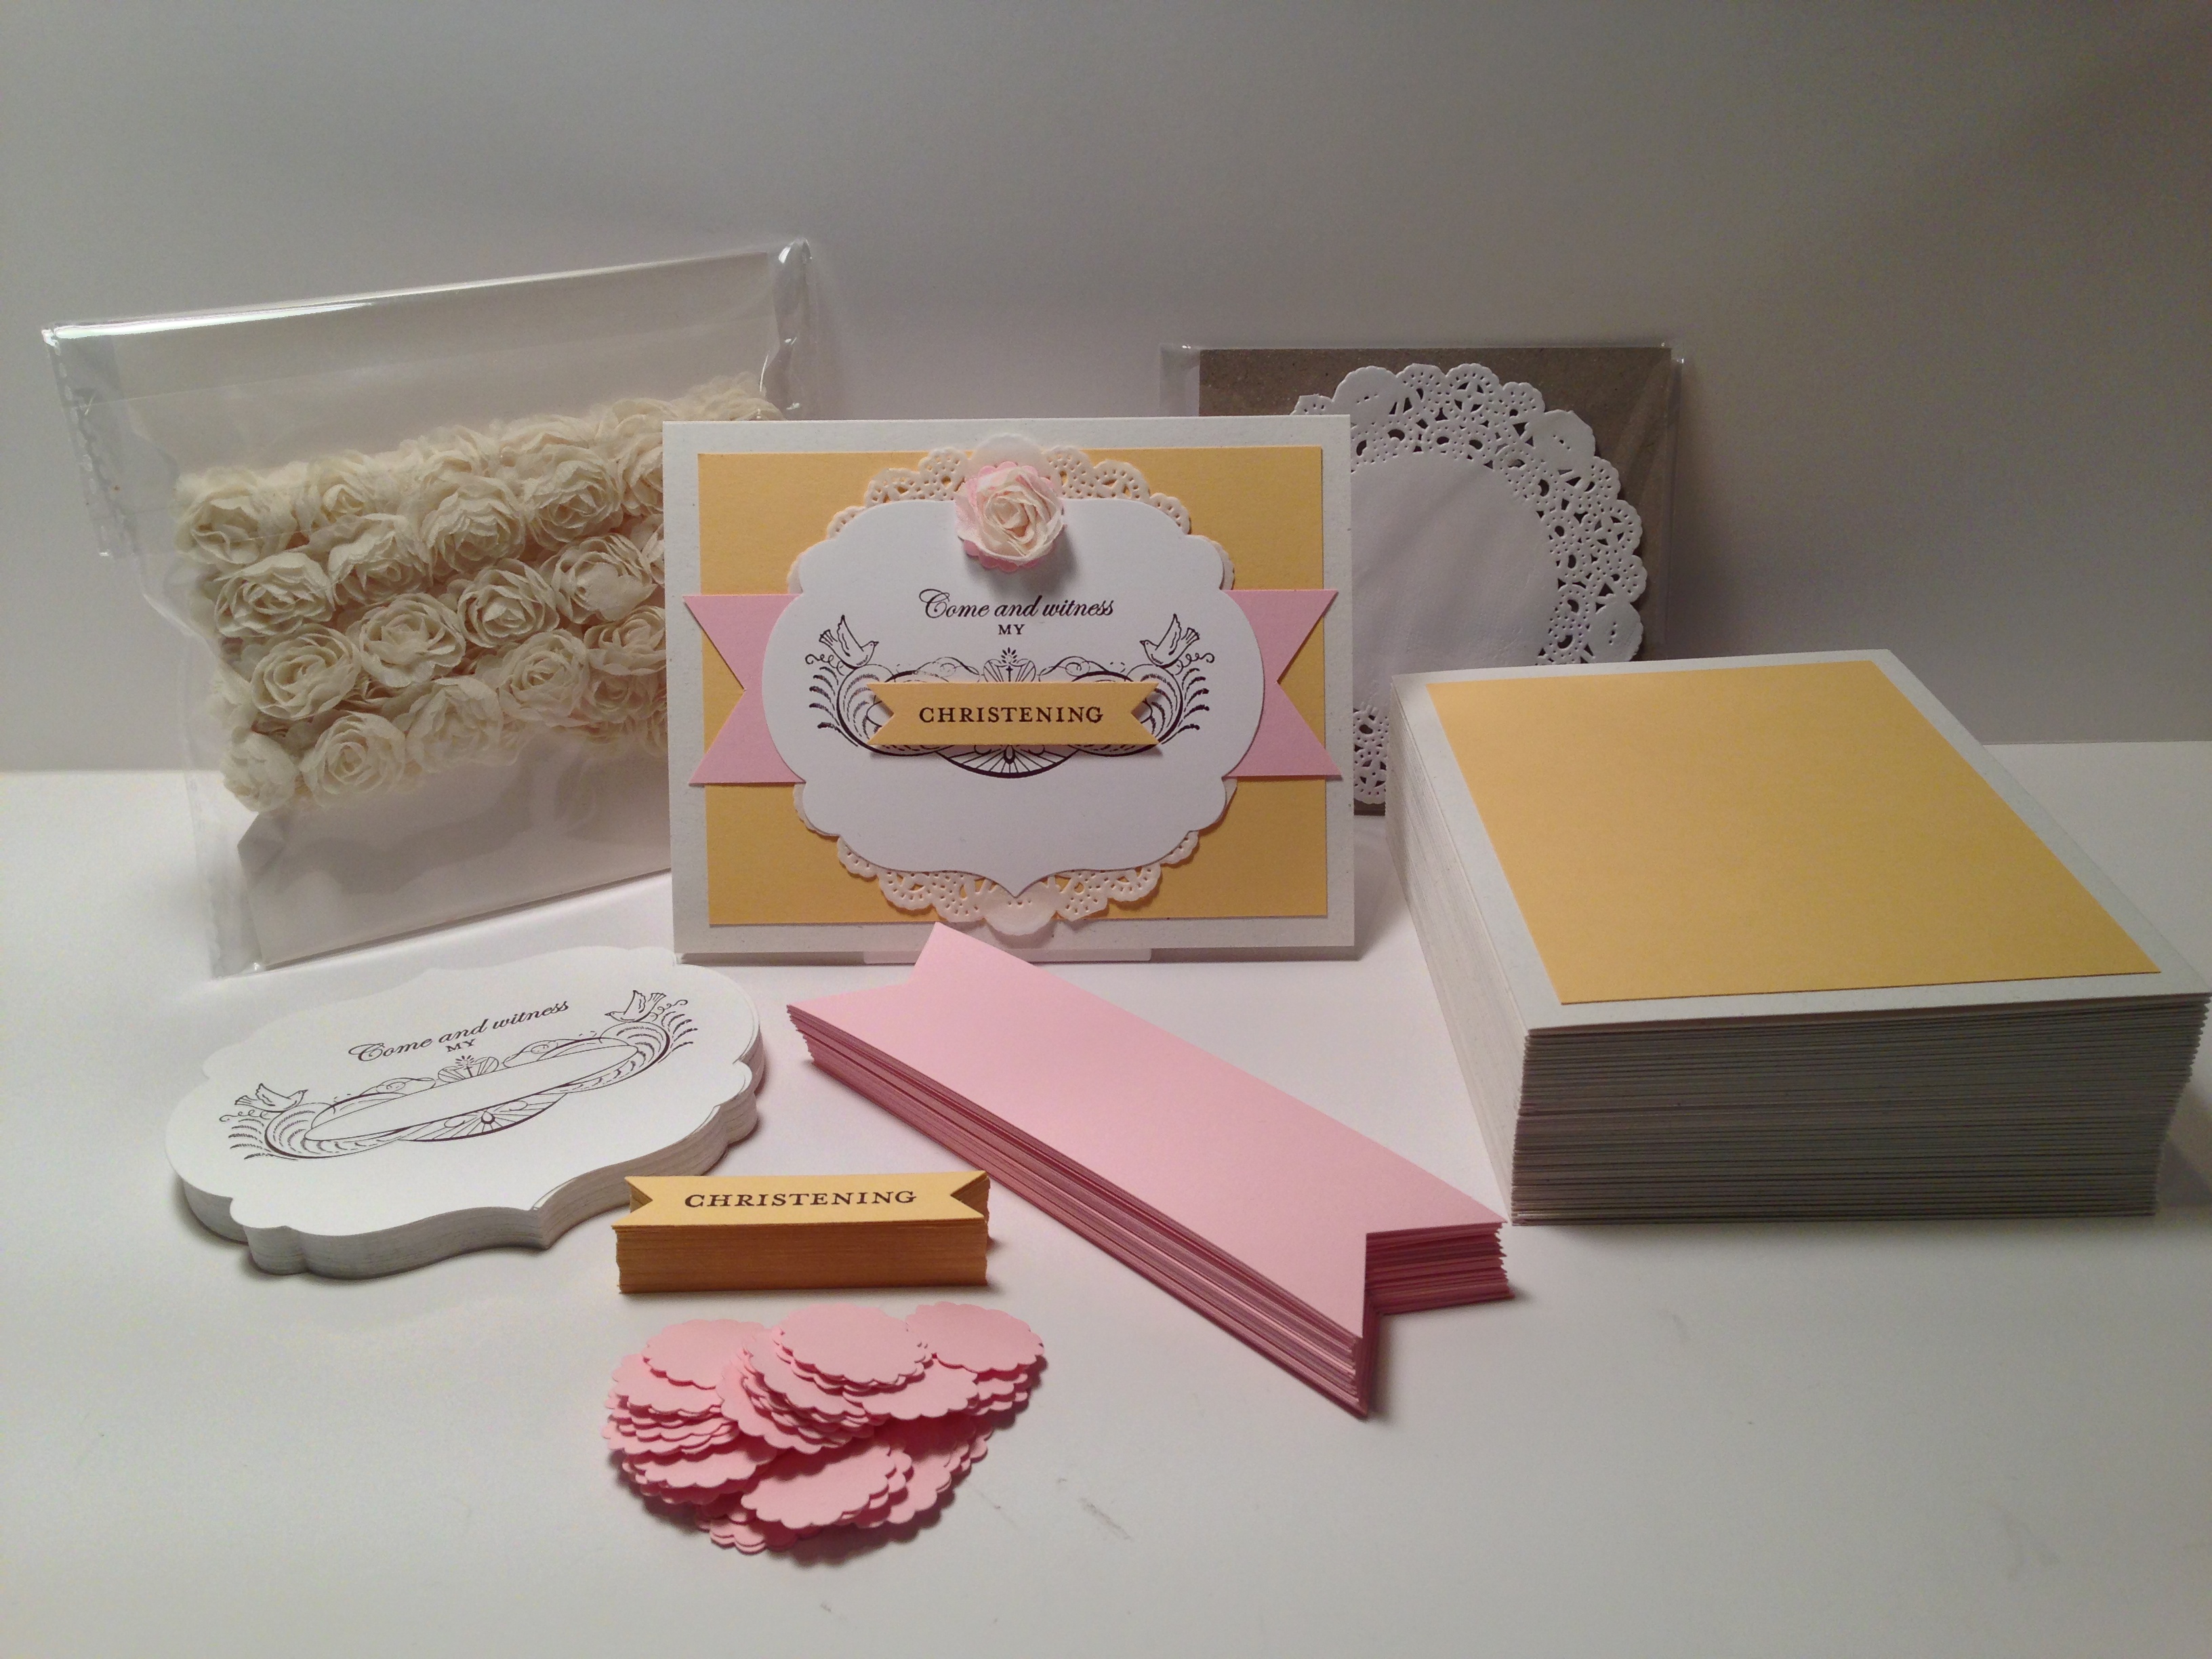
My second card is one that I made for my friend Kim’s daughter Savannah’s upcoming Christening. I made 40 of these. When I mass produce a card I cut all of the pieces and then assemble them. The last thing I do is use MDS to print the insides. The base of the card is Naturals White Card Stock. For the background I used a piece of So Saffron, just pain. Next up we have a Tea Lace Paper Doily and on top of that is a piece of Pink Pirouette that I flagged the ends on with my Paper Snips. The greeting is from the My Special Day Stamp Set and is stamped in Chocolate Chip on a piece of Whisper White that I cut out with the Labels Collection Framelits Dies. The “Christening” is also stamped in Chcocolate Chip on So Saffron and cut out with the Bitty Banners Framelits Dies. Some Stampin’ Dimensionals adhere it to the card. The 5/8″ Flower Trim is backed by a piece of Pink Pirouette that I punched out with the 7/8″ Scallop Circle Punch. They are adhered to each other and the card with Mini Glue Dots. You can see in the second picture all of the pieces waiting to be put together. I tried to keep it simple but I still made 80 passes though the Big Shot and the ends were all flagged with my Paper Snips!
I hope that you enjoyed my projects for this month’s Stylin’ Stampin’ Squad Blog Tour. Next up is Jennifer B. of N.W. Stamper, I’m sure you’ll love her projects! Thanks for stopping by and have a nice day!
Stampin’ Up! products used:
Card 1:
Card Stock: Basic Black, Whisper White and Basic Gray
Specialty: Window Sheets and Silver Glimmer Paper
Ink: Opaque White Staz-On
Embossing Folder: Chevron
Framelits: Apothecary Accents
Tools: Big Shot, Stampin’ Dimensionals and SNAIL
Card 2:
Card Stock: Natural White, Whisper White, So Saffron and Pink Pirouette
Ink: Chocolate Chip Classic Stampin’ Ink
Stamp Set: My Special Day Clear Mount
Framelits: Labels Collection and Bitty Banners
Embellishments: Tea Lace Paper Doilies and 5/8″ Flower Trim
Punch: 7/8″ Scallop Circle
Tools: Big Shot, Stampin’ Dimensionals and SNAIL
Here is a list of the full tour!
- Shellie G. of Craft Smashup
- Pam S. of Stampin’ in the Sun!
- Nancy B. of Lady Stamps-A-Lot
- Tonya B. of Stampin’ with Tonya
- Dawn S. of Dawn’s Creative Chalet
- Darcy J. of DJ’s Stampin’ Place
- Pamela W. of Stinky Tofu
- Kim R. of Stamping with Kim
- Justin K. of JK Cards
- Jennifer B. of NW Stamper
- Bree R. of Craft-somnia
- Diana E. of Stampin’ Fun with Diana


Love your window stamping!
Thanks! 🙂
I love your use of the framelits in the wedding card! The soft colors in the christening card are so pretty…awesome work!!!
Thanks Breelin! 🙂
Both cards are beautiful as always Justin! I really like the use of both framelits to accent your sentiment on your wedding card. Did you cut both at the same time or one then the other? Your christening card is so soft and pretty. Perfect for a baby. Thanks for sharing!
Thank you Tonya! I did cut both Framelits at once one the wedding card. 🙂
Love both of your cards! Love the window sheet…I forget to use those! So glad to be on the hop with you!
Thanks Kim! Glad to be on with you too! 🙂
Justin~ you are a master at simple and eye-catching. The wedding card is fabulous and the christening card is just adorable. Thanks for sharing your talent. My headstone many decades from now really is going to say that it’s all your fault ;p
Ha ha ha! Thanks Shellie! I hope many, many, many, many years from now! 🙂
Wow! What a cool card! And that Christening card is so much more work than I’d have the patience for making 40 of them! Thanks for joining us this month!
Thanks Pam! The Christening card didn’t see to have many pieces when I made the sample! 😛
Justin, your cards are gorgeous. You do an awesome job all the time! You really inspire me – thank you so much for sharing!
Thank you very much Dawn! 🙂
Love your cards Justin. Using the Framelits inside the Framelit is awesome!
Thank you Diana! 🙂
Wow, that window effect on the wedding card is awesome. Love the color combo for the 2nd card. Love seeing the stack before assembly, too. 🙂
Thanks Annie! I love the Window Sheets. The stack was a little daunting. 🙂
Amazing Christening card ideas. I really loved reading your blog. Your cards have a unique design and style.
Thank you very much!! 🙂